Asset Integration Guide
1. Introduction
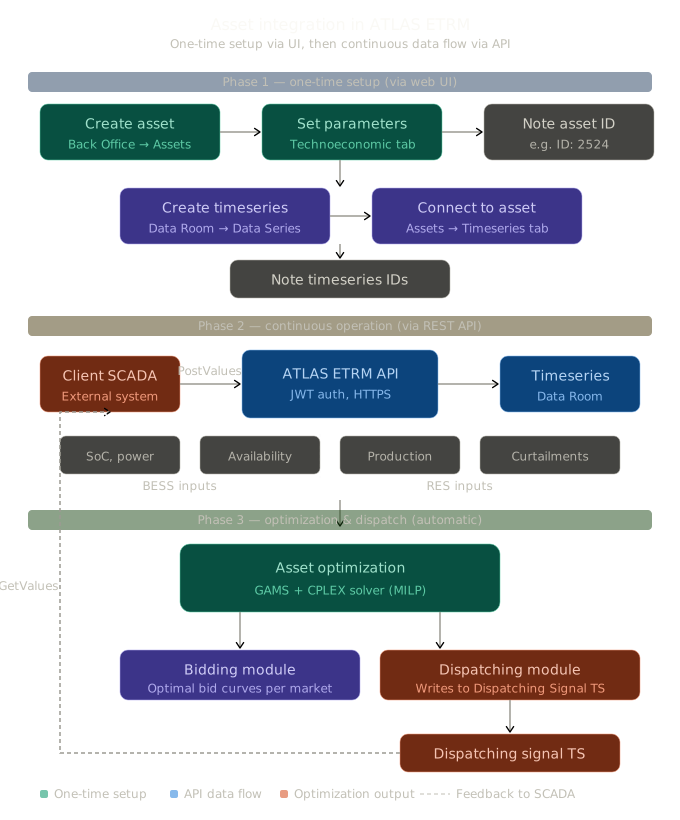
This document provides a step-by-step guide for integrating physical assets (Battery Energy Storage Systems, RES plants, thermal units, hybrid stations) into the ATLAS ETRM platform and maintaining their timeseries data. It covers:
Manual asset registration and configuration through the web UI
Timeseries creation in the Data Room and connection to assets
Programmatic data updates via the ATLAS ETRM REST API (for SCADA integration)
Key Principle: One-Time Setup vs. Continuous Updates
It is important to understand that asset registration, timeseries creation, and their connections are one-time setup operations. The recommended approach is:
Create the asset through the Back Office → Assets.
Create the required timeseries through the Data Room → Available Data Series.
Connect each timeseries to the asset through the Assets → Timeseries tab.
Note the timeseries IDs assigned by the system.
Use the API gateway for the continuous, automated updating of timeseries values from your SCADA or other external systems.
This way, the structural configuration is handled through the UI (where it can be visually verified), and the API is used exclusively for the high-frequency data flow that needs to be automated.
Relevant Modules
Module | Purpose |
|---|---|
Back Office → Assets | Create and manage asset records, enter technoeconomic parameters, and connect existing timeseries to assets. |
Data Room → Available Data Series | Create, browse, query, and export timeseries. Manage timeseries metadata and data values. |
Administration → Asset Timeseries Categories Types | Configure the available timeseries category types (Forecast, SCADA, Certified, etc.) that organize timeseries under each asset. Managed by IT administrators. |
Dispatching | Writes the dispatch instruction output per asset to the Dispatching Signal timeseries. |
Prerequisites
An active ATLAS ETRM user account with permissions for Back Office, Data Room, and Administration.
For API integration: a service account with valid credentials for obtaining JWT bearer tokens.
Network connectivity to the ATLAS ETRM API endpoint over HTTPS (port 443).
2. Asset Registration via the Web Interface
Navigate to Back Office → Assets and click the "+" button to create a new asset record. The examples in this guide cover two scenarios — a Battery Energy Storage System and a RES (wind/solar) plant — but the same workflow applies to all asset types.
2.1 Asset Info
Fill in the basic asset information:
Name: A descriptive name (e.g., "BESS 3").
Type: Select from the dropdown (Battery Storage, Wind, Solar, Thermal, etc.).
Plant Code: The official plant code registered with the TSO/DSO, if applicable.
Location: (Optional) Textual location description.
Latitude / Longitude: (Optional) Geographic coordinates. A map preview is displayed.
Once saved, the system assigns a unique Asset ID (visible at the top of the screen, e.g., ID: 2524). This ID is used in all subsequent API operations.
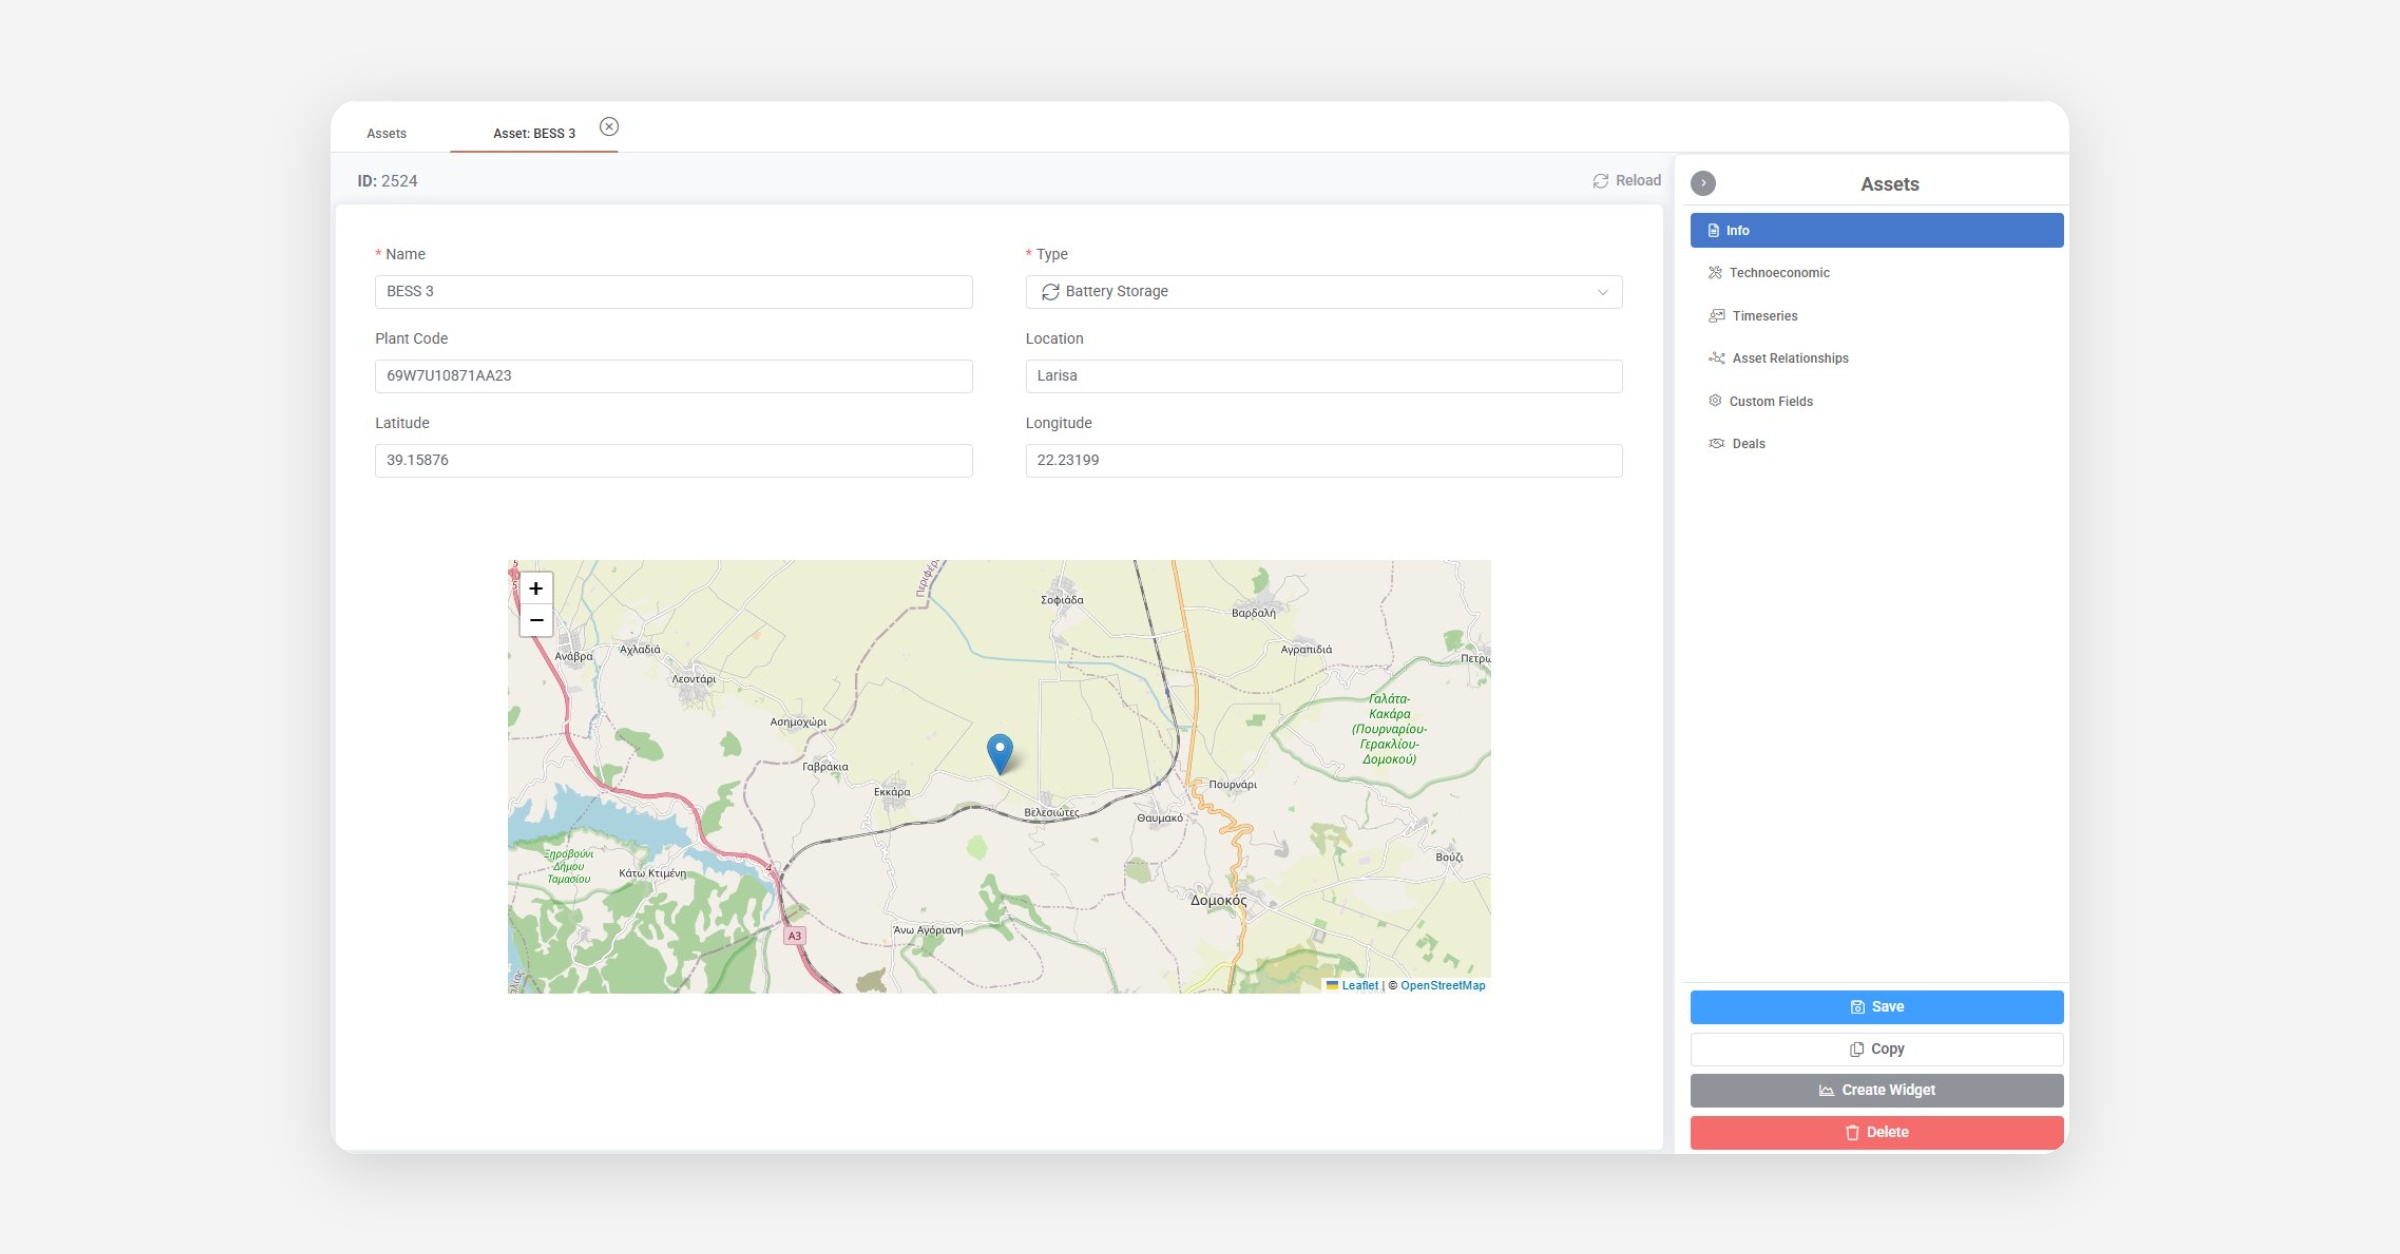
Figure 1: Asset Info tab — basic details, type, plant code, location, and map preview.
2.2 Technoeconomic Parameters
Navigate to the Technoeconomic tab in the right-hand panel. This section contains all operational and physical parameters that the Asset Optimization module reads as inputs. Parameters are versioned by the "Valid From" date — you can add new versions using the "+" button to reflect asset upgrades over time.
General Information & Ramp Parameters
Capacity / Min. Capacity / Licensed Capacity / Installed Capacity [MW]
Is Dispatchable: Whether the asset participates in dispatch scheduling.
Ramp Up/Down AGC [MW/min] and Expected Ramp Up/Down AGC [MW/min]
Min. Up/Down Charging/Discharging Time (15-min) and Min. Resting Time (15-min)
Capacity Parameters: Reserve capacity limits per type (FCR, aFRR, mFRR) and direction.
Percentage Parameters: Maximum percentage participation per reserve type.
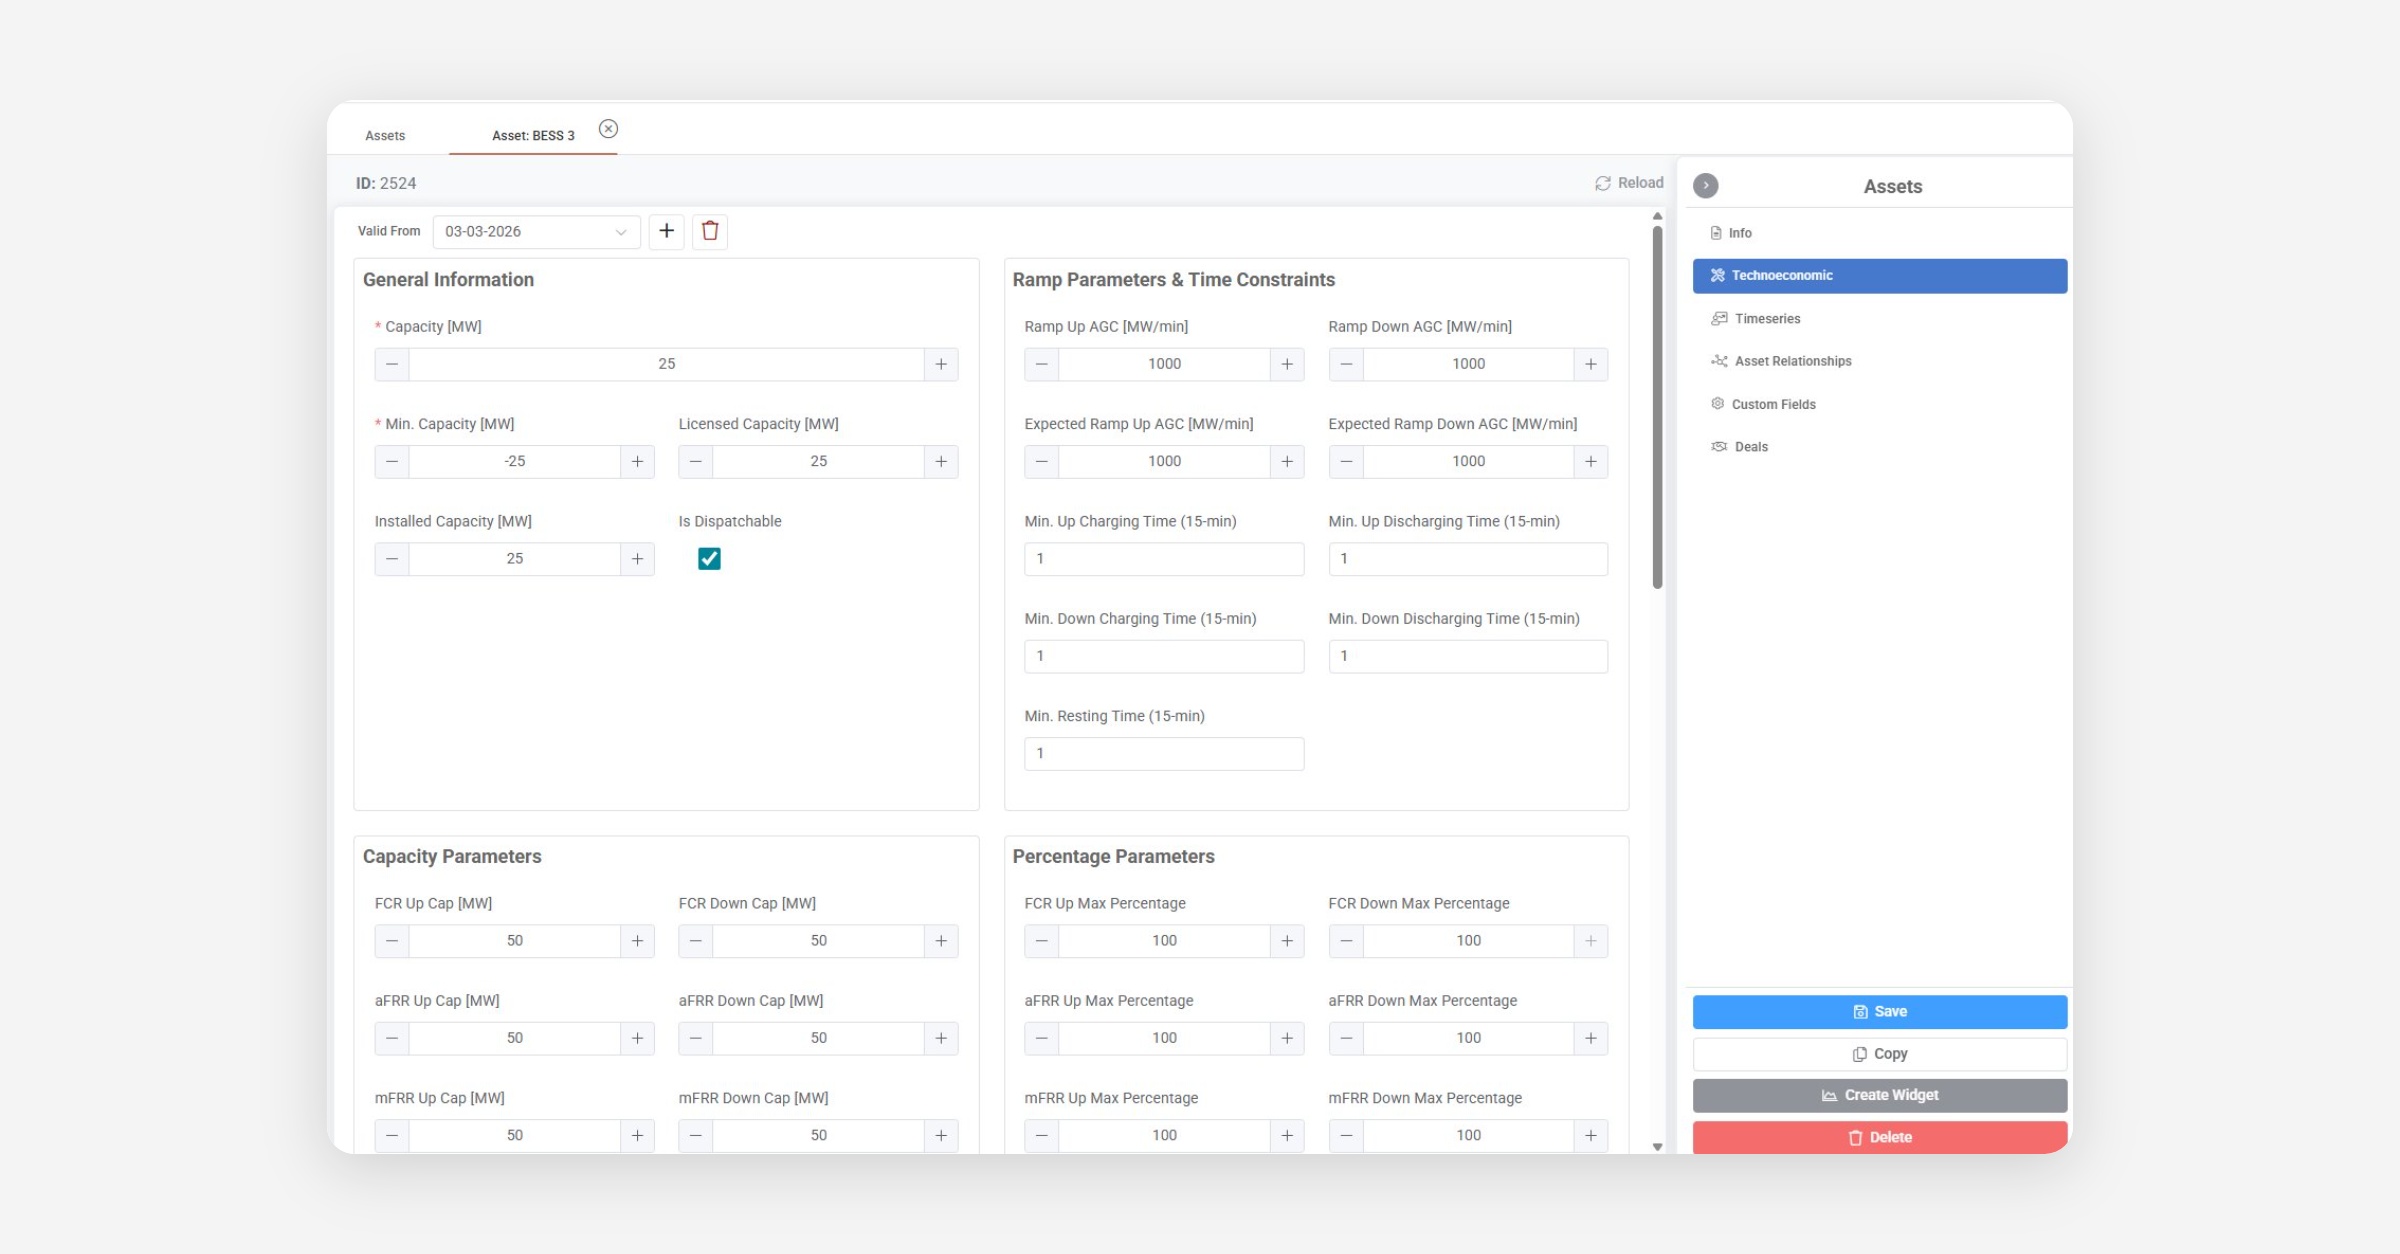
Figure 2: General Information, Ramp Parameters, Capacity and Percentage Parameters.
Energy Storage Characteristics & Power Conversion (BESS-specific)
Charging / Discharging / Round Trip Efficiency [%]
Storage Capacity [MWh], Max/Min Stored Energy [%]
Max Daily Energy [MWh], Max Cycles Per Day, Max Depth of Discharge [%]
PCS Loss Coefficients (0, 1, 2), Total PCS Capacity [MW], PCS Standby Losses [MW]
Transformer Rating [MVA], Copper Losses p.u., No Load Losses [kW]
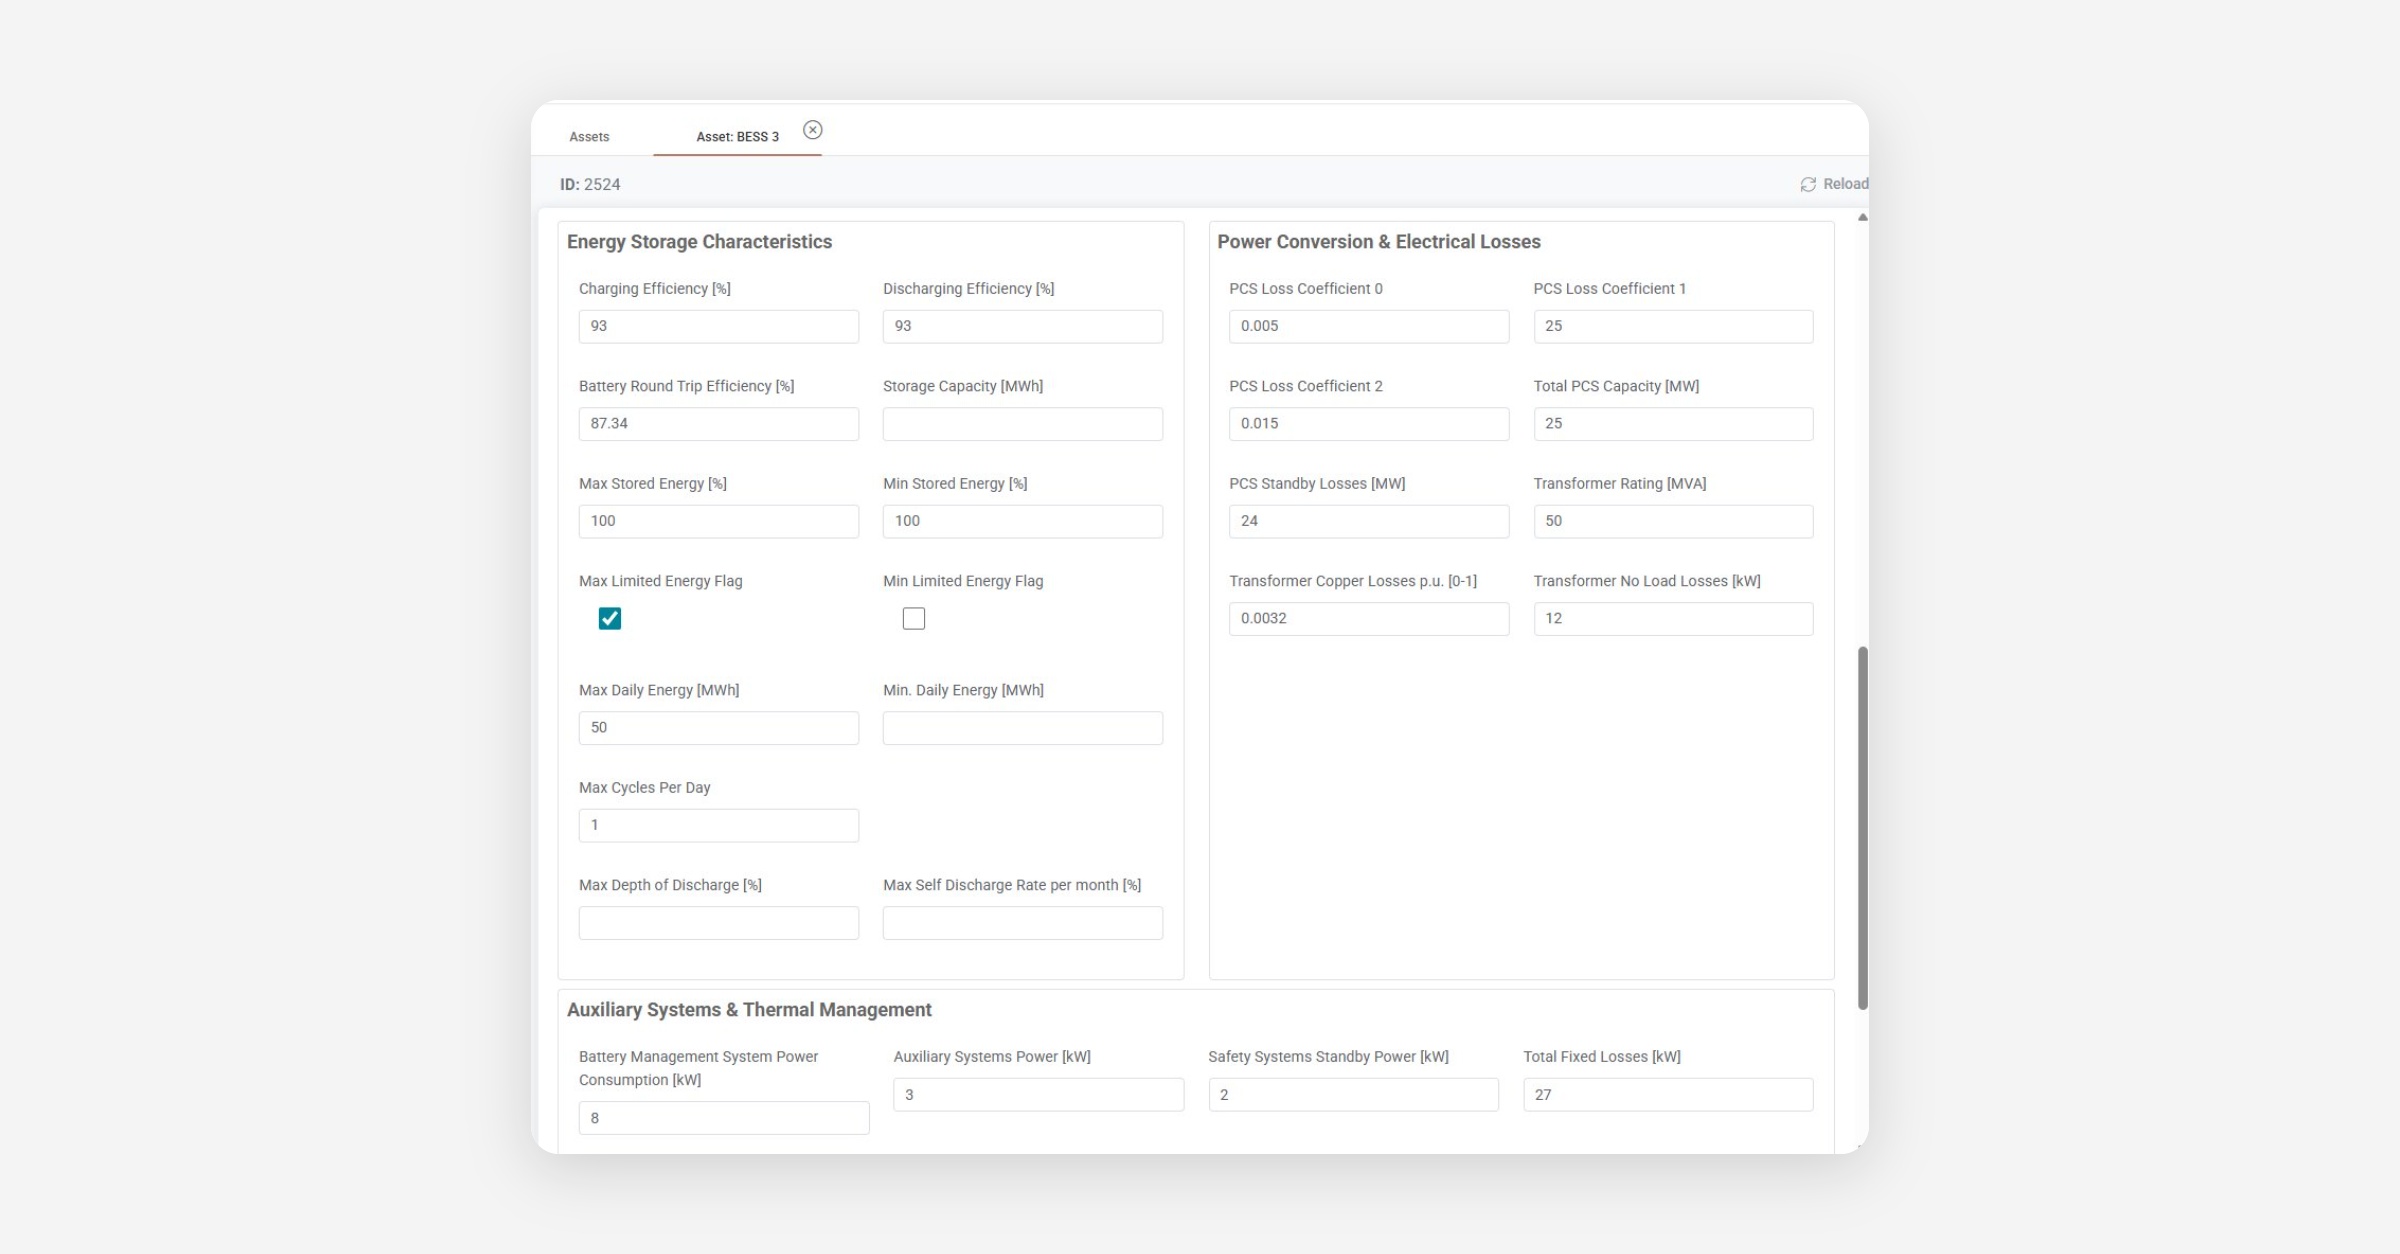
Figure 3: Energy Storage Characteristics and Power Conversion & Electrical Losses.
Auxiliary Systems & Thermal Management
BMS Power Consumption, Auxiliary Systems Power, Safety Systems Standby Power, Total Fixed Losses [kW]
HVAC Baseline Power [kW], Setpoint Temperature [°C], Reference COP, COP Degradation Coefficient
Container Thermal Transmittance [W/m²K], Surface Area [m²], Solar Heat Gain [W/m²], Solar Absorptivity
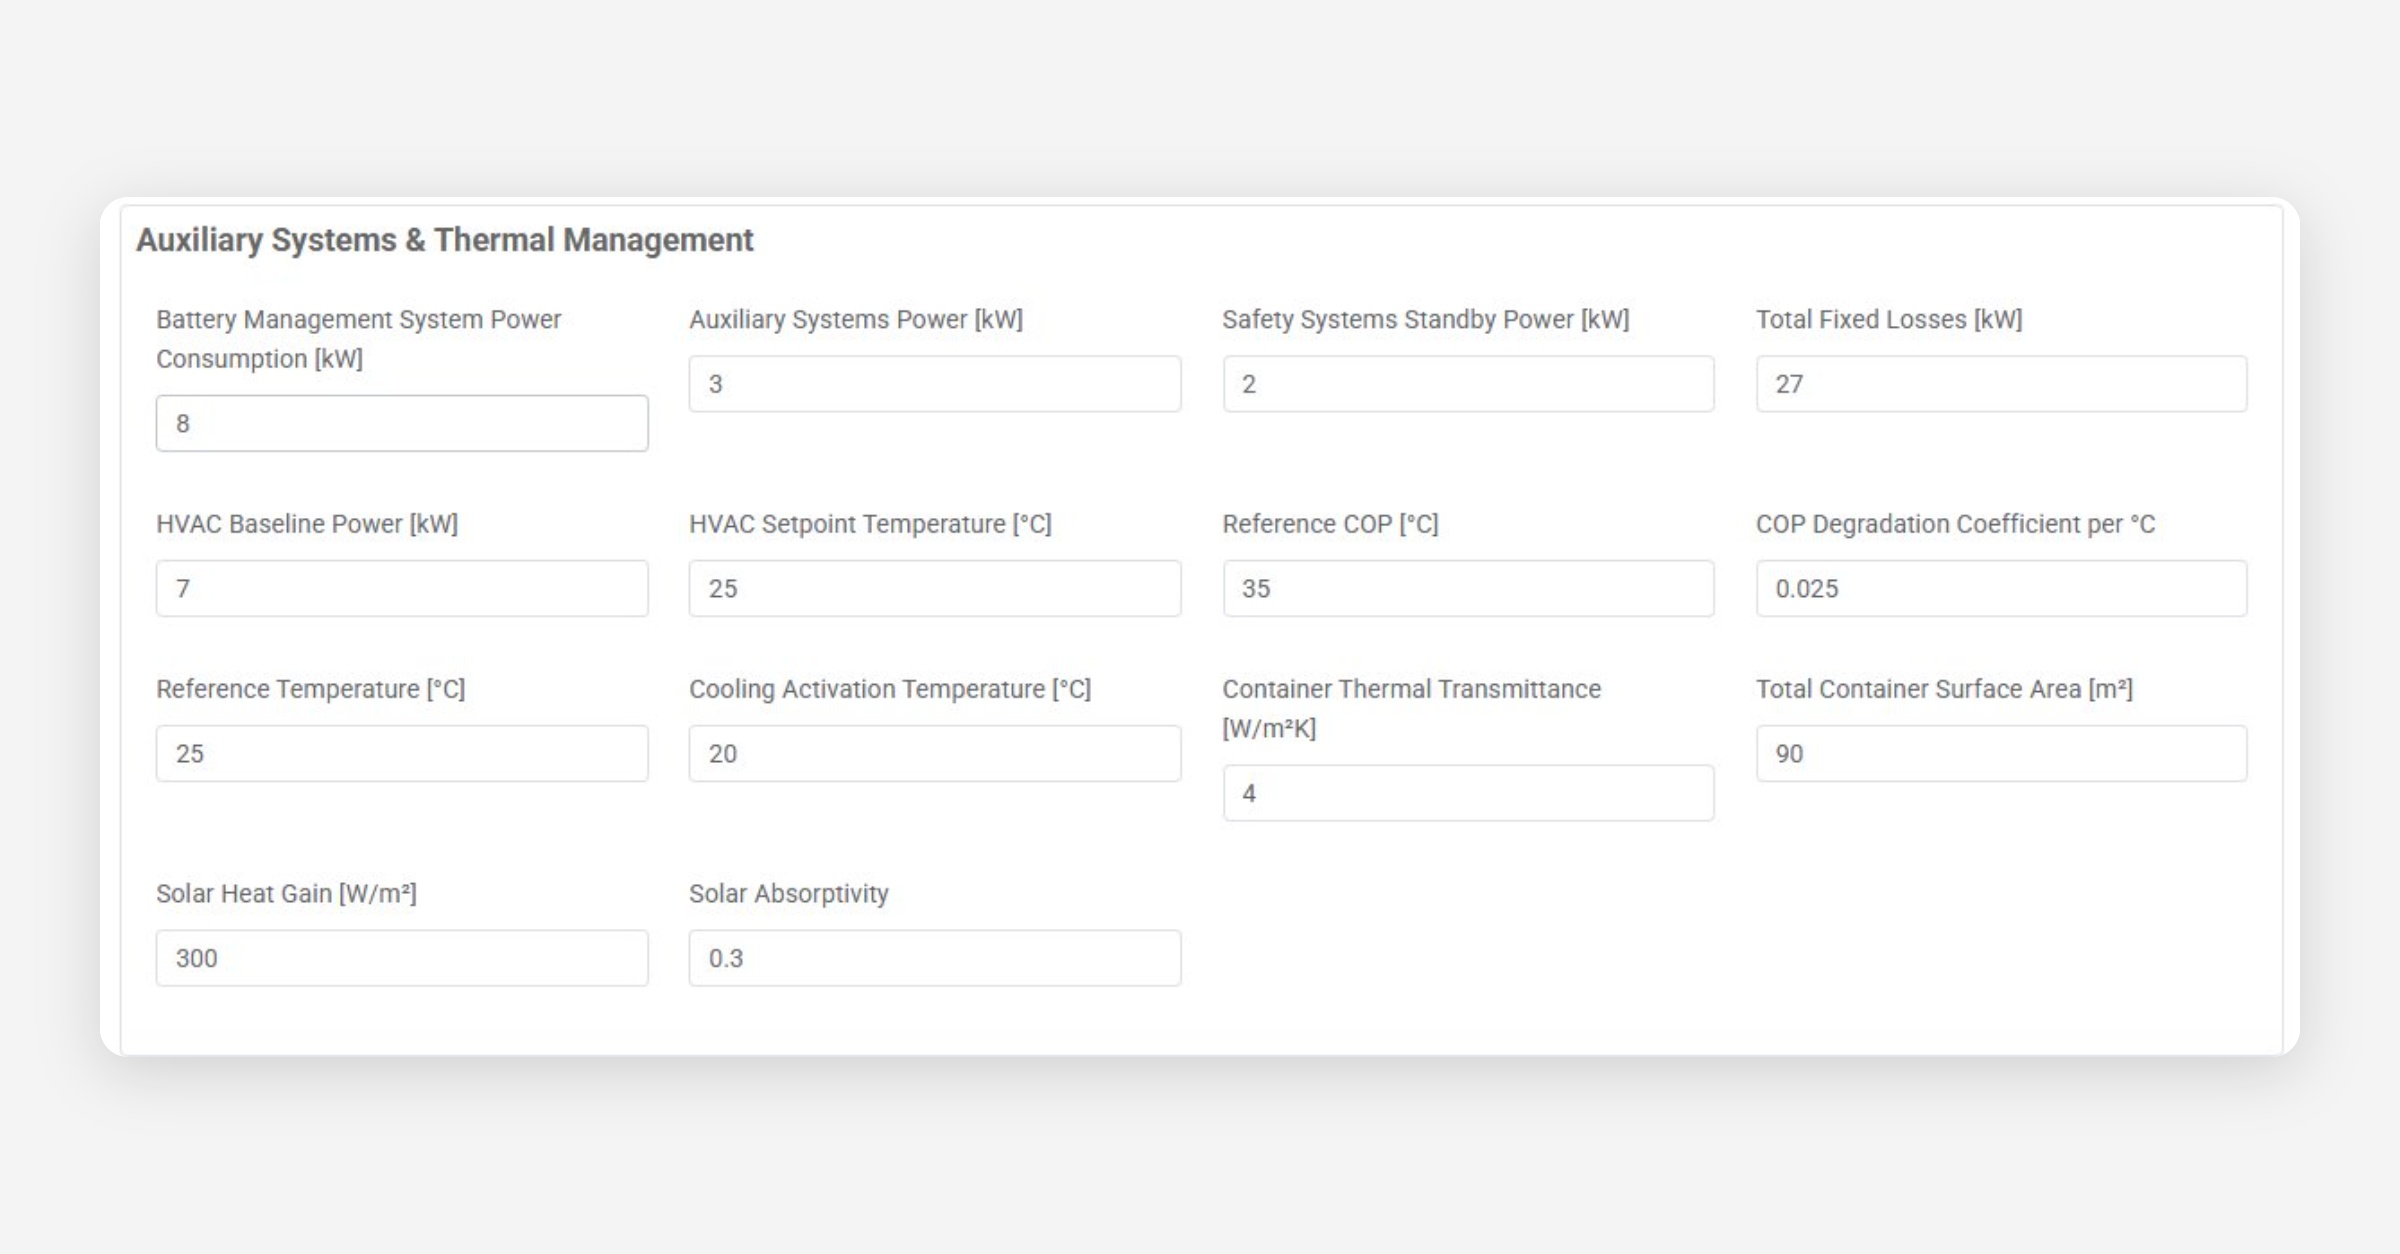
Figure 4: Auxiliary Systems & Thermal Management parameters.
3. Timeseries Creation and Asset Connection
Timeseries are the fundamental data containers in ATLAS ETRM. Every piece of time-varying data — SCADA measurements, production values, state of charge, dispatch instructions — is stored as a timeseries. Each timeseries has a unique numeric ID that can be used programmatically via the API.
Remember: creating a timeseries and connecting it to an asset are one-time operations. Once the setup is done, only the data values need to be updated continuously.
3.1 Timeseries Category Types (Administration)
IT administrators configure the available timeseries category types in Administration → Dynamic Types → Asset Timeseries Categories Types. These categories determine how timeseries are organized under each asset.
Default categories include:
Category | Description & Example Types |
|---|---|
Forecast | Per-Market Forecasts, SCADA vs No-SCADA models etc. |
SCADA | Close to real-time measurements of Consumption or Production |
Non-Certified | Non Certified Consumption or Production |
Certified | Certified Consumption or Production (e.g. W+52, W+6) |
Theoretical | Mainly for RES Assets: The Theoretical production (based on climatic data only). Used to indicate the optimal production of a RES asset without curtailments |
State of Charge (SoC) | State of Charge of a Storage asset (values 0.00 - 1.00) |
Availability | Availability of the asset, mainly used for market participation and scheduling |
Dispatching Signal | The Dispatching Signal timeseries to be sent to this asset. This is where Atlas Dispatching module writes values |
Telecommunication Signal | An optional telecommunication health check signal, indicating that this asset is available for sending and/or receiving data |
Each category entry has a unique internal ID used for API-based timeseries-to-asset connections.
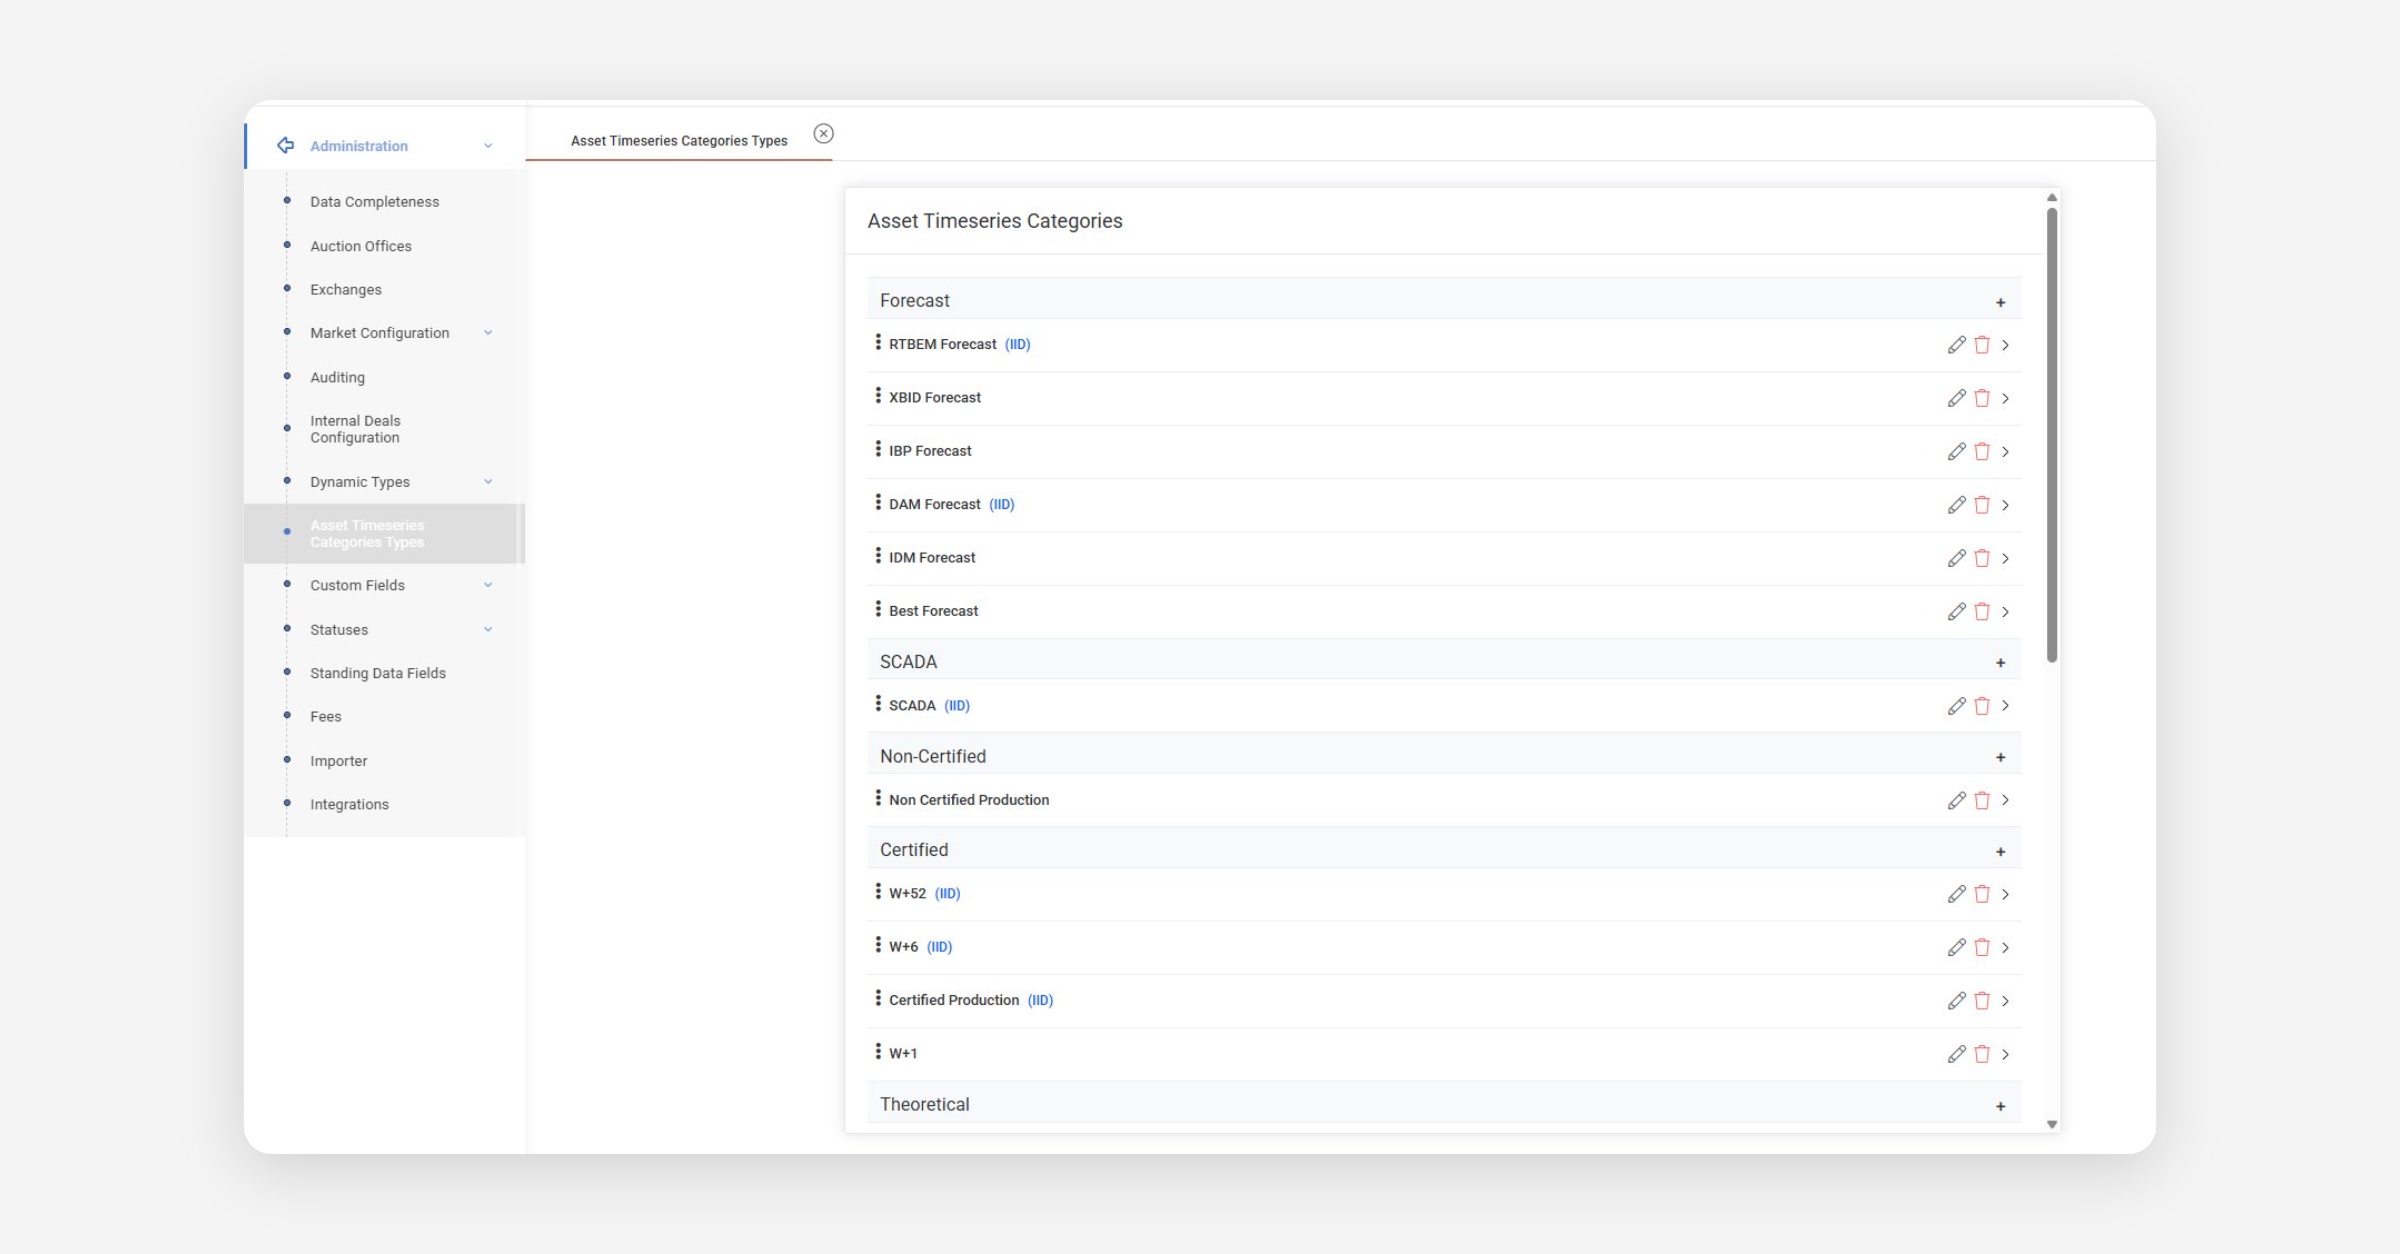
Figure 5: Administration — Asset Timeseries Categories Types configuration showing the Forecast, SCADA, Certified, and other category groups.
3.2 Creating a Timeseries (Data Room)
All timeseries are created through the Data Room → Data Series → Available Data Series screen. You can search existing timeseries using the search box (supports wildcard * patterns).
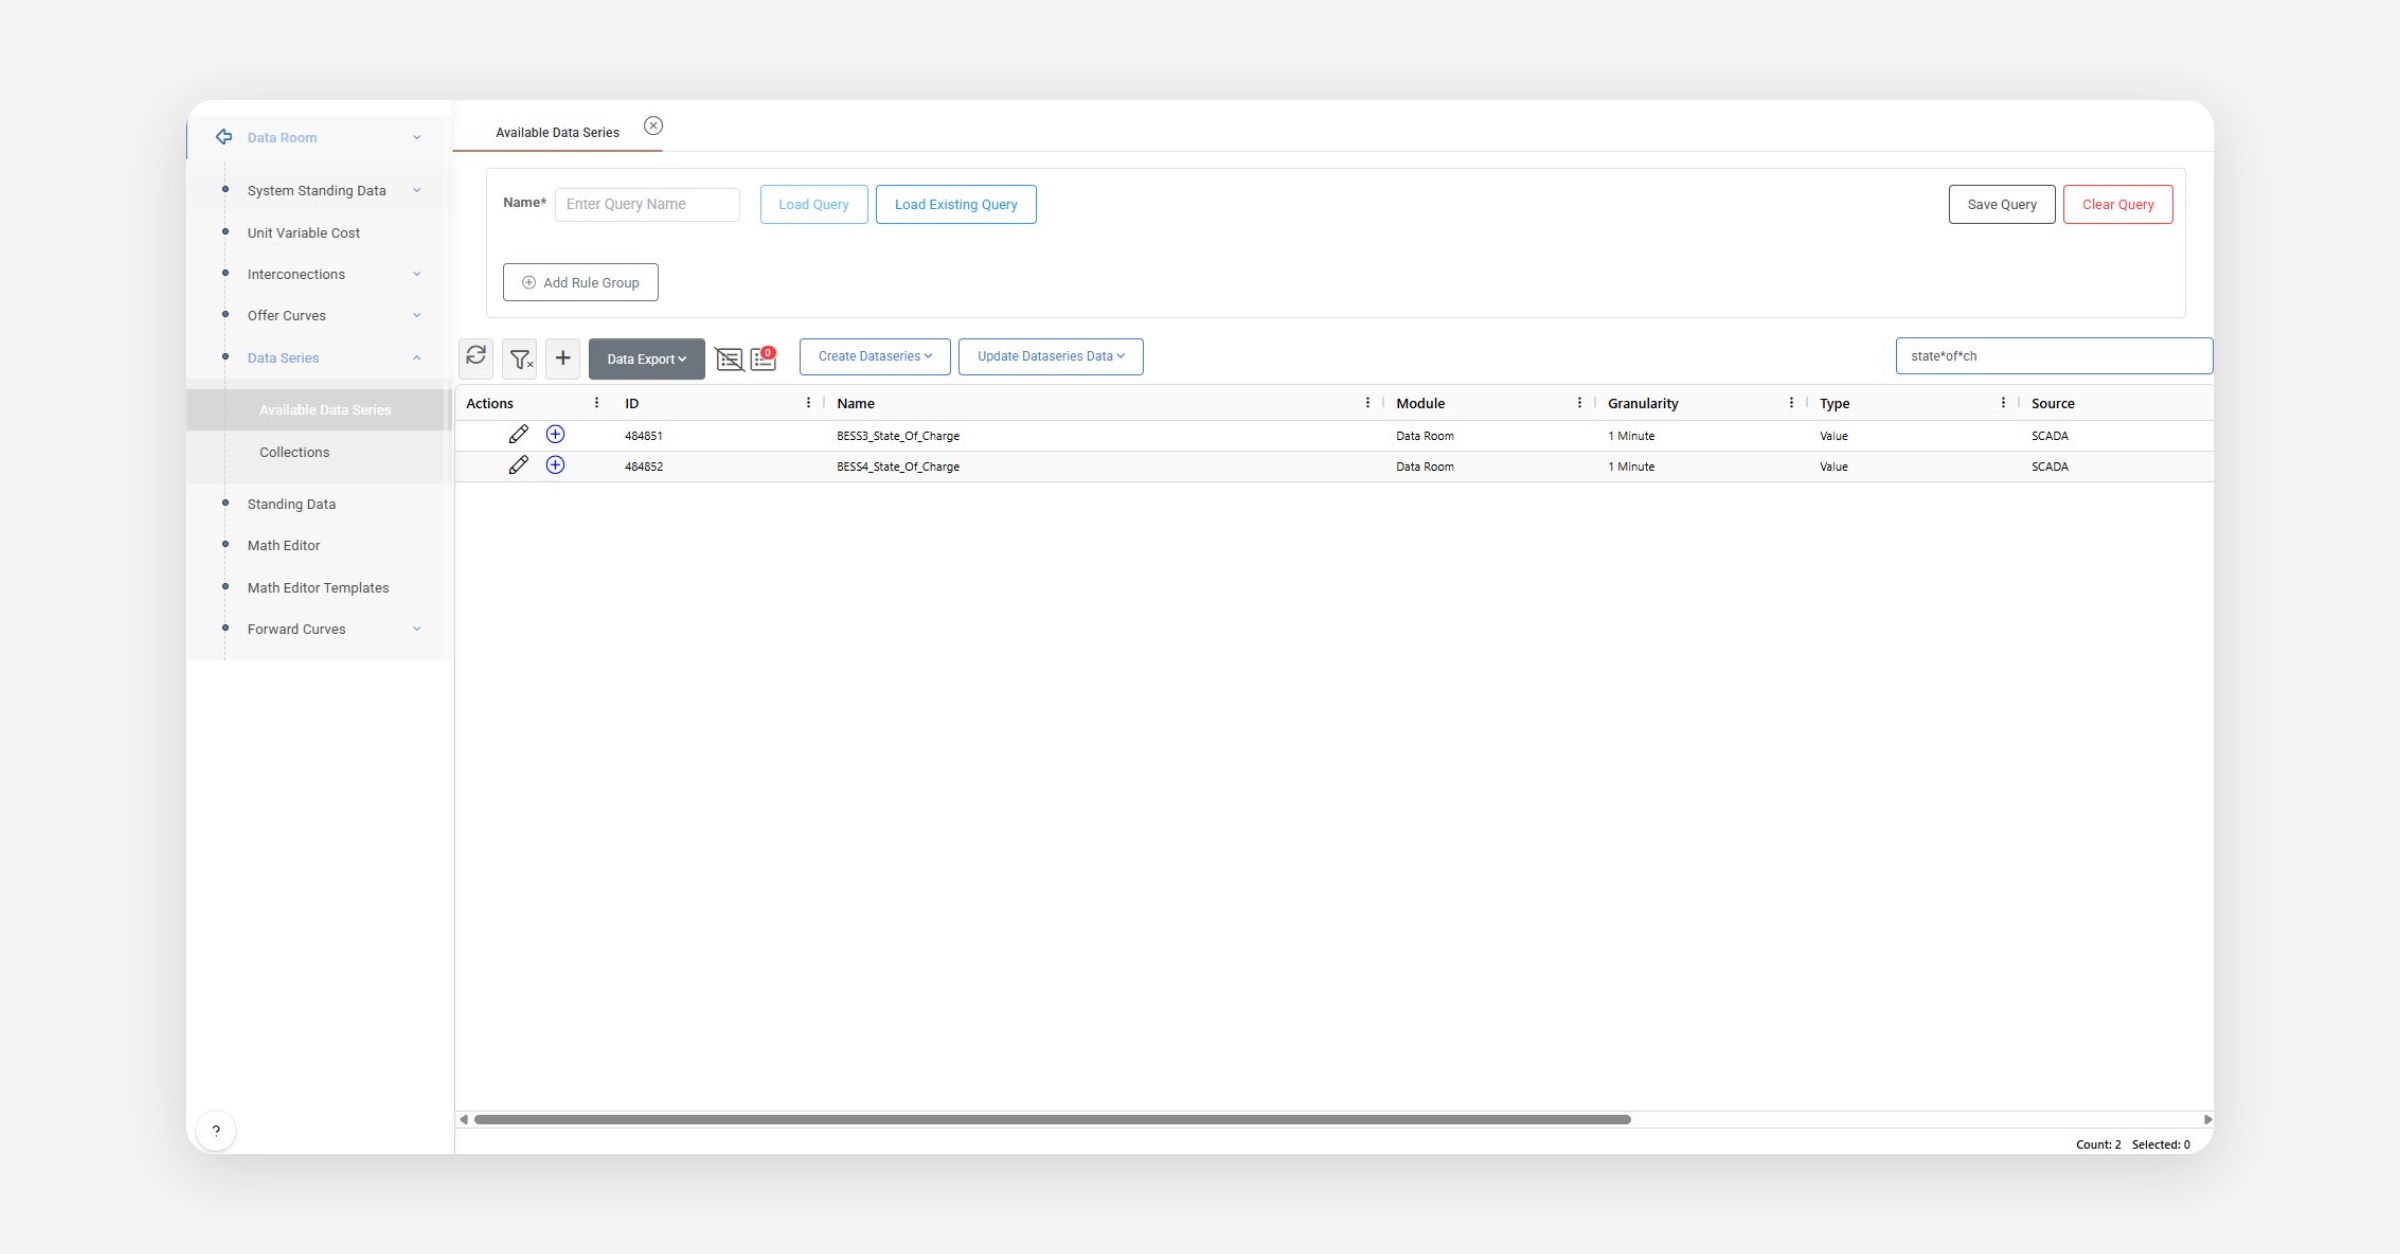
Figure 6: Data Room — Available Data Series list showing timeseries with their IDs, module, granularity, type, and source.
To create a new timeseries, click "Create Dataseries". Fill in the following fields:
Name: A unique, descriptive name (e.g.,
State_Of_Charge_BESS3). Use underscores for clarity and to facilitate API searches.Granularity: Time resolution (1 Minute, Quarter-Hour, Hour, Day, etc.).
Type: Value, Price, or Quantity.
UOM: Unit of measurement (%, MW, MWh, €/MWh, etc.).
Upsampling: Interpolation method for finer granularity requests (Front-Fill, Linear, Division, etc.).
Downsampling: Aggregation method for coarser granularity requests (Average, Sum, Min, Max, etc.).
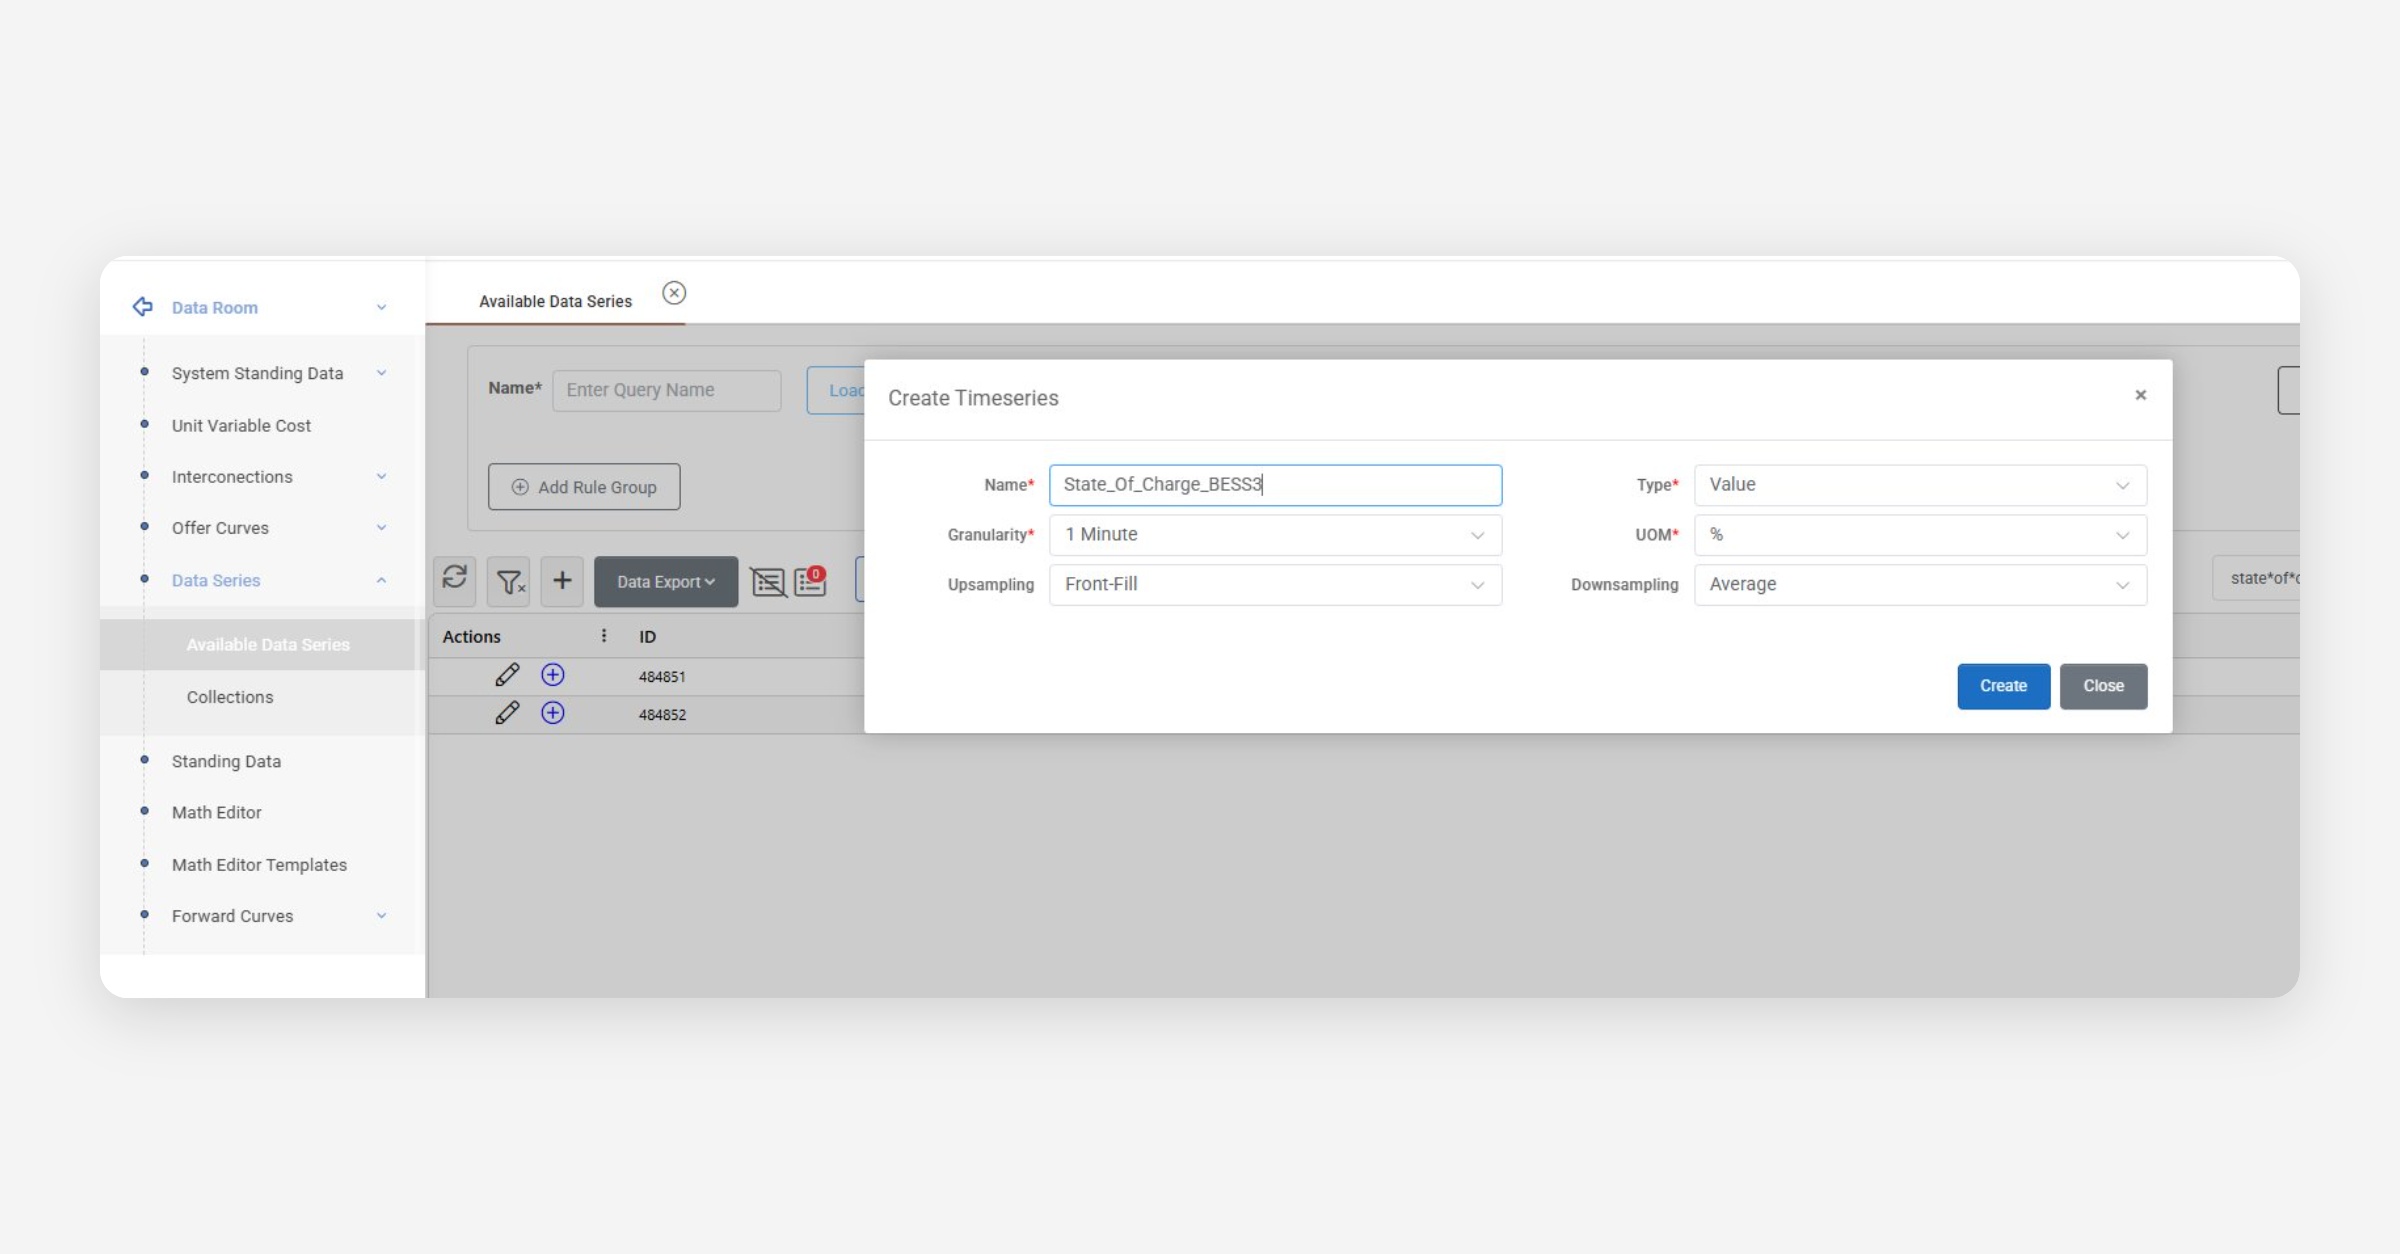
Figure 7: Create Timeseries dialog in the Data Room.
Important: When a timeseries is created — whether manually through the UI or programmatically through the API — it is assigned a unique numeric ID. This ID is displayed in the Data Room grid and is the primary identifier used by the API gateway to read and write data programmatically.
3.3 Connecting a Timeseries to an Asset
After creating a timeseries in the Data Room, navigate to Back Office → Assets, select the desired asset, and click the Timeseries tab in the right panel.
The left panel displays all timeseries category groups (Forecast, SCADA, State of Charge, Availability, Dispatching Signal, etc.). Each category shows the currently connected timeseries along with a "+" button. Clicking it opens a search dialog where you find the timeseries by name and add it to the asset under the selected category.
The right panel displays a chart preview of the selected timeseries data.
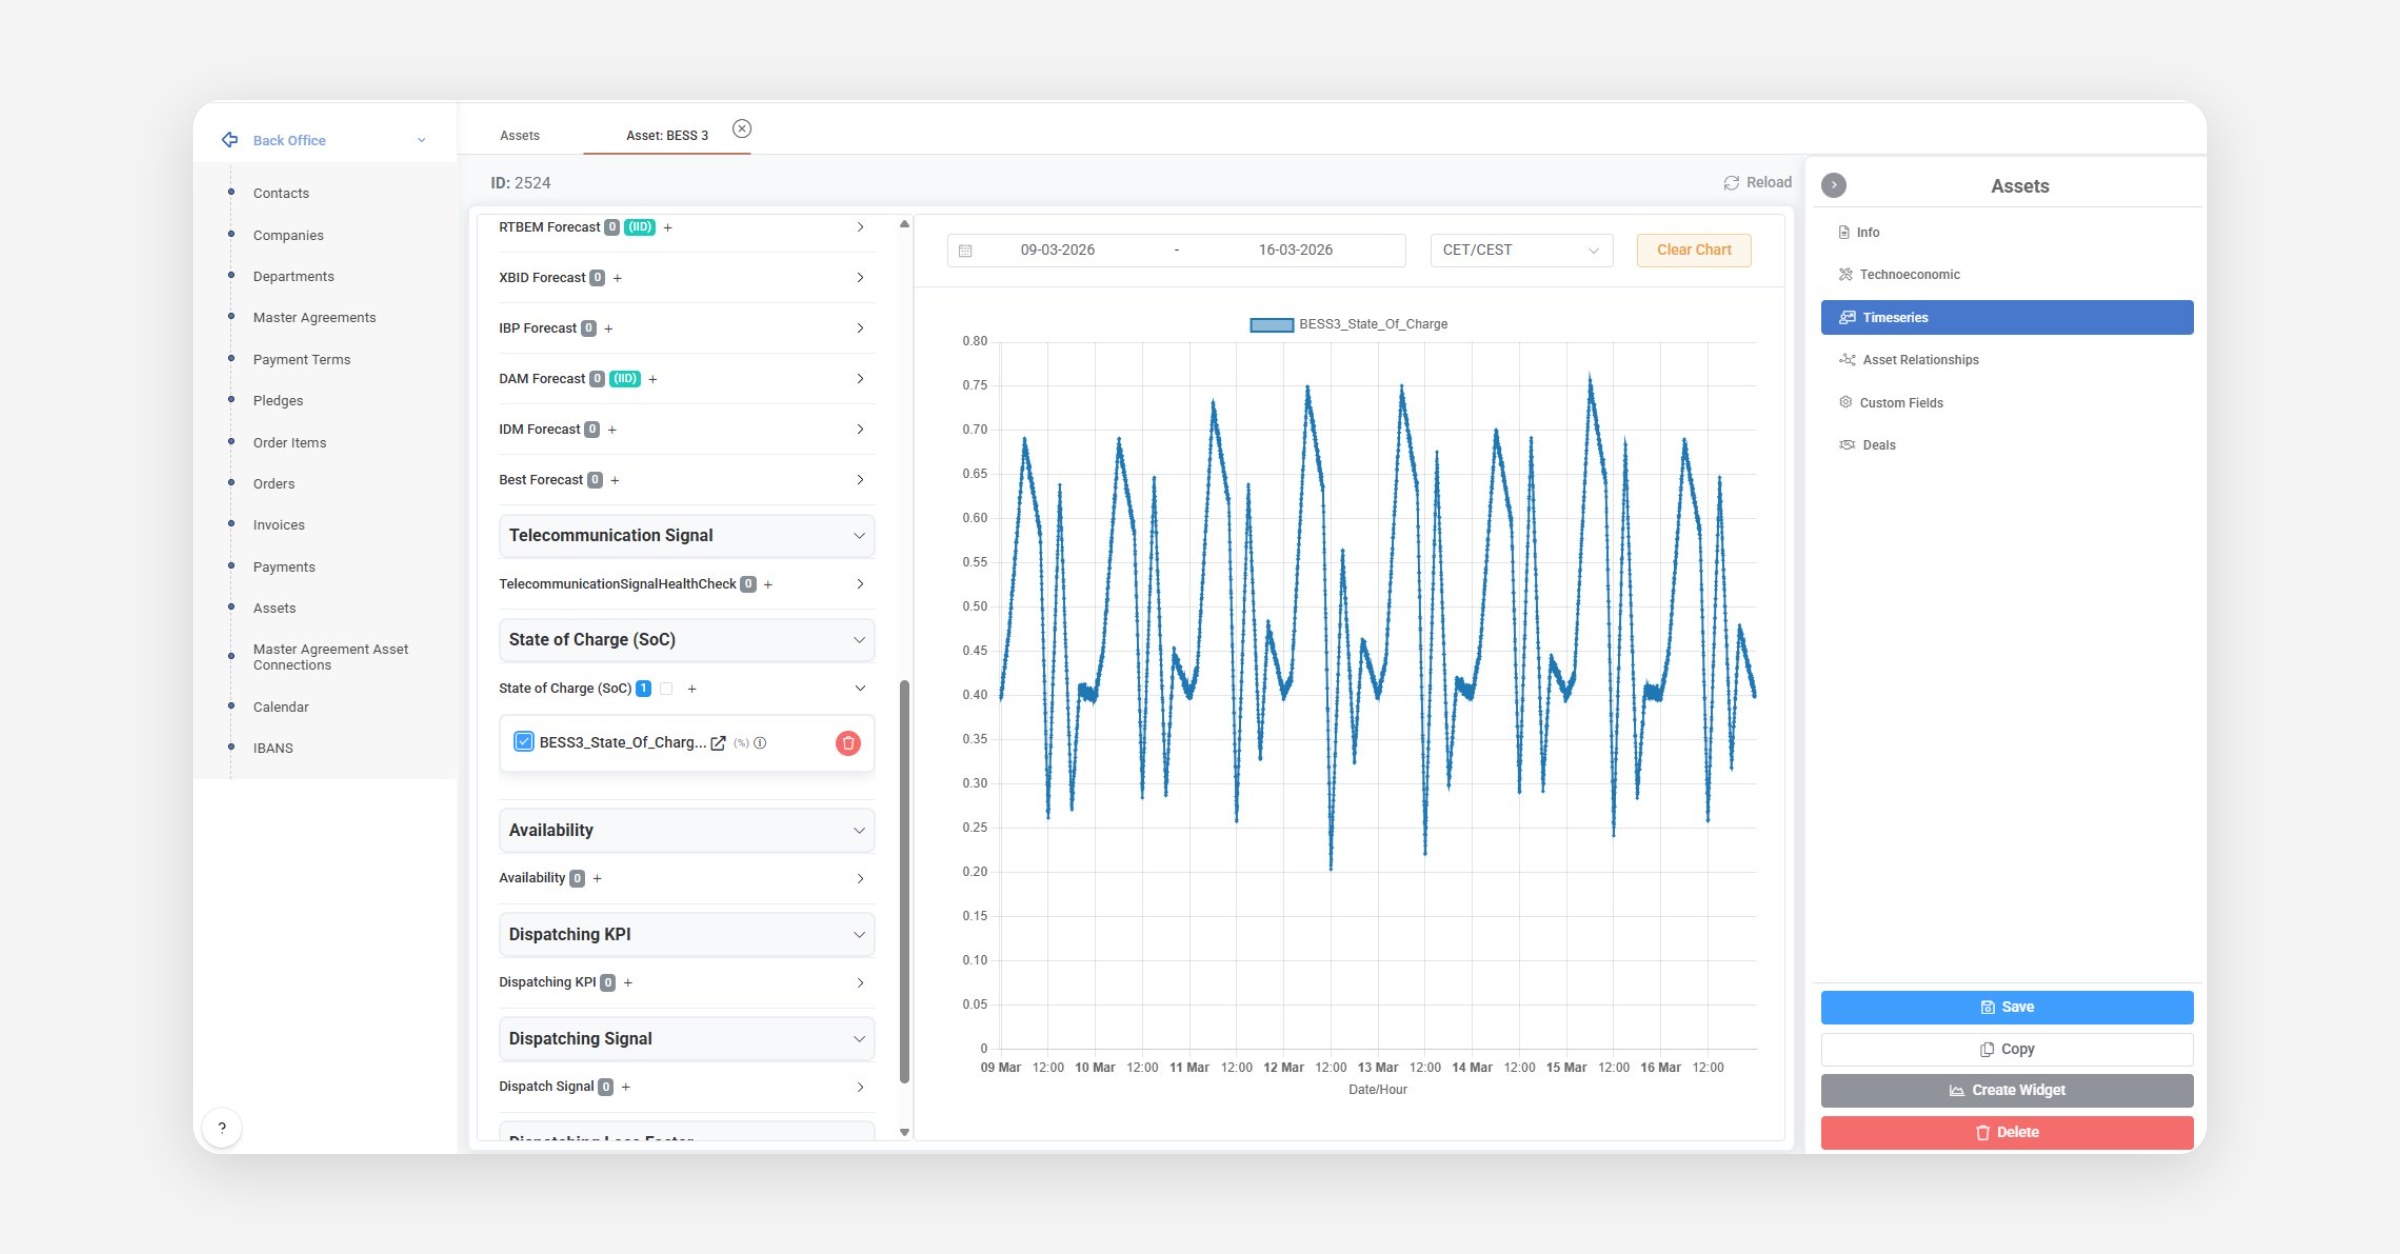
Figure 8: Asset Timeseries panel for BESS 3 with connected State of Charge timeseries and chart visualization.
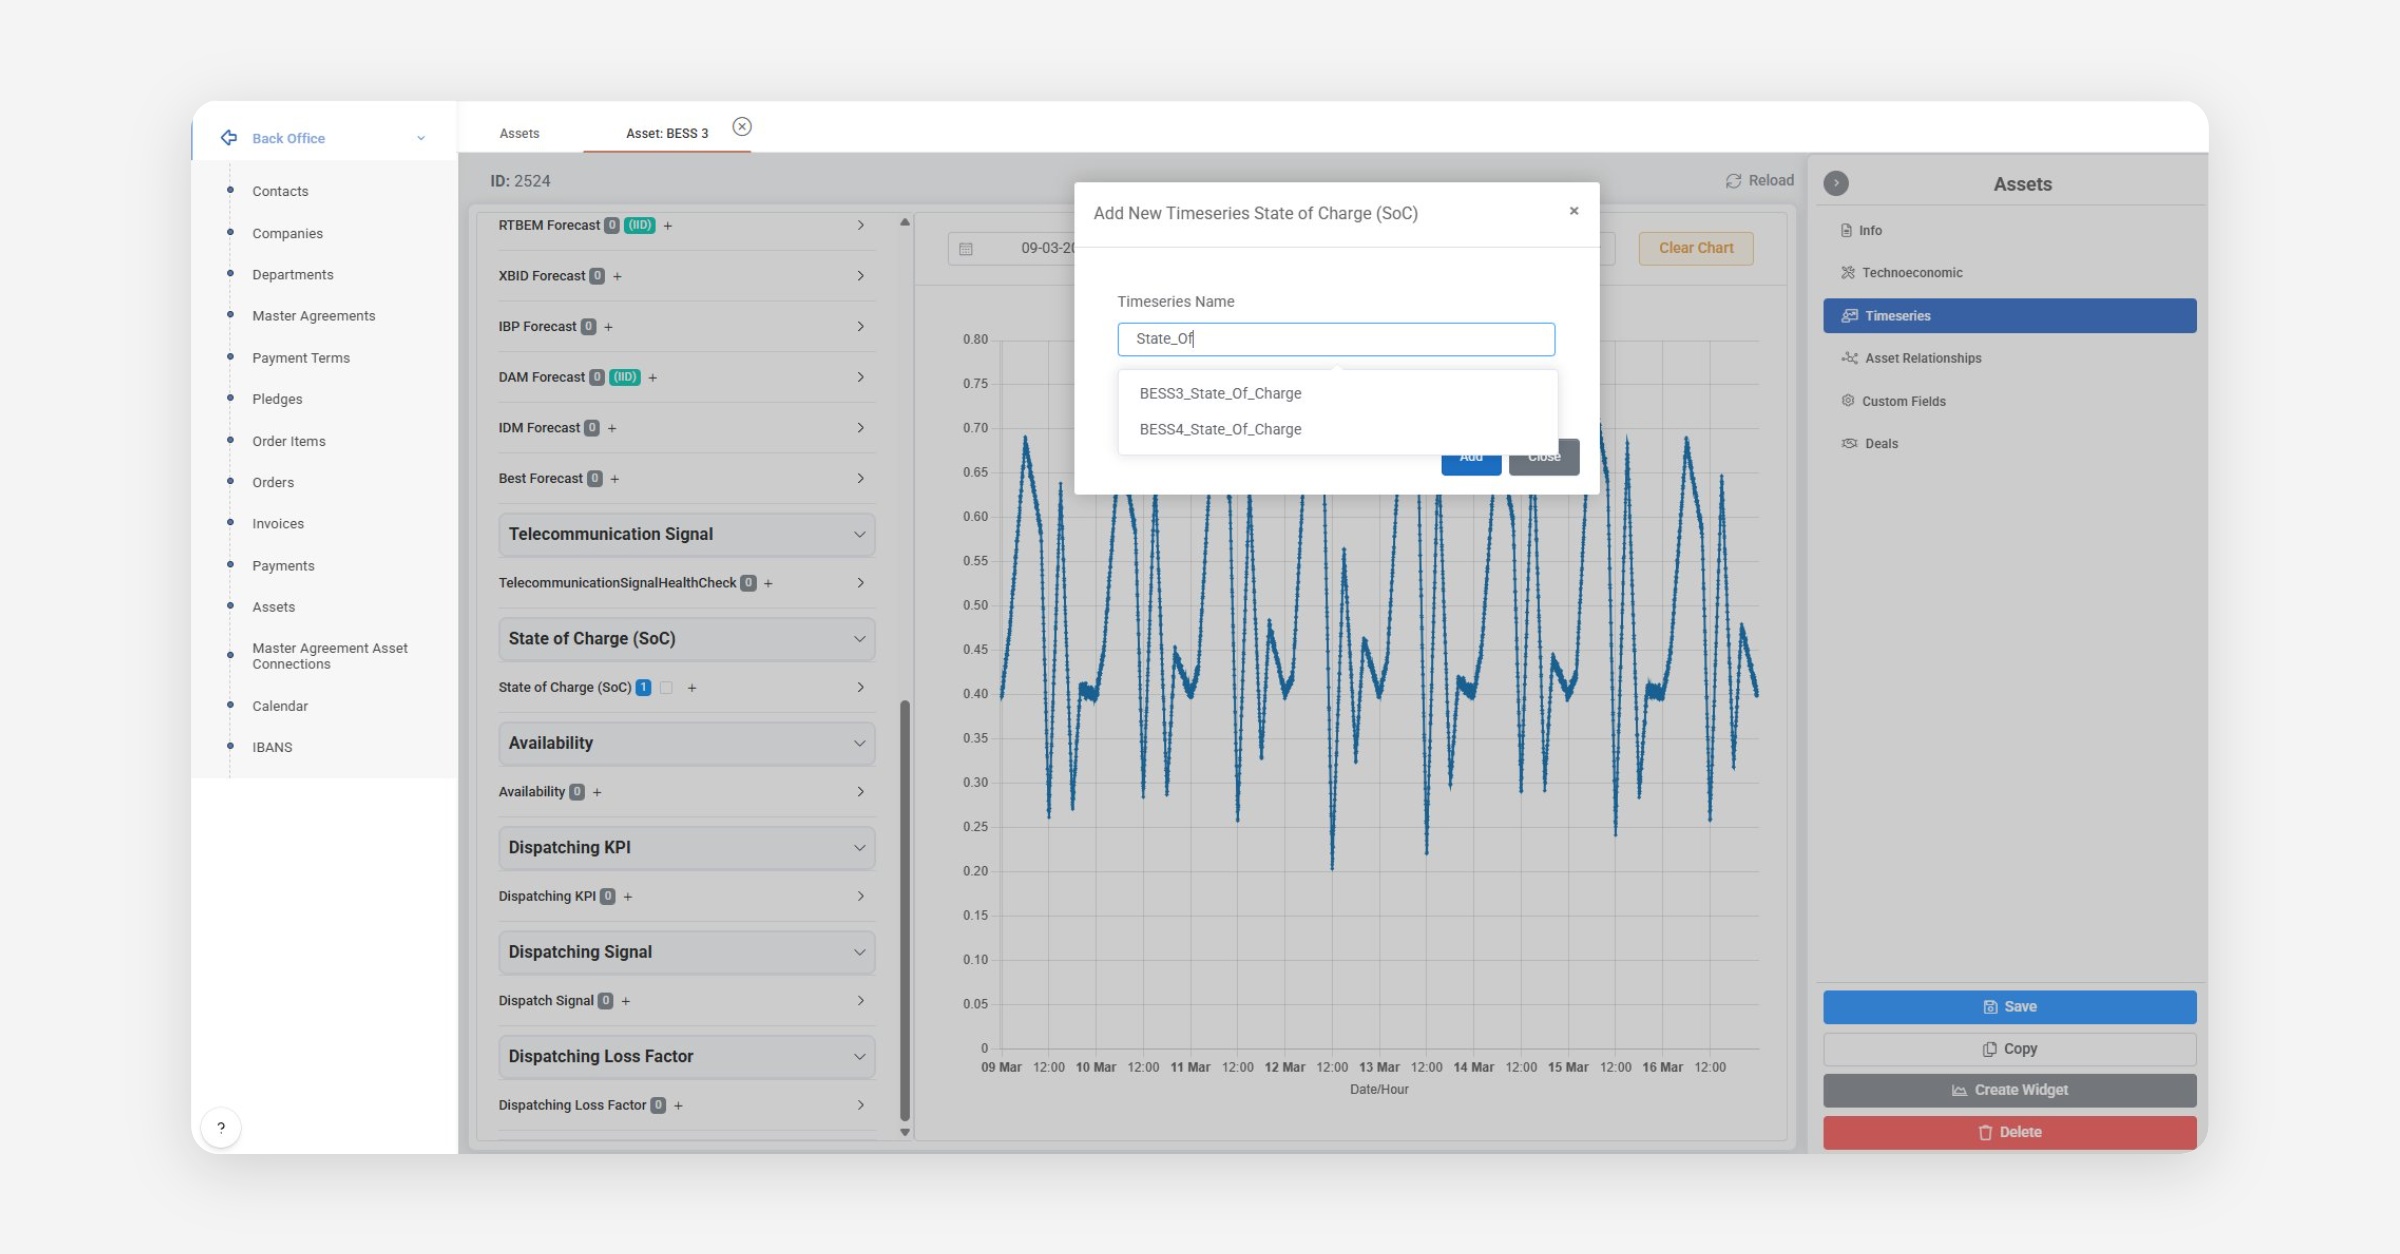
Figure 9: Add New Timeseries dialog — searching for existing timeseries to connect under the State of Charge category.
3.4 Scenario 1: Typical Timeseries for a BESS Asset
For a Battery Energy Storage System, the following timeseries should be created and connected:
Category | Name Pattern | Granularity | UOM | Source | Direction |
|---|---|---|---|---|---|
State of Charge |
| 1 Minute | % | SCADA | SCADA → ETRM |
SCADA |
| 1 Minute | MW | SCADA | SCADA → ETRM |
Availability |
| Quarter-Hour or 1 Minute | MW or % | SCADA | SCADA → ETRM |
Telecommunication Flag |
| 1 Minute | Dimensionless (0 or 1) | SCADA | SCADA → ETRM |
Dispatching Signal |
| Quarter-Hour | MW | Dispatching | ETRM → SCADA |
The first three timeseries are inputs — your SCADA system pushes measurements into them via the API. The Dispatching Signal is an output — the Dispatching module of Atlas ETRM writes the computed dispatch instruction for the asset into this timeseries. Your SCADA/EMS can read it via the API to execute the dispatch commands on the physical asset.
3.5 Scenario 2: Typical Timeseries for a RES Asset (Wind / Solar)
For a Renewable Energy Source asset, the relevant timeseries focus on production, availability, and curtailments:
Category | Name Pattern | Granularity | UOM | Source | Direction |
|---|---|---|---|---|---|
SCADA |
| Quarter-Hour or 1 Minute | MW | SCADA | SCADA → ETRM |
Availability |
| Quarter-Hour or 1 Minute | MW or % | SCADA | SCADA → ETRM |
Curtailment Flag |
| Quarter-Hour or 1 Minute | Dimensionless (0 or 1) | SCADA | SCADA → ETRM |
Telecommunication Flag |
| 1 Minute | Dimensionless (0 or 1) | SCADA | SCADA → ETRM |
Dispatching Signal |
| Quarter-Hour | MW | Dispatching | ETRM → SCADA |
As with BESS, the first three timeseries are inputs from the client's SCADA system. The Dispatching Signal is again an output written by the Dispatching module of Atlas ETRM, containing the dispatch instruction for the RES asset.
4. Asset Optimization — Data Flow
The Asset Optimization module reads all the data described above as inputs to compute optimal bidding and dispatch strategies.
Inputs to the optimizer:
Technoeconomic Parameters — capacity, efficiency, ramp rates, storage characteristics, loss parameters, thermal parameters (from the asset's Technoeconomic tab for the matching validity period).
SCADA Timeseries — real-time power output, state of charge (BESS), production (RES).
Availability — the asset's declared availability profile.
Reserve Requirements — FCR, aFRR, mFRR capacity parameters combined with market reserve price forecasts.
Dispatch Constraints — minimum up/down times, resting times, max daily energy, max cycles per day.
Output:
Optimal Bidding Strategies — step-wise bid curves for each market session are stored in the Bidding module.
Dispatching Signal — the Dispatching module of Atlas ETRM writes the computed dispatch instruction per asset to the Dispatching Signal timeseries. This contains the power setpoint (MW) at the dispatch granularity (typically 15-minute intervals). External systems can read this timeseries via the API to receive dispatch commands.
5. Programmatic Integration via the REST API
The ATLAS ETRM REST API enables external systems (SCADA, EMS, forecasting platforms) to create timeseries, update data values, and manage asset-timeseries connections. All communication is secured with HTTPS and JWT bearer token authentication.
Full API documentation (Swagger / OpenAPI) is available at
https://<your-instance>/docs. The examples below cover the most common SCADA integration workflows. Refer to the Swagger docs for complete request/response schemas and all available endpoints.
5.1 Recommended Workflow
As described in Section 1, the recommended approach is:
One-time setup (via UI): Create asset, create timeseries in the Data Room, connect timeseries to the asset, and note down the timeseries IDs.
Continuous operation (via API): Use the API gateway exclusively for updating timeseries values from your SCADA system.
The API endpoints for creating timeseries and managing connections are documented below for completeness, but in practice the UI is the preferred method for these one-time setup tasks.
5.2 Authentication
Obtain a JWT bearer token (valid for 1 hour). Rate limit: 100 requests/minute.
POST /api/token
Content-Type: application/json

{
  "username": "<service_account>",
  "password": "<service_account_password>"
}
Use the returned token in all subsequent requests:
Authorization: Bearer <token>
5.3 Creating a Timeseries (if needed via API)
POST /api/Timeseries/Post
Authorization: Bearer <token>

{
  "data": {
    "name": "BESS3_State_Of_Charge",
    "granularity": -3,
    "type": 3,
    "unitOfMeasurement": 2,
    "source": "SCADA",
    "module": 13,
    "upsampling": 3,
    "downsampling": 1,
    "isActive": true
  }
}
The module field should be set to 13 (DataSeries) as the default option. The response includes the assigned timeseries ID. Key enum values:
Granularity | Type | UOM (common) |
|---|---|---|
|
|
|
Upsampling | Downsampling | Timezone |
|---|---|---|
|
|
|
5.4 Pushing Values from SCADA
This is the primary endpoint for continuous SCADA integration — the only API call that needs to run on an ongoing basis.
Convention: Timeseries follow a date-from inclusive / date-to exclusive convention. In an hourly timeseries, the value at
2026-03-14T00:00:00represents the period 00:00–01:00.
POST /api/Timeseries/PostValues
Authorization: Bearer <token>

{
  "data": {
    "id": 484851,
    "timezone": 2,
    "values": [
      { "timestamp": "2026-03-14T10:00:00", "value": 75.3 },
      { "timestamp": "2026-03-14T10:01:00", "value": 74.8 },
      { "timestamp": "2026-03-14T10:02:00", "value": 74.2 }
    ]
  }
}
Values can be set to null to indicate missing data points.
5.5 Reading Values (e.g., Dispatch Signals)
To read dispatch commands written by the Dispatching module:
POST /api/Timeseries/GetValues
Authorization: Bearer <token>

{
  "data": {
    "id": 484851,
    "dateFrom": "2026-03-14T00:00:00",
    "dateTo": "2026-03-15T00:00:00",
    "timezone": 2,
    "fill": true
  }
}
5.6 Connecting a Timeseries to an Asset (if needed via API)
POST /api/Assets/AddAssetTimeseriesConnection
Authorization: Bearer <token>

{
  "data": [
    {
      "timeseriesId": 484851,
      "assetId": 2524,
      "assetTimeseriesTypeId": 15,
      "validityOrder": 0
    }
  ]
}
The assetTimeseriesTypeId corresponds to the category type ID from Administration → Asset Timeseries Categories Types.
5.7 Other Useful Endpoints
Endpoint | Description |
|---|---|
| Search timeseries by name (wildcards |
| Create or update an asset (ID=0 for new). |
| Retrieve assets by ID (empty array = all). |
| Remove a timeseries-asset connection. |
| Delete a timeseries. |
6. SCADA Integration Pattern
A typical integration follows this closed-loop pattern:
SCADA → (PostValues) → ATLAS ETRM → Optimization → Dispatching Signal → (GetValues) → SCADA
A middleware service on the client's infrastructure reads measurements from SCADA at the native sampling rate.
The middleware authenticates with the ATLAS ETRM API and caches the JWT token (refreshing before the 1-hour expiry).
At configurable intervals (e.g., every 1 minute for SoC/Power, every 15 minutes for availability), the middleware batches measurements and pushes them via
PostValues.The middleware reads the Dispatching Signal timeseries via
GetValuesand forwards dispatch commands to the SCADA/EMS for execution.
Python example (simplified):
import requests, time
from datetime import datetime

API_BASE = "https://<your-instance>/api"
TS_ID = 484851  # SoC timeseries ID (obtained from the UI during setup)

def get_token():
    r = requests.post(f"{API_BASE}/token",
        json={"username": "svc_account", "password": "***"})
    return r.json()["data"]

def push_values(token, values):
    requests.post(f"{API_BASE}/Timeseries/PostValues",
        json={"data": {"id": TS_ID, "timezone": 2, "values": values}},
        headers={"Authorization": f"Bearer {token}"})

token = get_token()
token_time = time.time()

while True:
    if time.time() - token_time > 3000:  # refresh before 1h expiry
        token = get_token()
        token_time = time.time()

    soc = read_scada_soc()  # your SCADA reader
    now = datetime.now().strftime("%Y-%m-%dT%H:%M:%S")
    push_values(token, [{"timestamp": now, "value": soc}])
    time.sleep(60)
Appendix: Onboarding Checklist
Obtain service account credentials from the ATLAS ETRM administrator.
Verify network connectivity to the API endpoint (HTTPS, port 443).
Create the asset in Back Office and note the Asset ID.
Fill in all technoeconomic parameters.
Create the required timeseries in the Data Room and note their IDs.
Connect each timeseries to the asset under the appropriate category (via Assets → Timeseries tab).
Deploy the SCADA middleware with the correct timeseries IDs and API credentials.
Test by pushing sample values and verifying them in the Data Room UI.
Configure Dispatching Signal readback in the middleware.
Validate end-to-end: SCADA → ETRM → Optimization → Dispatch → SCADA.
Was this helpful?