Microsoft Entra ID (SSO) Integration
Configure single sign-on for ATLAS ETRM with Microsoft Entra ID (OIDC), and optionally provision ATLAS accounts automatically from Entra app roles.
1. Introduction
This guide describes how to integrate Microsoft Entra ID (formerly Azure Active Directory) with the ATLAS ETRM platform to provide single sign-on (SSO) using the OpenID Connect (OIDC) protocol. It covers:
Registering ATLAS ETRM as an application in the client's Entra ID tenant
Configuring the redirect / logout URIs and enabling ID token issuance
Generating the client secret that ATLAS uses to complete the OIDC handshake
(Optional) Automatically provisioning ATLAS user accounts from Entra ID app roles at login, and mapping those roles to ATLAS roles
Key Principle: Entra ID as the Identity Provider
With SSO enabled, Microsoft Entra ID becomes the identity provider for ATLAS ETRM. Users authenticate against their organisation's Entra ID tenant and ATLAS consumes the resulting ID token — ATLAS does not store or manage user passwords, as authentication is delegated entirely to Entra ID.
Optionally, ATLAS can also read the app roles carried in the token to create user accounts automatically and assign the corresponding ATLAS role at first login (see Section 5).
Prerequisites
A Microsoft Entra ID tenant with administrative rights to register applications.
The deployed ATLAS UI URL (referred to below as
<atlas-ui-url>).Coordination with the StellarBlue team, who activate the integration on the ATLAS side (see the note below).
Note — StellarBlue completes the server-side activation. The Entra ID integration is a handshake between the client tenant and ATLAS. After the application has been registered (Sections 2–4), the client must send StellarBlue the Application (client) ID, the Directory (tenant) ID, and a generated client secret. StellarBlue then enables and configures the Entra ID integration on the ATLAS side using these values. SSO will not be active until this server-side step has been completed by StellarBlue.
2. Registering ATLAS ETRM in Entra ID
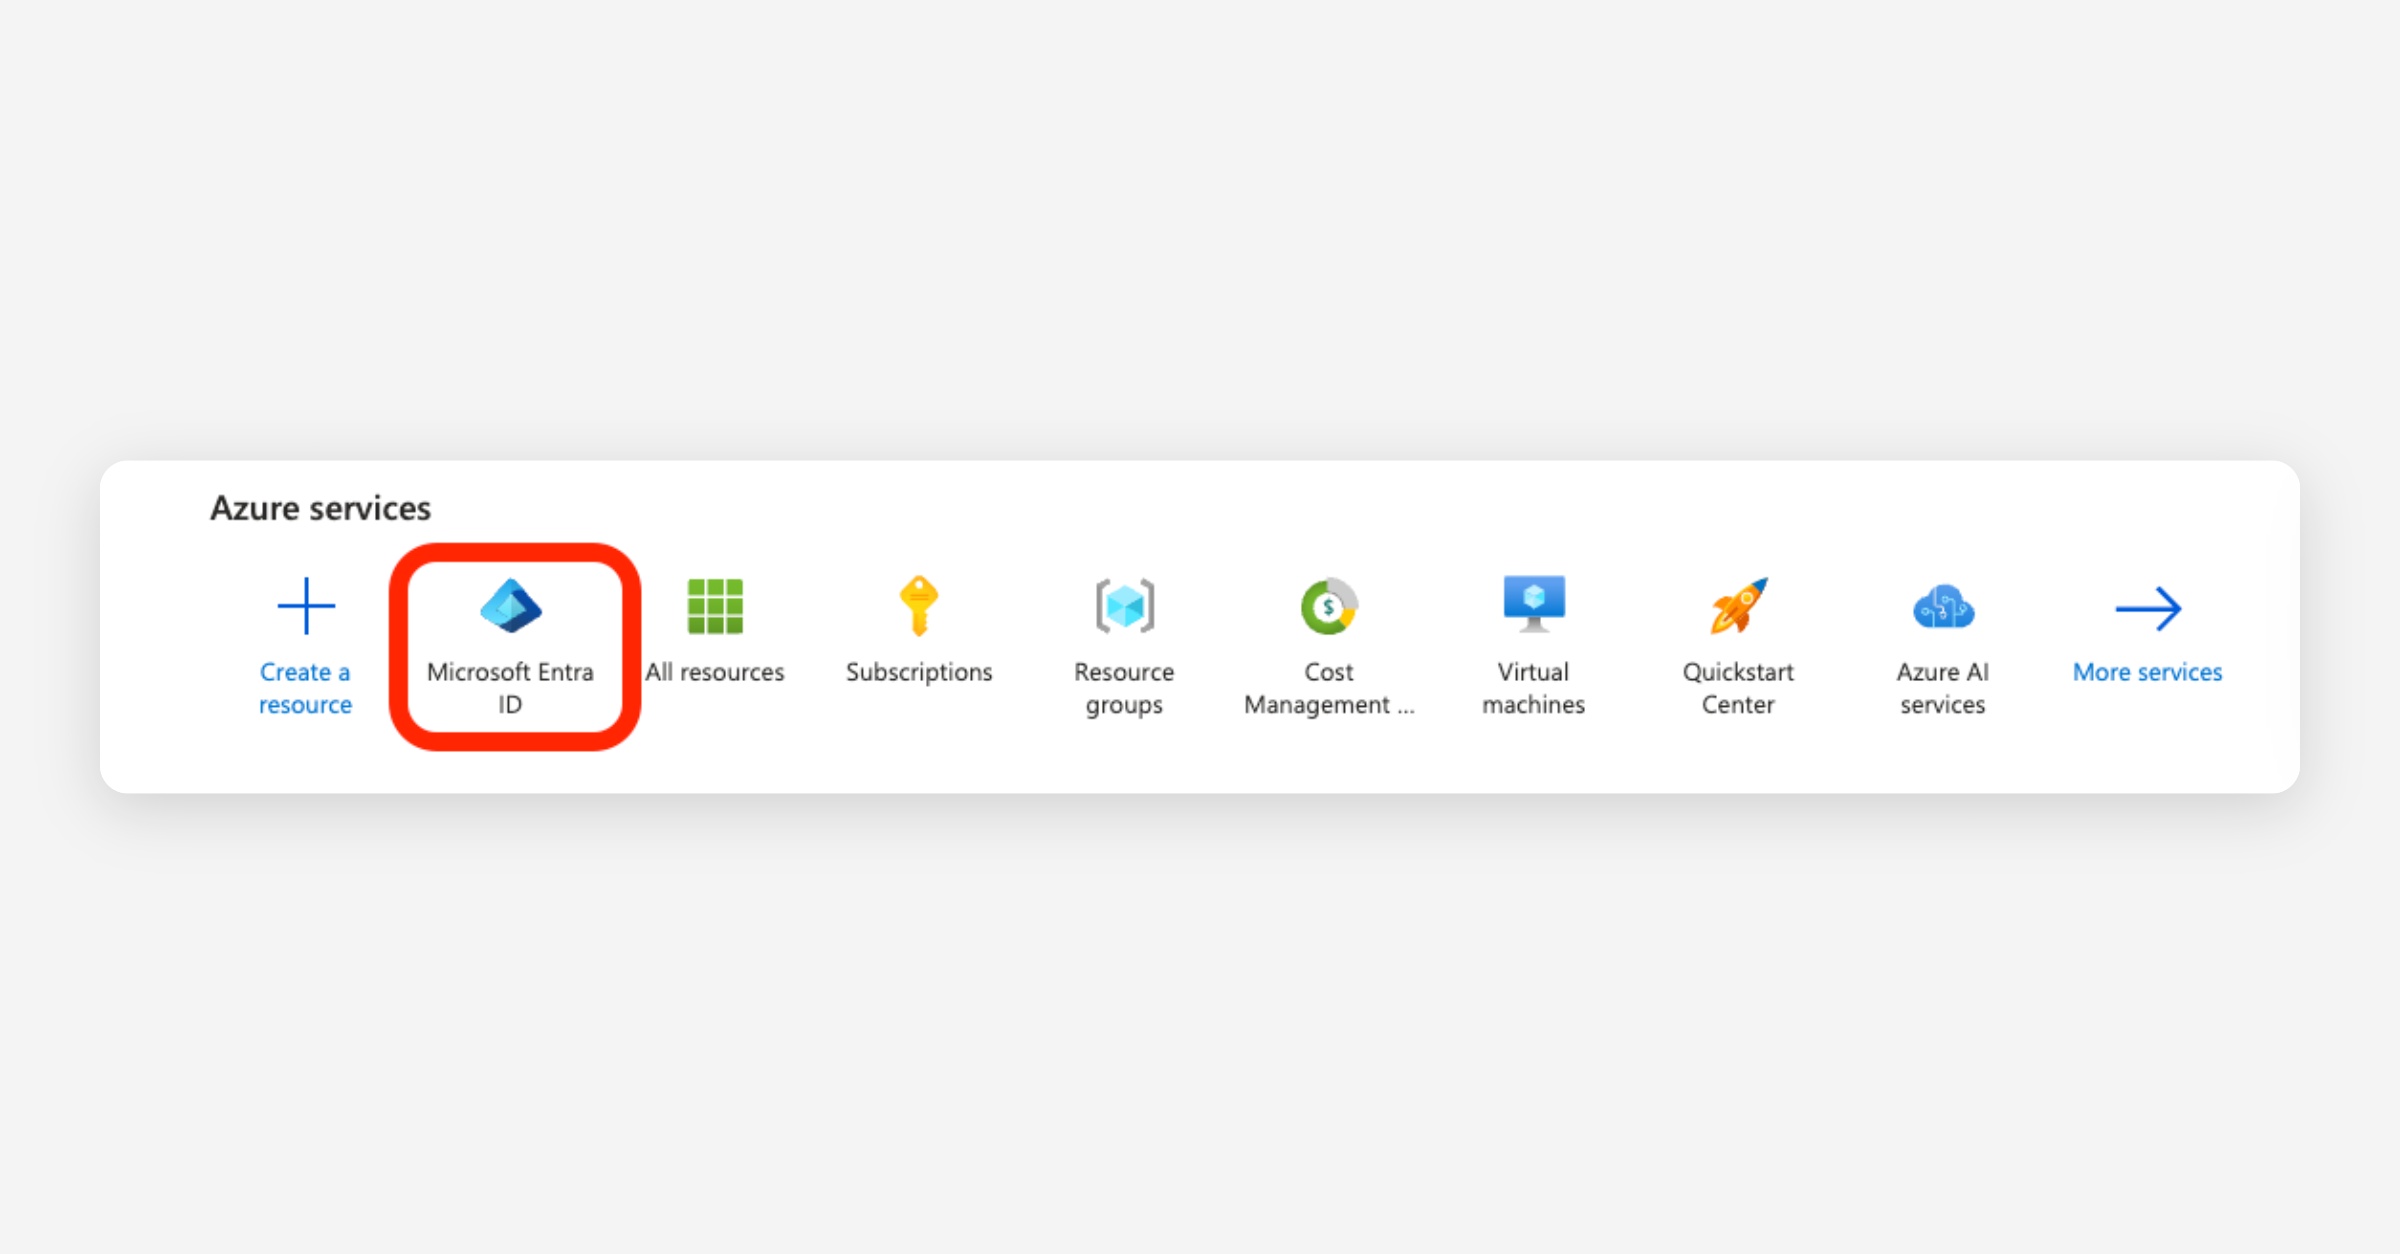
Step 1 — Open Microsoft Entra ID
Navigate to your Azure portal and open Microsoft Entra ID.
Step 2 — App registrations
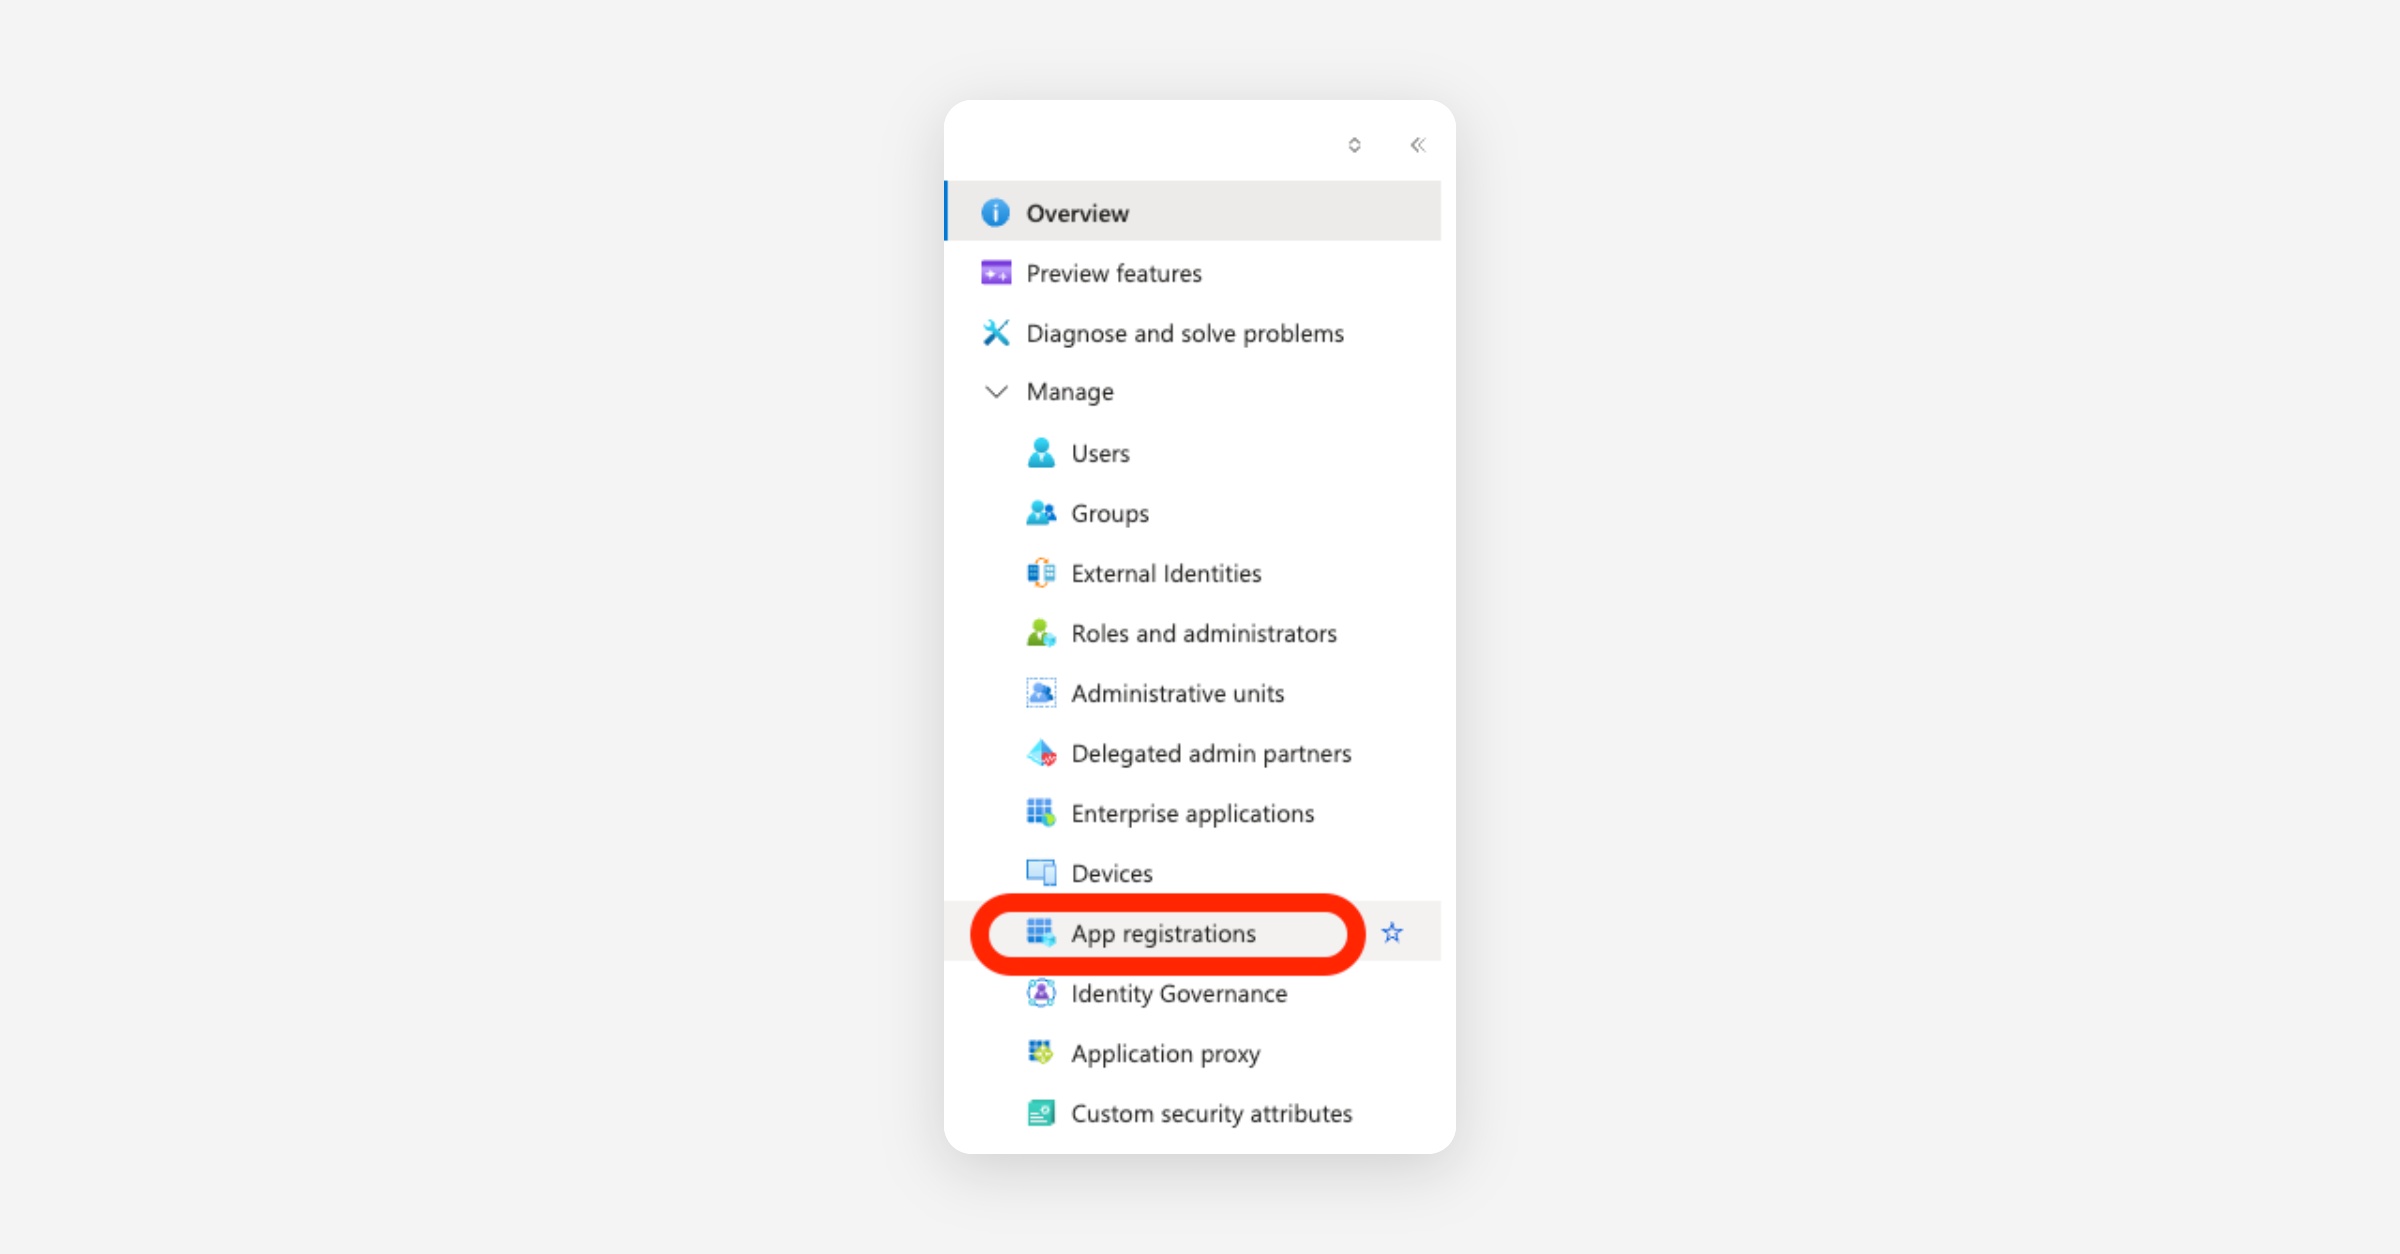
Go to App registrations.
Step 3 — New registration
Click New registration and give the application a name. We suggest "Atlas ETRM UAT" for the test environment (or "Atlas ETRM" for production).
Step 4 — Record the identifiers
Once the app is registered, note the Application (client) ID and the Directory (tenant) ID shown on the Overview page. These must be shared with StellarBlue (see the note in Section 1).
3. Authentication — Redirect & Logout URIs
Step 5 — Add a Web platform
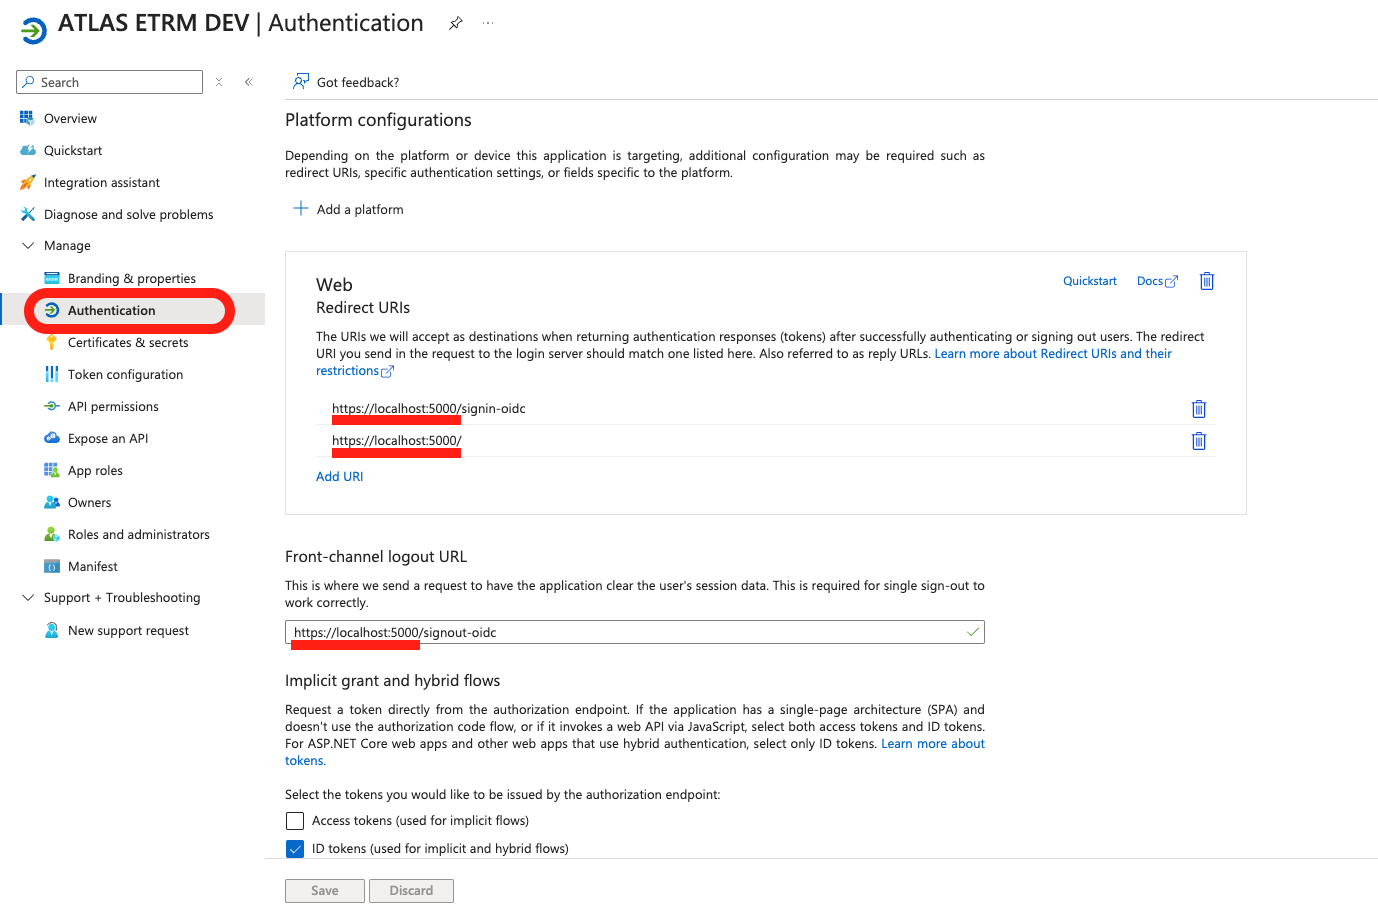
Open the Authentication menu item and click Add a platform. Select Web and configure:
Redirect URI:
https://<atlas-ui-url>/Front-channel logout URL:
https://<atlas-ui-url>/signout-oidc
Click Configure.
Step 6 — Add the sign-in redirect URI
Under Redirect URIs click Add URI and add:
https://<atlas-ui-url>/signin-oidc
Step 7 — Enable ID tokens
Check the ID tokens checkbox and Save. The final configuration should list both redirect URIs and the front-channel logout URL, with ID tokens enabled — replacing any localhost:5000 placeholder with https://<atlas-ui-url>/.
4. Client Secret
ATLAS acts as a confidential OIDC client, so a client secret is required to complete the authentication handshake.
Navigate to Certificates & secrets → Client secrets → New client secret. Provide a description and an expiry period, then click Add. Copy the secret Value immediately — it is displayed only once and cannot be retrieved later.
Send this to StellarBlue. Share the client secret Value securely with the StellarBlue team, together with the Application (client) ID and Directory (tenant) ID from Step 4. Do not send secrets over unsecured channels. When the secret is close to expiry, generate a new one and notify StellarBlue so the integration can be updated without downtime.
5. Automatic User Provisioning via Entra ID (Optional)
This section is optional. It applies when you want ATLAS user accounts to be created directly from Microsoft Entra ID instead of being added manually inside ATLAS.
When a user signs in, ATLAS reads the Entra app roles assigned to that user and compares each one against the Microsoft Entra Role value configured on the ATLAS roles. If a match is found, the account is created automatically ("opened") on that first login and the matching ATLAS role is assigned to it.
Account types and reserved roles
Two app role values are reserved and determine the account type that is created:
Admin→ creates an Administrator accountIT_Admin→ creates an IT Admin account
Every other matched app role creates a standard member account carrying the mapped ATLAS role. If none of the user's Entra app roles matches an ATLAS role, the account is not created automatically in ATLAS.
5.1 Create app roles (Entra ID)
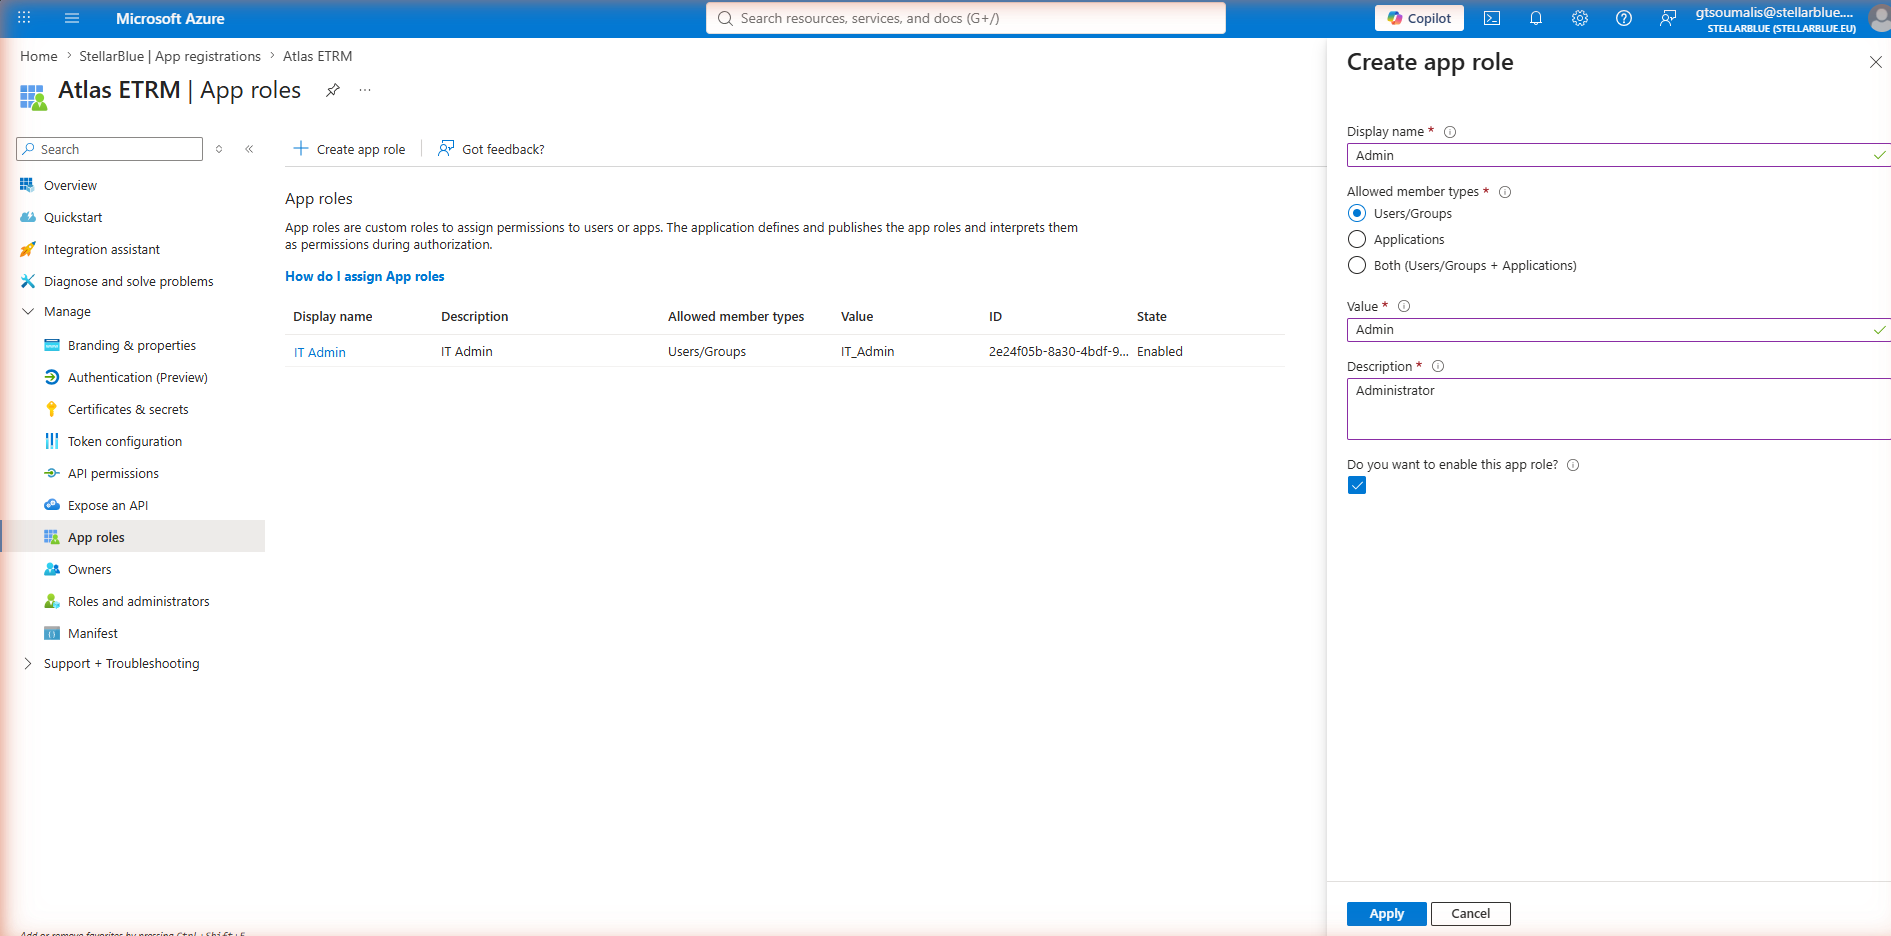
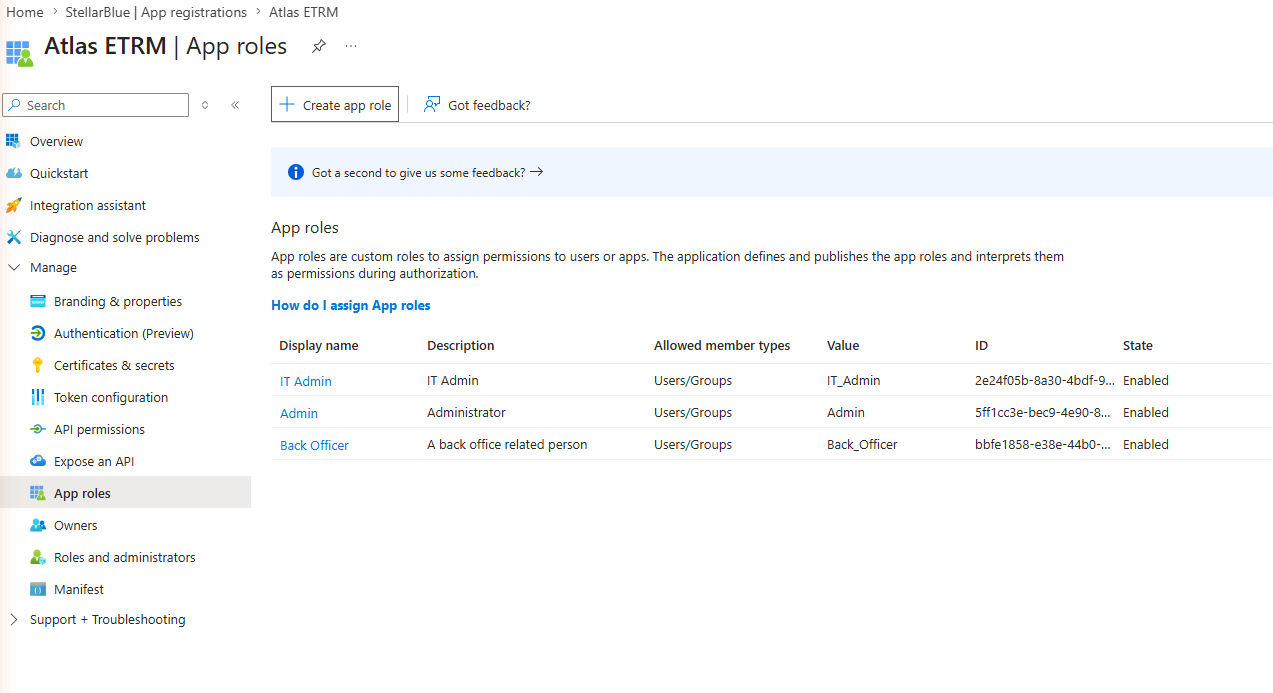
In the app registration, open App roles and click Create app role. For each role set the Display name, set Allowed member types to Users/Groups, set a Value, add a Description, keep Do you want to enable this app role? checked, and click Apply. Create:
Admin — Value
AdminIT_Admin — Value
IT_AdminOne app role per ATLAS role you want to map, where the Value matches the ATLAS role's Microsoft Entra Role value (see Section 5.3).
5.2 Assign users / groups (Enterprise application)
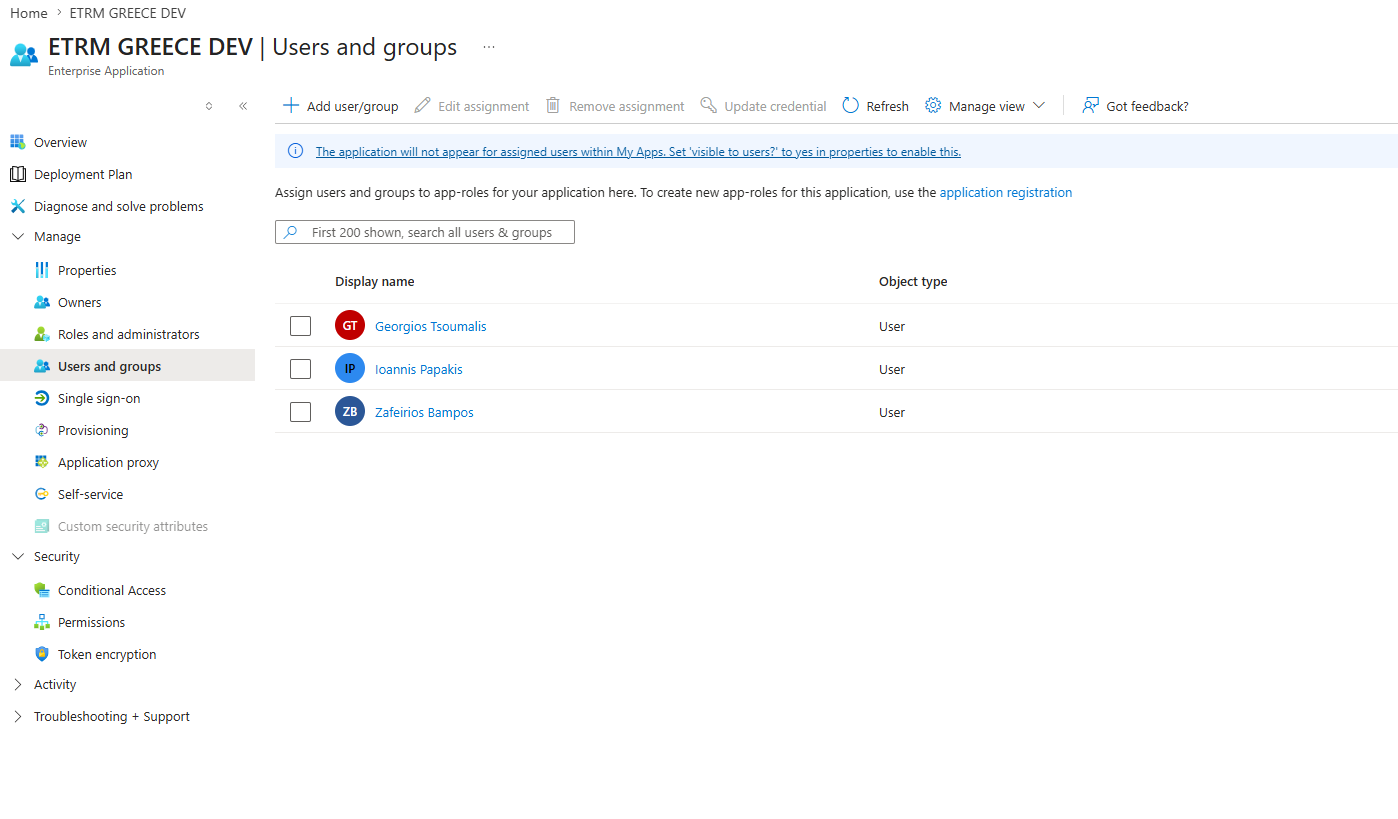
Open the corresponding Enterprise Application, navigate to Users and groups, and click Add user/group to assign each user (or group) to the appropriate app role. Only users assigned to a mapped app role here will be provisioned in ATLAS at login.
5.3 Map ATLAS roles to Entra app roles
In ATLAS, go to User Management → Accounts → Roles. Each role exposes a Microsoft Entra Role value (shown in the Entra Id column); this is the value ATLAS matches against the Entra app role.
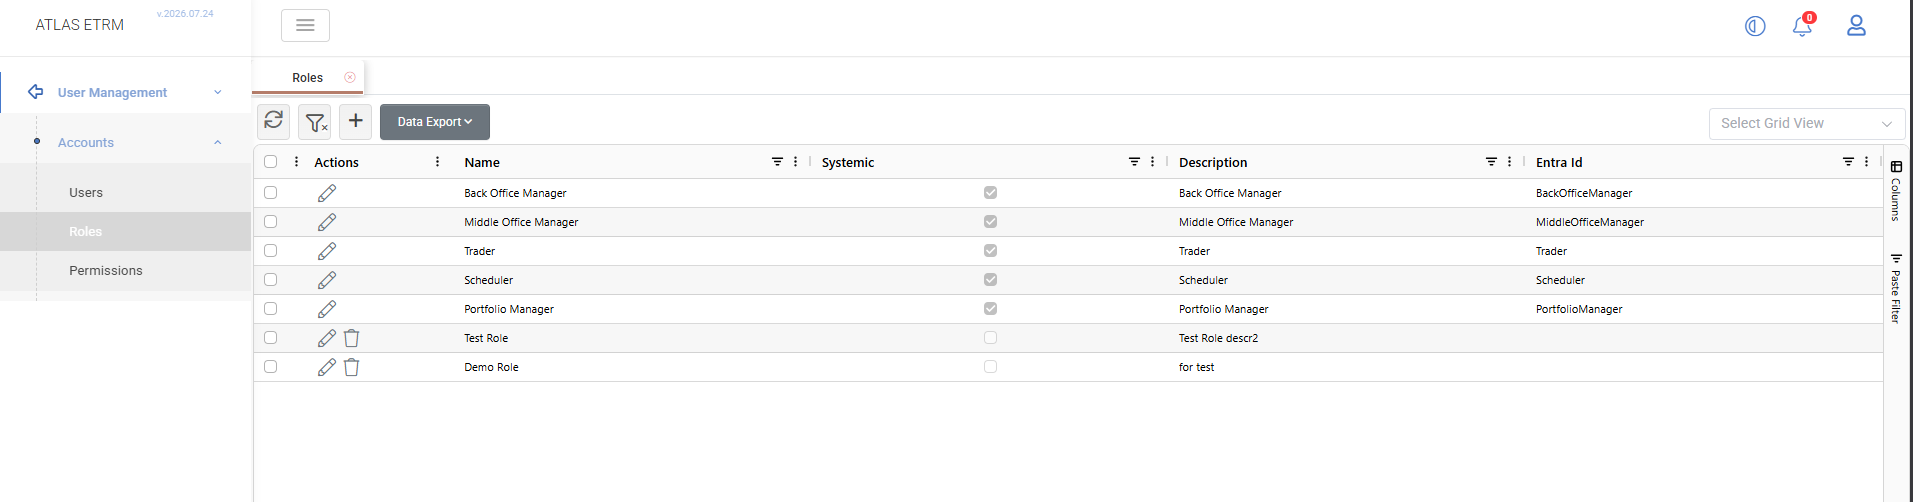
The systemic roles that ship with ATLAS already carry their default Entra Id mappings, while custom roles can define their own. To set or change a mapping, open the role (or create a new one), fill in the Microsoft Entra Role field so that it matches the Value of the Entra app role exactly, then click Save.
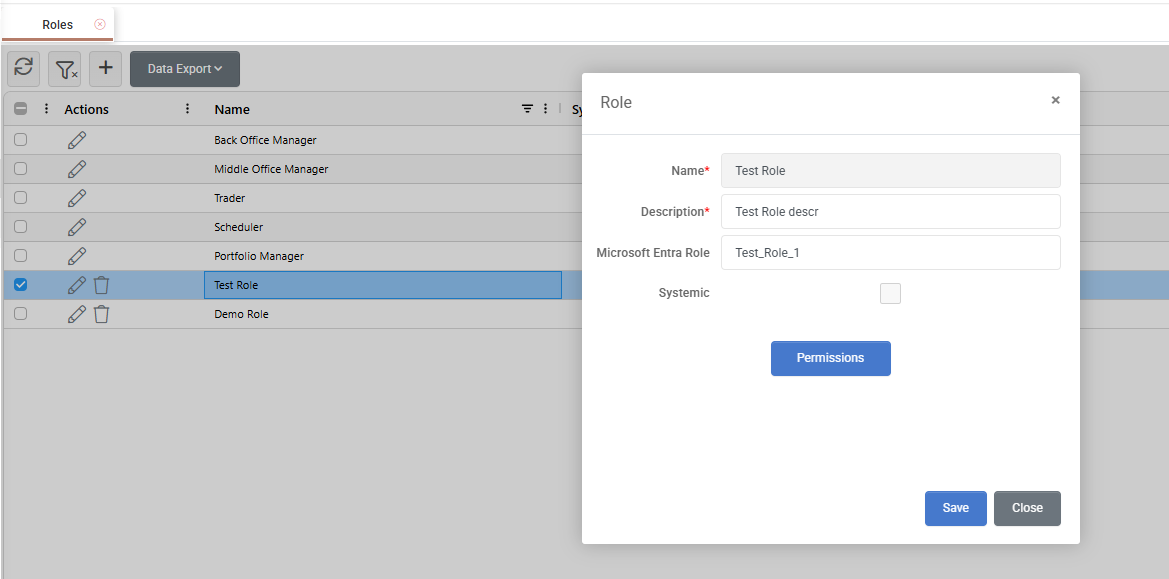
Values must match exactly. The Entra app role Value and the ATLAS Microsoft Entra Role field are compared literally. If they do not match, no role is matched and the account is not provisioned. Confirm the reserved values
AdminandIT_Adminare spelled exactly as shown.
Appendix: Onboarding Checklist
Register the ATLAS ETRM application in Entra ID (Section 2) and record the Application (client) ID and Directory (tenant) ID.
Add the Web platform with the redirect and front-channel logout URIs, and enable ID tokens (Section 3).
Generate a client secret and copy its value (Section 4).
(Optional) Create the
AdminandIT_Adminapp roles plus any role you want to map, and assign users/groups to them (Sections 5.1–5.2).Send StellarBlue the Application (client) ID, Directory (tenant) ID, and client secret value over a secure channel.
StellarBlue enables and configures the Entra ID integration on the ATLAS side and confirms SSO is active.
(Optional) Verify the ATLAS role ↔ Entra app role mappings in User Management → Accounts → Roles (Section 5.3), then test a first login to confirm the account is auto-created with the expected role.