Part 5 - Jobs & Automation
Order Item Calculation Job - Orders Creation Job

View the full Part 5 walkthrough: https://stellarblue.storylane.io/share/aorgwjpnganr
1. Order Item Calculation Job
Order Items represent the financial amounts that must be settled with counterparties for defined settlement periods. They are generated from Deals and include all relevant settlement information, such as delivery period, volume, amount, due date and cash flow direction. Order Items can be created manually through Deal Capturing or automatically through a scheduled job.
Once generated, they are available in Back Office → Order Items, where they can be reviewed, grouped into Orders and used for cash flow monitoring and invoicing processes.
To automate the systematic creation and update of these settlement amounts, users can configure an Order Item Calculation job through the Job Manager module.
Main Action Steps
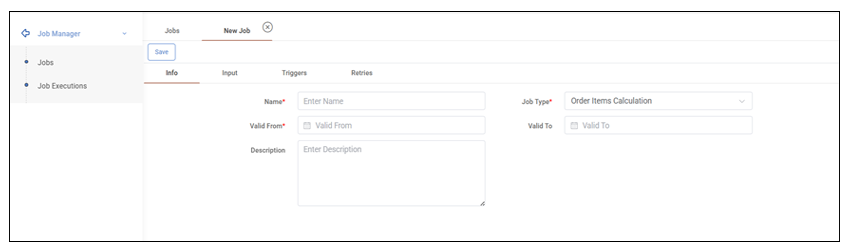
Step 1 – Create the Job
Go to Job Manager → Jobs and click the “+” button.
In the Info tab:
Enter a descriptive Name (e.g. “Order Items – Daily Calculation”).
Select Job Type = Order Item Calculation.
Define Valid From.
Optionally define Valid To.
Add a Description if required.
Save the job.
Step 2 – Define the scope of Deals (Input tab)
In the Input tab, a grid of Deals is displayed.
At the top of the grid, filtering criteria can be applied using queries(for example based on fields such as Status, Transaction Time or other available Deal attributes). After applying the desired filters, the resulting set of Deals defines the scope of the calculation.
Additionally, if Deal Collections have been created in Portfolio Management → Deal Collections, they can be selected in this tab to restrict the scope to a predefined group of Deals.
The job will generate Order Items only for the Deals included in the final filtered or selected scope.
Step 3 – Configure execution timing (Triggers tab)
In the Triggers tab, define when the job will run.
Available trigger types:
Time-based: The job runs according to a defined Cron expression and selected Timezone. In practice, this configuration is commonly used to execute the calculation periodically (e.g. daily).
After Job: The job runs after another job completes successfully, allowing execution sequencing between processes.
Multiple triggers can be configured if required.
Step 4 – Configure retries (optional)
In the Retries tab, define:
The number of retry attempts in case of failure.
The interval between retries.
Step 5 – Monitor executions
Executions can be monitored in Job Manager → Jobs Executions, where users can review:
Past executions (History)
Scheduled executions (Future)
A graphical overview (Timeline).
By opening a specific execution, the user can review its Info, Input, Logs and Results.
View Order Item Calculation Job walkthrough: https://stellarblue.storylane.io/share/02xkijttr8yt
2. Orders Creation Job
An Order represents the formal settlement document that aggregates one or more Order Items into a single payable or receivable amount. Operationally, it is equivalent to an invoice, while the underlying Order Items correspond to invoice lines. Orders are managed in Back Office → Orders, where users can review their details, monitor their lifecycle status, and interact with the accounting system (e.g., send to ERP).
Since multiple Deals may generate multiple Order Items for the same settlement period, an Orders Creation job allows the automated grouping of eligible Order Items into structured Orders according to predefined criteria (such as counterparty or portfolio structure). This ensures consistency in the invoicing process and supports integration with downstream accounting workflows without requiring manual order assembly.
Main Action Steps
Step 1 – Create the Job
Go to Job Manager → Jobs and Click the “+” button.
In the Info tab:
Enter a descriptive Name (e.g. “Monthly Orders Creation”).
Select Job Type = Orders Creation.
Define Valid From.
Optionally define Valid To.
Add a Description if required.
Save the job.
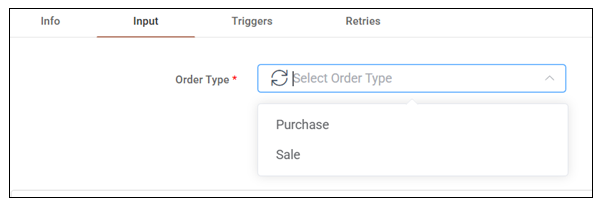
Step 2 – Configure grouping logic (Input tab)
In the Input tab, define how Order Items will be aggregated into Orders.
First, select the Order Type (Purchase or Sale).
Then configure the Groupings, which determine how Order Items will be combined into a single Order. The grouping logic defines the structural and commercial dimension of each generated Order.
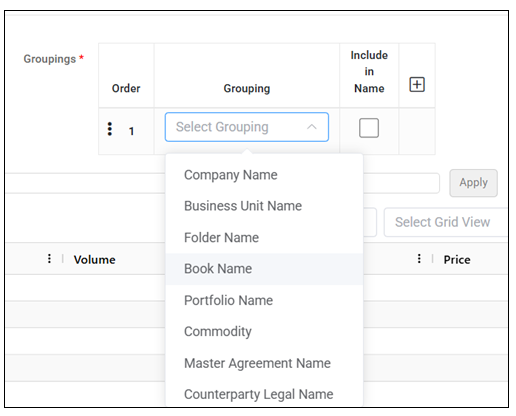
In practice, the most commonly used grouping fields include:
Counterparty Legal Name, to create one Order per counterparty,
Portfolio or Book, to separate Orders by internal commercial structure,
Master Agreement Name, when contractual separation is required.
Additional grouping fields are available in the system depending on configuration. The selected grouping hierarchy defines how granular or consolidated the resulting Orders will be. The “Include in Name” option allows selected grouping fields to be incorporated into the generated Order name.
After configuring the grouping logic, apply the settings to finalize the input definition.
Step 3 – Configure Execution Timing (Triggers tab)
In the Triggers tab, define when the Orders Creation job will run.
Available trigger types:
Time-based: Commonly used for periodic invoicing cycles (e.g. monthly).
After Job Typically configured to run after the Order Item Calculation job completes successfully, ensuring that Orders are created from the latest calculated Order Items.
Multiple triggers may be defined if required.
Step 4 – Configure Retries (optional)
In the Retries tab, define:
Number of retry attempts in case of failure.
Interval between retries.
Step 5 – Monitor Executions
Executions can be monitored in Job Manager → Jobs Executions, where users can review:
Past runs (History),
Scheduled runs (Future),
Timeline visualization.
Each execution can be opened to review configuration, logs and results.
View Orders Creation Job walkthrough: https://stellarblue.storylane.io/share/wzazocec18ff
Was this helpful?