Docs / 4. Back Office
4.7 Order Items
Overview of Order Items

An Order Item is created from a Deal registered in the Deal Capturing menu item of the Portfolio Management module. The Order Item essentially represents the amount (e.g., in €) to be settled with a counterparty for a given settlement period as a result of a Deal. The Order Item represents not only the amount to be settled, but also all related metadata such as the due day for settlement, the delivery period, the counterparty and others. Order item may be considered as a single line inside a total invoice. Order items may manually be created from deals (refer to deal capturing section) or automatically by setting up a job from "Job Manager" menu.
Edit/Delete Order Items
The user can view details about the Orders Items, such as the amount, the cash flow type, the counterparty, the delivery period, the relevant Deal name and Deal id, etc. These details are described in the Deal Capturing menu item of the Portfolio Management module.
User can edit an order item by either double click on it or select the "pencil" icon from actions area. A new pop up windows opens where the user can view the details of the order item:
Status: It shows the status of order items (like calculated).
Cash flow: It shows the cash flow direction of the order item (Passive refers to negative amounts that our company has to pay to someone else, while active refers to positive amounts that our company is about to receive the relevant amount).
Start/End Compensation: It shows the reference period of the order item that is drawn from the relevant deal period.
Volume: It shows the total volume that the order item involves (for power and gas it refers to MWh, while for oil refers to tones).
MTM: It refers to the total Mark-to-Market value (in euros) that has been used in the specific order item. Mark-to-Market are data series that are used as an index price for the order item (for example the market clearing price of DAM etc.).
PnL: It refers to total profit and loss value in euros for a specific order item.
Amount: It is the total amount of the order item.
Due Date: It shows the due date up to which the order items has to be paid.
Created Time: It shows the creation date and time of the order item
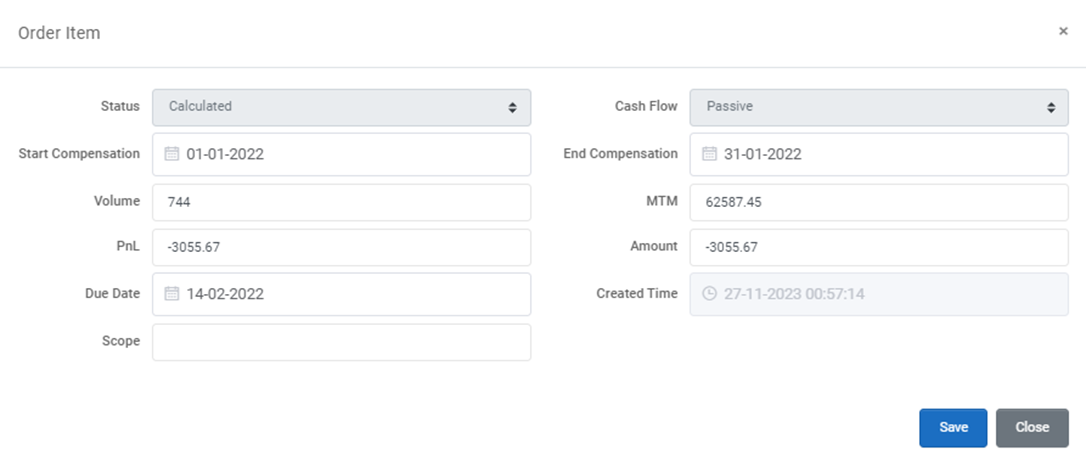
The grey fields are not editable, while manual interventions can be made in all other fields. After any change "Save" button must be pressed.
Order Creation
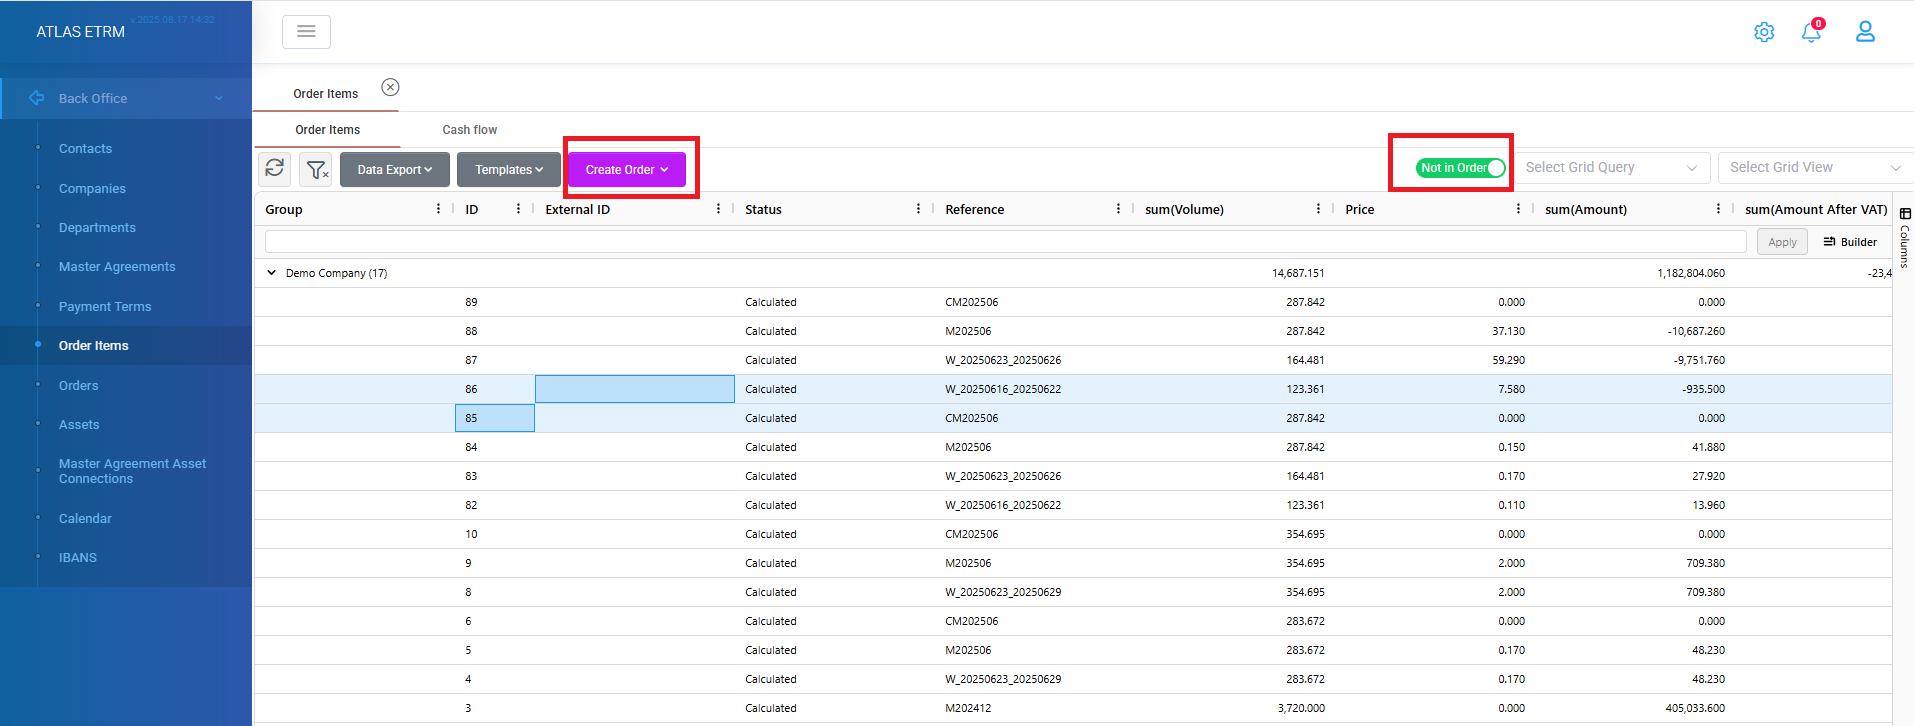
In the top-right corner of the Order Items grid (see circled button in the figure below), users can access the Order Creation view for simplified processing. By default, the grid displays all Order Items. When the user clicks the Order Creation button:
The grid updates to show only Order Items not yet included in an order.
The system automatically groups the order items by counterparty, since each order can only be created for a single counterparty.
A "Create Order" button becomes visible at the top of the grid.
To create a new order:
Select one or more eligible order Items (multiple order items can be selected by holding the ctrl button on your keyboard and clicking the relevant order items or by holding shift and click on a range of rows to select all the middle order items in grid).
Click the "Create Order" button.
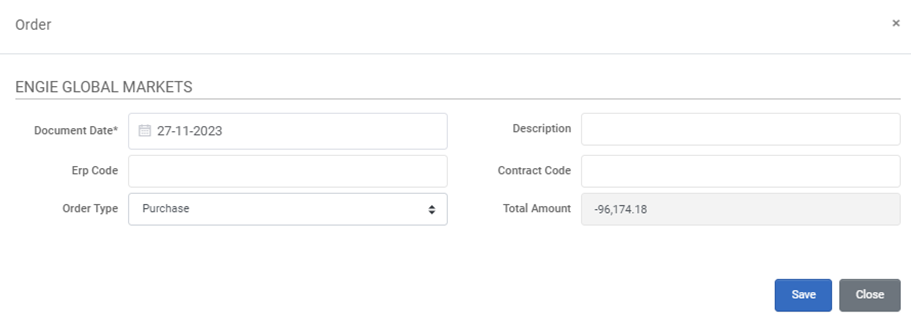
A pop-up window will appear where the user must configure the order's details:
Document Date:
The date the invoice is issued.Description (optional):
A free-text field for notes or a memo associated with the order.ERP Code (optional):
Reference code from the integrated ERP system, if applicable.Contract Code (optional):
Contract number linked to the invoice or financial document.Order Type:
Automatically populated as Purchase or Sale, depending on the sign of the order value (positive or negative).Order Amount:
Displays the total invoice amount, calculated automatically by the system. The system differentiates between Purchase Orders and Sales Orders. Purchase Orders represent a net charge to the company, while Sales Orders represent a net payment. Also, Order amount is automatically calculated from the selected order items. This field is read-only and cannot be edited by the user.The second way of creating Orders is by setting up rules in the form of queries so that to combine various Order Items. Refer to Queries article for more information.
Additional Actions
By right clicking on an order item user can make additional actions. These actions include:
Actions:
Change IBAN: User can change the IBAN that is connected with the specific order item from the available in the list (first the IBAN should be registered in system from relevant tab)
Export Prices: An excel is downloaded in user's system with the prices that are linked with the selected order items and relevant information from the deal that the order items are produced.
Export Prices and Quantities: An excel is downloaded in user's system with the prices and the quantities that are linked with the selected order items and relevant information from the deal that the order items are produced.
Export Quantities: An excel is downloaded in user's system with the quantities that are linked with the selected order items and relevant information from the deal that the order items are produced.
Export PnL Report: A PnL report gets downloaded in user's system containing the notional, MTM, Volume and PnL result.
Create Orders by Selected Order Items: User can also create orders from this button.
Add to existing order: User can add an order item to an existing order in the system. By clicking this, user should fill the relevant order id to make the linkage.
Delete Order Item: User can delete the selected order items. A relevant confirmation message appears for the user to accept the deletion.

Cash flow
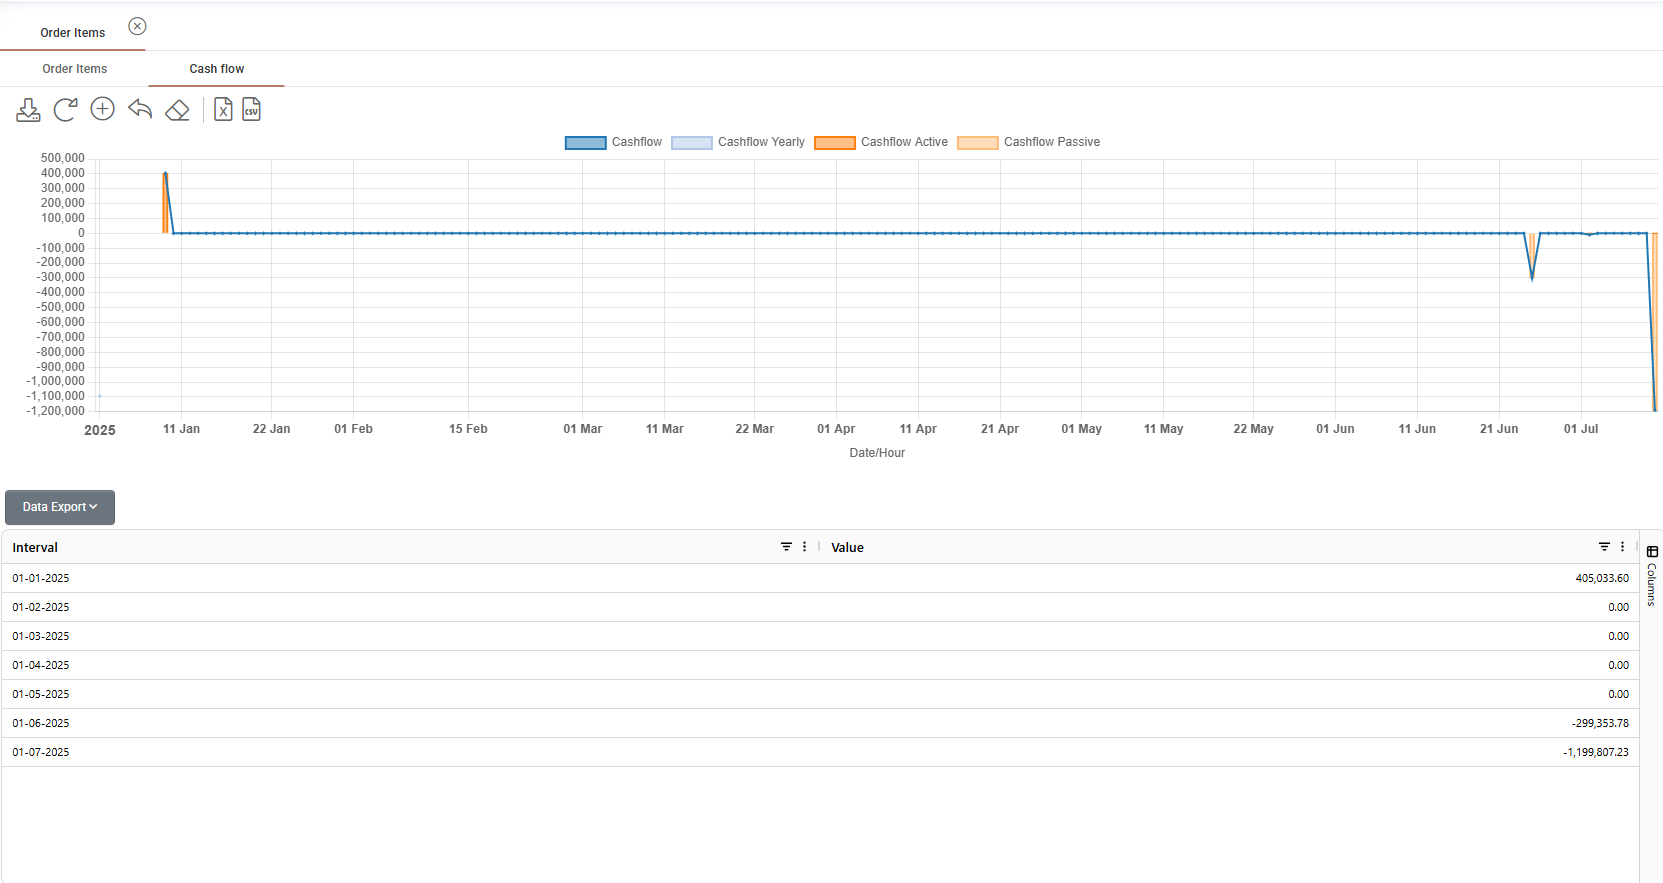
The second sub tab “Cash Flow” of the Order Items menu calculates and displays the cash flow of all Order Items selected in the previous tab (possibly through a query in the previous tab). By “Cashflow” here we refer to the due day of each Order Item for settlement, so the respective dates noted in the “Cashflow” diagram are essentially the due days for payment. Below the “Cashflow” diagram a table summarizes the due amounts per settlement month, as shown in the figure below.
The user can change the chart parameters by pressing the “+” button (change limits), modify the parameters and save the changes. Changes must be applied to the chart. The user can also reload, reset the zoom, and delete the chart by pressing the respective “Reset Chart”, “Reset Zoom”, “Clear Chart” button.
Also, the user can download the chart by pressing the “Download Chart” button, download the data by pressing the “Export to Excel” or “Export to CSV”.
Was this helpful?