13. Importer
Overview of Importer

The Mass Importer functionality in ATLAS ETRM enables users to import bulk data into the system, significantly streamlining the data entry process and ensuring consistency across multiple datasets. It is particularly useful for initial data setup or periodic data updates across several modules.
Users can import data for the following categories:
Data series
Data series Collections
Companies
Master Agreements
Deals
Deal Collections
Before importing data, users must first download a preformatted Excel template that aligns with the data structure required by ATLAS ETRM. This is achieved through the “Download Template” box within the Importer tab. The following selections should be made:
Granularities: Select one or more granularities relevant to the granularity of the data series that are about to be imported (e.g., Quarter-Hour, Half-Hour, etc.). Multiple granularities can be selected for the same template.
Time-zone: Choose the time-zone that corresponds to the timestamps of the data series data (e.g., UTC, CET/CEST, EET/EEST, GAS).
Start Date and End Date: Specify the date range for which the data series data will be inserted. This range defines the rows of timestamp entries in the template that automatically will be created.
The largest data series to be imported will determine the date range of the generated timestamps in the template.
After all fields are completed, click the “Download Template” button to receive the generated Excel file. This file will contain preformatted columns and timestamp entries based on the selected granularity, time-zone, and date range. It will be saved on the user's local computer and is ready for data entry.
Once the user downloads the Excel template, it will contain multiple sheets—each corresponding to one of the supported data types (as referred above). If multiple granularities were selected during template generation (e.g., Quarter-Hour, Half-Hour and Day), separate sheets will be included for each relevant data series structure, as you see in the figure below.
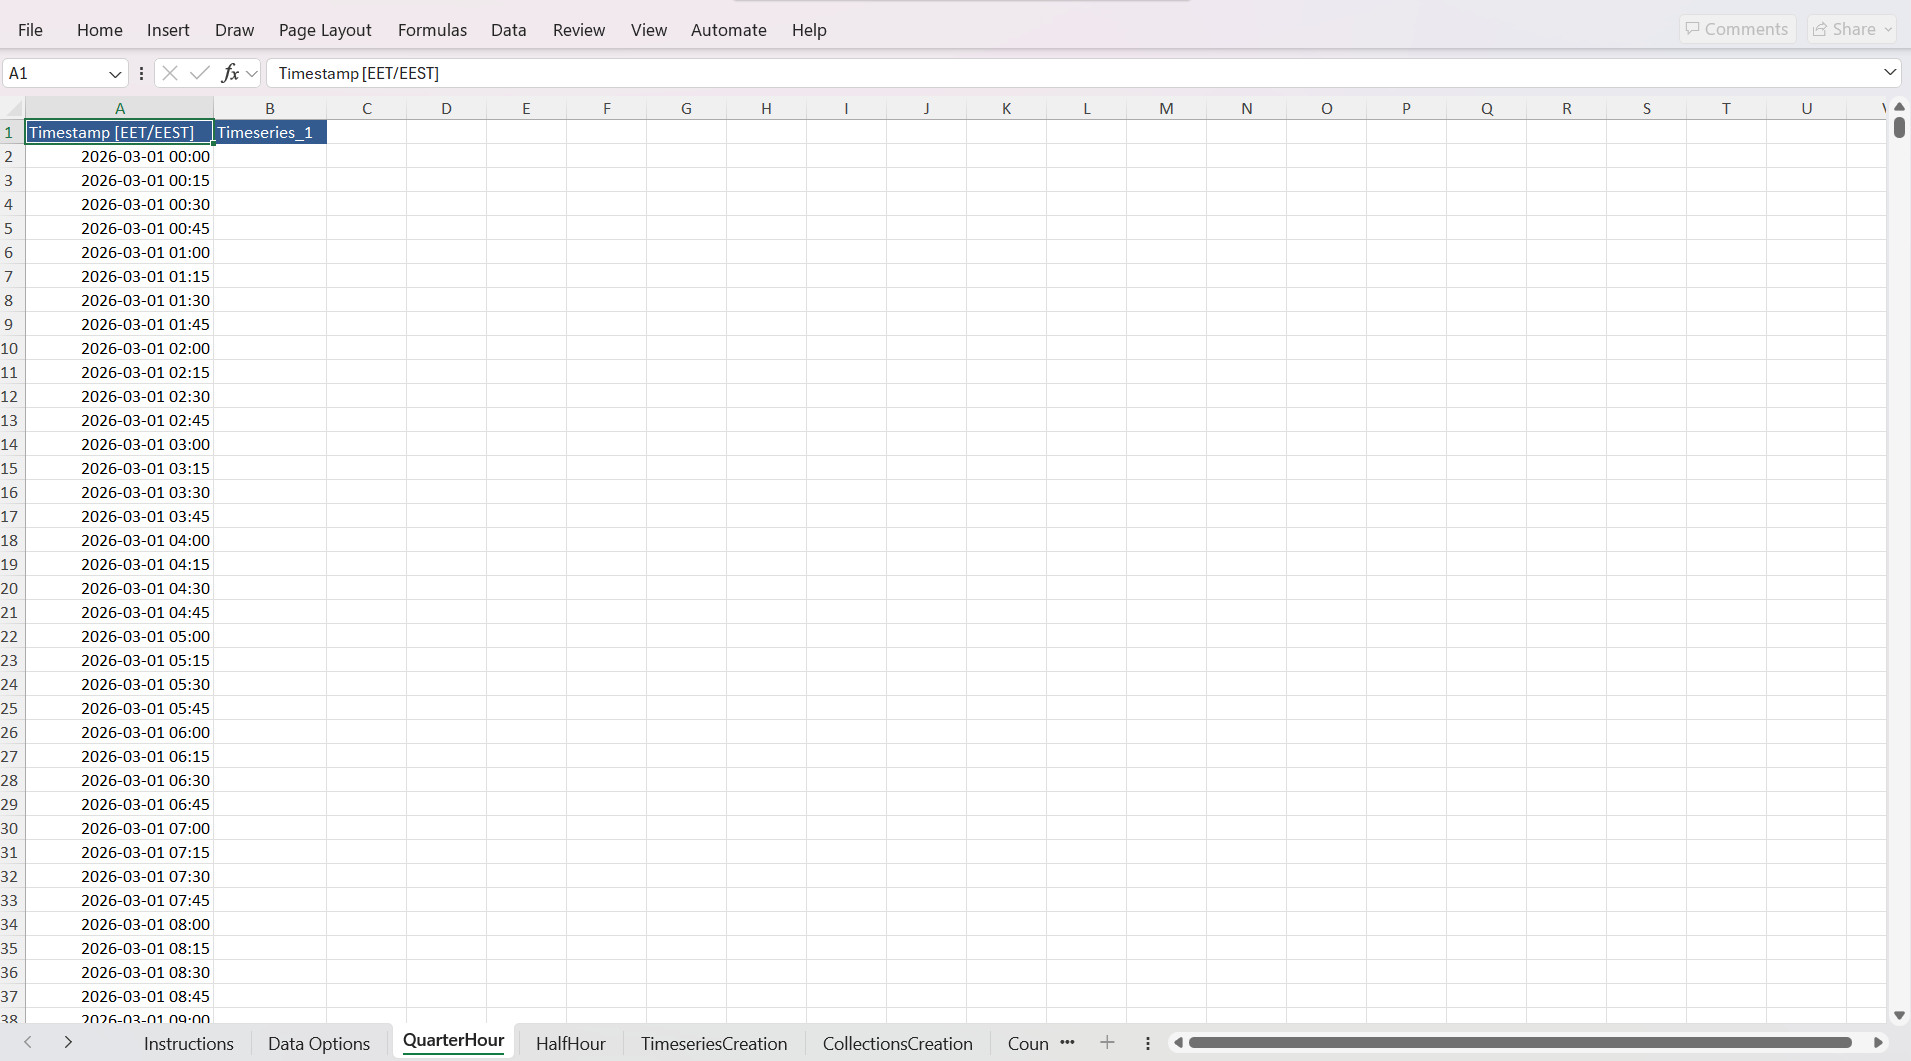
Filling Out the Excel Template
The downloaded Excel file is organized into multiple sheets, each serving a specific function in the data import process.
The first sheet provides quick instructions for using the template effectively. Users are advised to review this sheet carefully before proceeding with data entry.
This sheet includes reference data fetched from the system's database at the time of template download. It contains lists of many elements that are stored in system, which later are provided as options in lists at relevant cells.
Each of the remaining sheets corresponds to a selected granularity type (e.g., Quarter-Hour, Half-Hour etc). The first column contains pre-populated timestamps according to the selected time-zone and date range. The second column header should be filled with the name of the data series to be imported. Beneath this header, the user should fill in the respective data values aligned with the timestamp rows. If the user wants to insert multiple data series, they should enter the name of the next data series in the third column header. Fill in the corresponding data values in the rows below. Repeat this process across as many columns as needed. This format supports bulk upload of many data series in one go, grouped by granularity. Ensure that all data series names match valid names in the system or are new names intended to be created upon import.
After populating data in the granularity-specific data series sheets (e.g., Quarter-Hour, Half-Hour), the next step is to define the creation of those data series using the “Timeseries Creation” sheet. This sheet serves to register metadata and configuration parameters for each data series being imported. First, copy and paste all data series names used in the granularity sheets into the "Name" column. For each data series name, the user must complete the following columns using options provided in the dropdown lists:
Module: The module within ATLAS ETRM to which the data series belongs. There are predefined options to select from list in this cell
Up sampling Method: The method for increasing granularity resolution (e.g., forward fill, linear interpolation etc). There are predefined options to select from list in this cell.
Down sampling Method: The method for aggregating finer-grain data (e.g., average, sum). There are predefined options to select from list in this cell.
Source: The source of the data series (e.g. Deal Capturing).
Granularity: Must match the granularity sheet where the data series’ values were entered (e.g., Quarter-Hour).
Type: The category of the data series (e.g. Quantity, Price, Value). There are predefined options to select from list in this cell.
Unit of Measurement: The unit in which values are expressed (e.g., MWh, MW, EUR/MWh). There are predefined options to select from list in this cell.
All dropdown-based fields must be filled using exact values from the provided lists. Copy-pasting is supported, but ensure entries exactly match system options to avoid validation errors during import.
The “Collections Creation” sheet in the Excel template allows users to define new data series collections, which are logical groupings of individual data series for easier management and analysis within ATLAS ETRM.
Field Descriptions
Id: This field can be ignored by the user; it is reserved for system use.
Name: Enter the name of the new collection. This is a mandatory field.
Description (optional): Provide a brief description of the collection for context or identification.
Columns D and onward – Data series Names: Input the names of data series that should be part of the collection. Each data series should be placed in its own column, under the following standardized header: 1. Data Series Name, 2. Data Series Name, 3. Data Series Name, etc.
The column headers must follow this naming convention exactly to be correctly recognized by the import engine.
The Counterparty sheet is used for importing new companies (also referred to as counterparties) into the ATLAS ETRM system. These entries can be referenced across other sheets—including Master Agreements, Deals, and Deal Collections—even if they are not already stored in the system's main database. This sheet enables one-time or bulk registration of companies. You can define metadata to describe each company in detail.
Field Descriptions:
Id: Reserved for system use. Do not fill this column.
Legal Name (mandatory): This is the only required field. Input the full legal name of the company.
Remaining Columns (Optional): Additional fields are available for entering detailed company information such as address, Zip Code, Country, VAT, etc. In other words, all the typical attributes that can be found when creating new company from inside the system.
Important: While only the legal name is mandatory, it is highly recommended to provide as much information as possible to ensure completeness and traceability, especially if these entities will be involved in multiple agreements or deals.
The Master Agreement sheet is used to insert new master agreements into the ATLAS ETRM system, either as standalone records or in preparation for linking them to deals in the next sheet. It replicates the same structure available when creating master agreements manually within the system. So this sheet enables bulk upload of agreements and can also be used new counterparties defined in the previous Counterparty sheet. Also, custom fields are supported, which are dynamically configured within the system.
Mandatory Fields (marked with an asterisk * in the template)
Name – The unique name of the master agreement.
Counterparty – The company involved in the agreement. This can be an existing company in the system or one newly defined in the Counterparty sheet.
Valid From – The start date of the agreement.
Optional Fields
Numerous optional fields are available, mirroring those found in the Master Agreement form in the UI. These may include “Valid To”, “Master Agreement Type”, “Calendar”, “Memo”, etc.
Custom Fields
The system supports custom fields for master agreements. It should be marked here an important element to be careful which is the Custom Field Dependencies. Each custom field may be tied to specific agreement types. These dependencies are managed in the system under:
“Administration → Custom Fields → Master Agreement Custom Fields”
If a user selects a Master Agreement Type (e.g., “PPA”) and fills in a custom field that is not valid for that type, the system will raise an error during import. To avoid validation failures, confirm that each custom field corresponds to the selected agreement type by cross-reference with the system’s “Custom Fields” configuration before finalizing the Excel.
The Deal sheet is used to insert new trading deals into the ATLAS ETRM system. It is one of the most complex and flexible sheets, supporting multiple types of deal structures depending on the selected Class. Each class (e.g., Forward Standard, Forward Custom) comes with its own requirements and data dependencies. The first column with ID is system reserved and does not need to be filled by user.
Mandatory Fields
Fields marked with an asterisk * are mandatory for each deal row:
Name
Deal Status
Class
Commodity
Direction
Deal Delivery
Valid From
Valid To
Price Type
Upfront 1
Time-zone
Currency
Counterparty
A key feature to consider is the deal classes & field dependencies. The selected deal class (e.g., Forward Standard, Forward Custom) dynamically dictates which fields must be populated. Users must cross-reference with the system to ensure they fill in only the relevant fields. For example:
For a Forward Standard deal: The Quantity field should include both the granularity and quantity value.
For a Forward Custom deal: Instead of quantity, users must define a synthetic profile, referencing the relevant data series name under the field Profile Name.
Incorrect or irrelevant field values based on the class will result in validation errors during import.
It is important to notice that the valid from at AK column should match the valid from of X column, otherwise an error will be produced.
Field Linking
Company and Counterparty fields can use values from either the existing system or newly defined entries in the Counterparty sheet. The Book, Portfolio, and other reference fields should use valid names as listed in the system. Many columns such as IBAN, Broker, Control Area, and Calendar are optional and context-dependent. Due to the complexity of this sheet, users are advised to test with a few rows before performing a full-scale upload. Validate each combination of class, profile type, and pricing logic carefully.
The Deal Collection sheet allows users to define new deal collections, which are groupings of individual deals under a shared classification. This functionality is ideal for organizing deals by type, trading strategy, or operational logic within the ATLAS ETRM system.
Field Descriptions
ID: System-reserved. Do not fill this column.
External ID (optional): A unique identifier used for referencing the deal collection from external systems or integration layers.
Column C – Name (mandatory): The name of the deal collection. This field must be filled for every new collection.
Column D – Description (optional): Additional details about the purpose or structure of the collection.
Deal Collection Status (mandatory): The current status of the collection (Pending, Active, Closed, etc.). Must match system-configured options. Any deviation from the predefined values will result in an import error.
Deal Collection Type (mandatory): The type of collection (e.g Click Agenda, Click Moment).Also, must match system-defined values to avoid errors.
Columns G onward – Deal Names: Deal Names should be filled as shown in the figure below. Down of each header (1. Deal Name, 2. Deal Name etc.) user should define the name of deals that will be included in collection. These deals can either be new ones that are stated in “Deal” sheet or even existing deals in the system (there is a list with all existing deals). So, there can be a mix of them. For each additional deal to be linked to the collection, continue in the next column using the incremented header label format.
Uploading the Completed Template
Once the user has filled out the necessary sheets in the Excel template, the data can be uploaded back into ATLAS ETRM via the Upload Data File box in the Administration → Importer tab.
Steps to Upload
Open the “Upload Data File” Section: Found in the same Importer tab where the template was downloaded.
Select the Time-zone: Choose the time-zone corresponding to the data series timestamps. This should match the time-zone selected during the template generation step to ensure correct alignment of time-indexed data.
Upload the File: Either drag and drop the completed Excel file into the upload box or use the file selector to browse and upload manually.
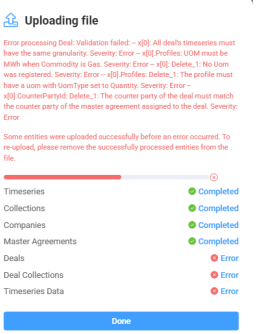
Partial upload is supported. It is not required to fill in or use every sheet in the template. The system will only process the sheets where data is present. This allows for focused updates (e.g., importing only new deals, updating only timeseries) without modifying or submitting unrelated sections. When you upload in system you will receive a status message that shows the progress of the upload and inform the user of any error that should be fixed and the sheet that the error occurred. If everything is correctly filled user will see a successful message as illustrated in the figure below.

Validation Rules and Error Handling
The system performs automatic checks on all uploaded data to ensure consistency and integrity. To prevent failed imports, users must adhere to the following guidelines:
Dropdown Field Validation
Fields with predefined dropdown options (e.g., Deal Status, Granularity, Collection Type, Price Type, Time-zone) must be filled with exact values as configured in the system. Any typo, casing difference, or custom input will result in an upload error.
Master Agreement Custom Field Dependencies
Custom fields in the Master Agreement sheet are conditionally tied to the Master Agreement Type. For example, selecting "PPA" and filling a custom field unrelated to that type will trigger an error. Users should cross-reference field availability at:
“Administration → Custom Fields → Master Agreement Custom Fields”.
Date Format Requirement
All dates must follow the DD/MM/YYYY format. Example: 21/06/2025
Uniqueness Enforcement
If a value (e.g., deal name, data series name, collection name) already exists in the system, reusing it in the upload will produce a duplicate error. Always verify uniqueness before uploading.
Partial Upload and Error Feedback
Users can upload a partially filled template; the system will process only the sheets with data. If any validation error occurs, the system will provide a descriptive error message, indicating: The sheet and row where the error occurred and the field and reason for failure (e.g., invalid value, missing required field). Users are encouraged to start with a few rows to verify setup before proceeding with a full dataset.
Recovery and Re-Upload Tip
If some entities were uploaded successfully, do not reupload them. Instead remove the successfully processed rows from the excel file, correct the remaining errors and upload only the corrected part of the file to avoid duplicate entries.
Was this helpful?