Overview
The Jobs page lists every job configured in ATLAS and is the starting point for creating, scheduling and maintaining automated processes. The grid shows each job's name, type and validity period, together with its next scheduled execution, so users can see at a glance what will run and when. The Next Execution column is calculated from the job's time-based triggers, so it is empty for jobs that only start after another job or are run manually.
Each row offers two actions. Edit opens the job in its own tab, where its configuration can be reviewed and changed. Run Job executes the job immediately with its saved configuration, outside its regular schedule. Several jobs can be open at the same time, each in a separate tab, which makes it easy to compare configurations.
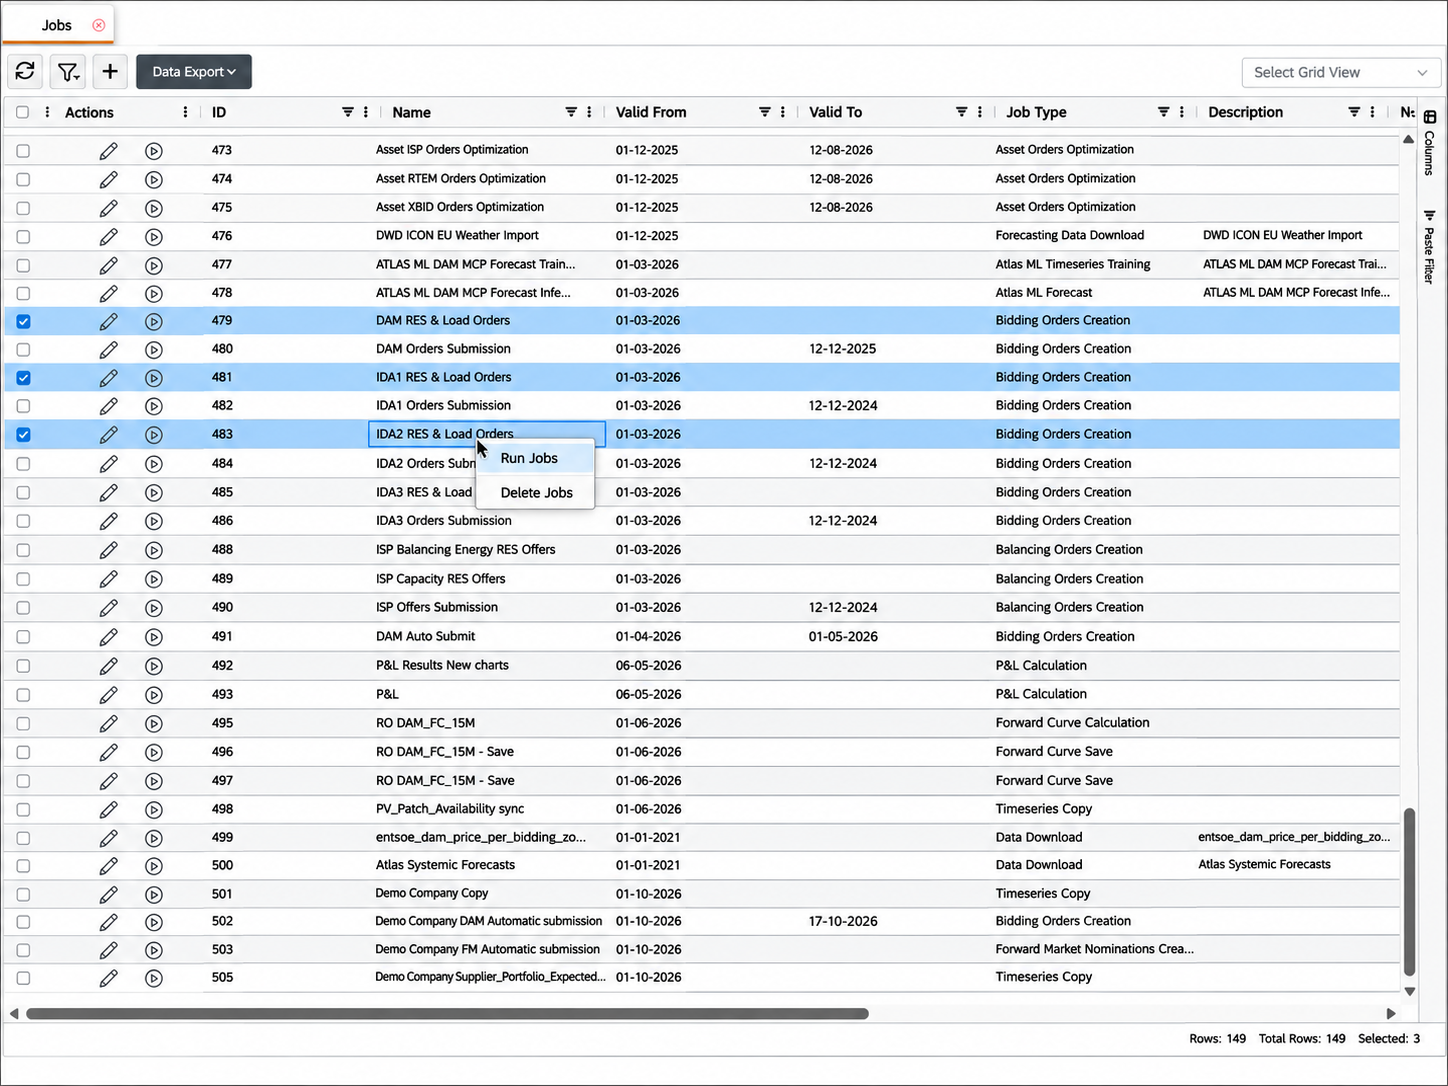
To act on several jobs at once, users select them with the row checkboxes and right-click the grid. The context menu offers Run Jobs, which starts all selected jobs, and Delete Jobs, which removes them.
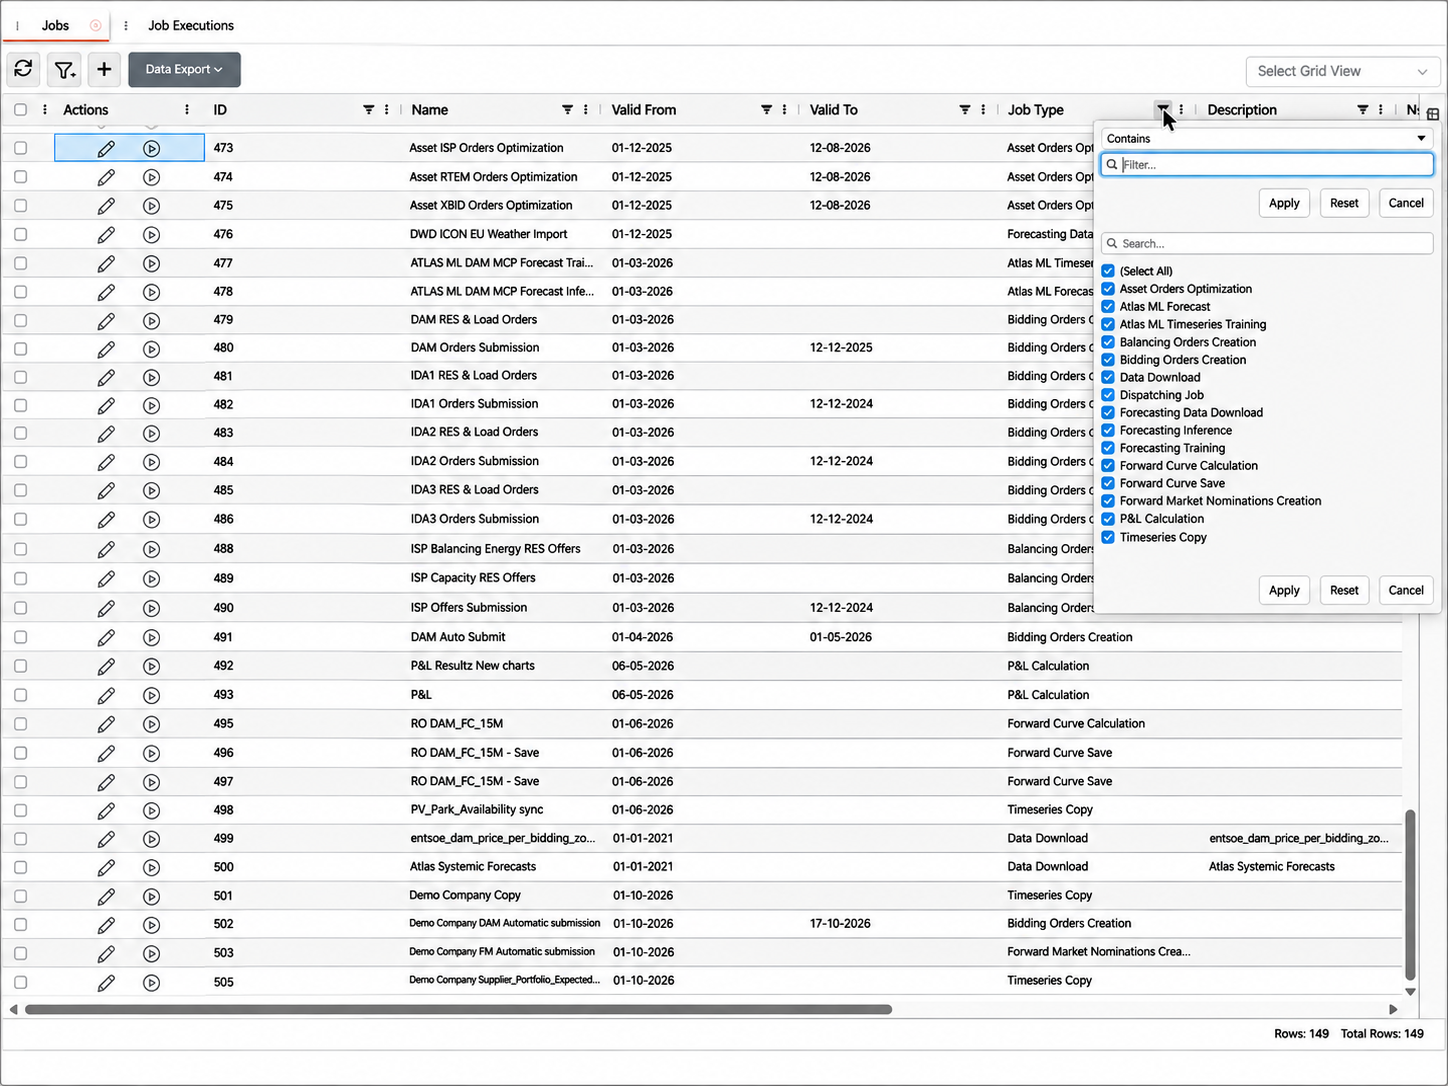
Standard grid tools help users focus on the jobs relevant to them. Every column can be filtered, for example the Job Type column to show only bidding or forward curve jobs, and users can choose the visible columns, save grid views and export the grid data.
Creating a Job
A new job is created with the + (New Record) button and opens in its own tab. Its configuration is organized into four sub-tabs, which together describe what the job does, when it runs and how it recovers from a failure.
After completing all tabs, click Save to save the job.
Info
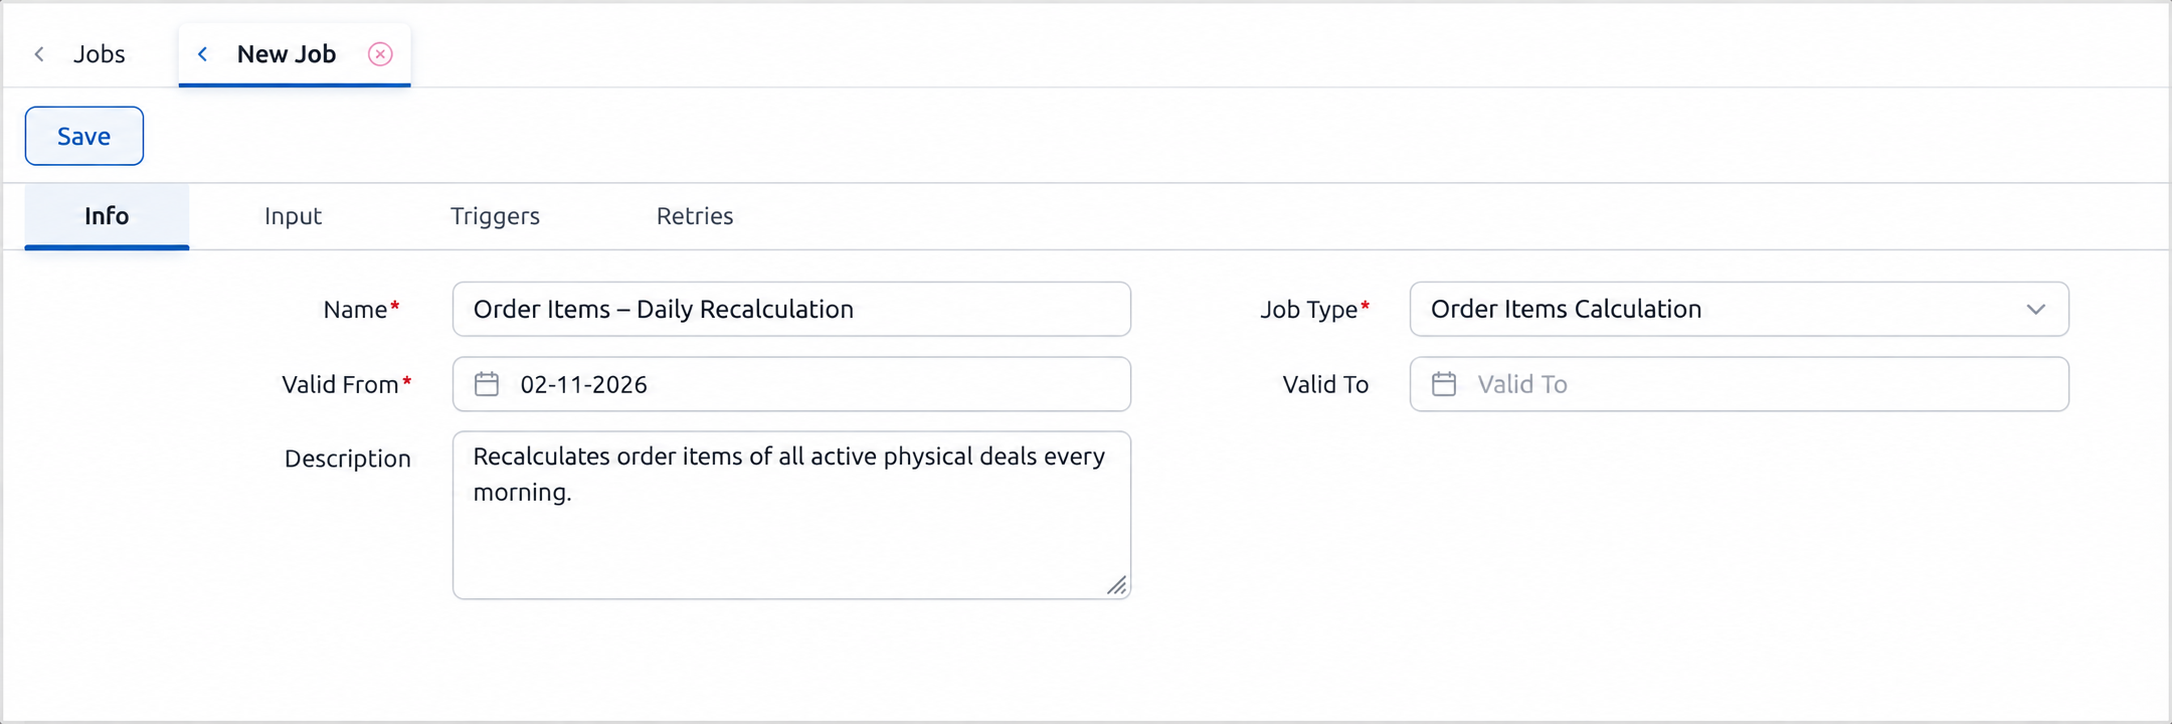
The Info tab identifies the job. Users give the job a name and an optional description, select its job type and define the period during which it is valid. A job is executed only within its validity period, which makes it possible to prepare a job in advance or retire it at a given date without deleting it.
The name appears in the Jobs grid, on the Job Executions page and in the After Job trigger list of other jobs.
A name that states both the process and its scope, such as "DAM Orders – Solar Portfolio", makes jobs easier to find and to chain.
The job type determines the content of the Input tab and cannot be changed after the job is saved, so it should be confirmed before saving.
Input
The Input tab holds the parameters that the selected job type needs, such as the deals to process, the target market or the timeseries to read and write. Its content therefore changes with the job type, and required fields are marked with an asterisk. The parameters of each type are described in Job Types.
Job types that work on a selection of records, such as deals or order items, include the query bar and grid used across ATLAS, so the selection can be defined and checked before saving. Job types that submit orders or send notifications organize the Input tab into Configuration and Email Settings sub-tabs.
Triggers
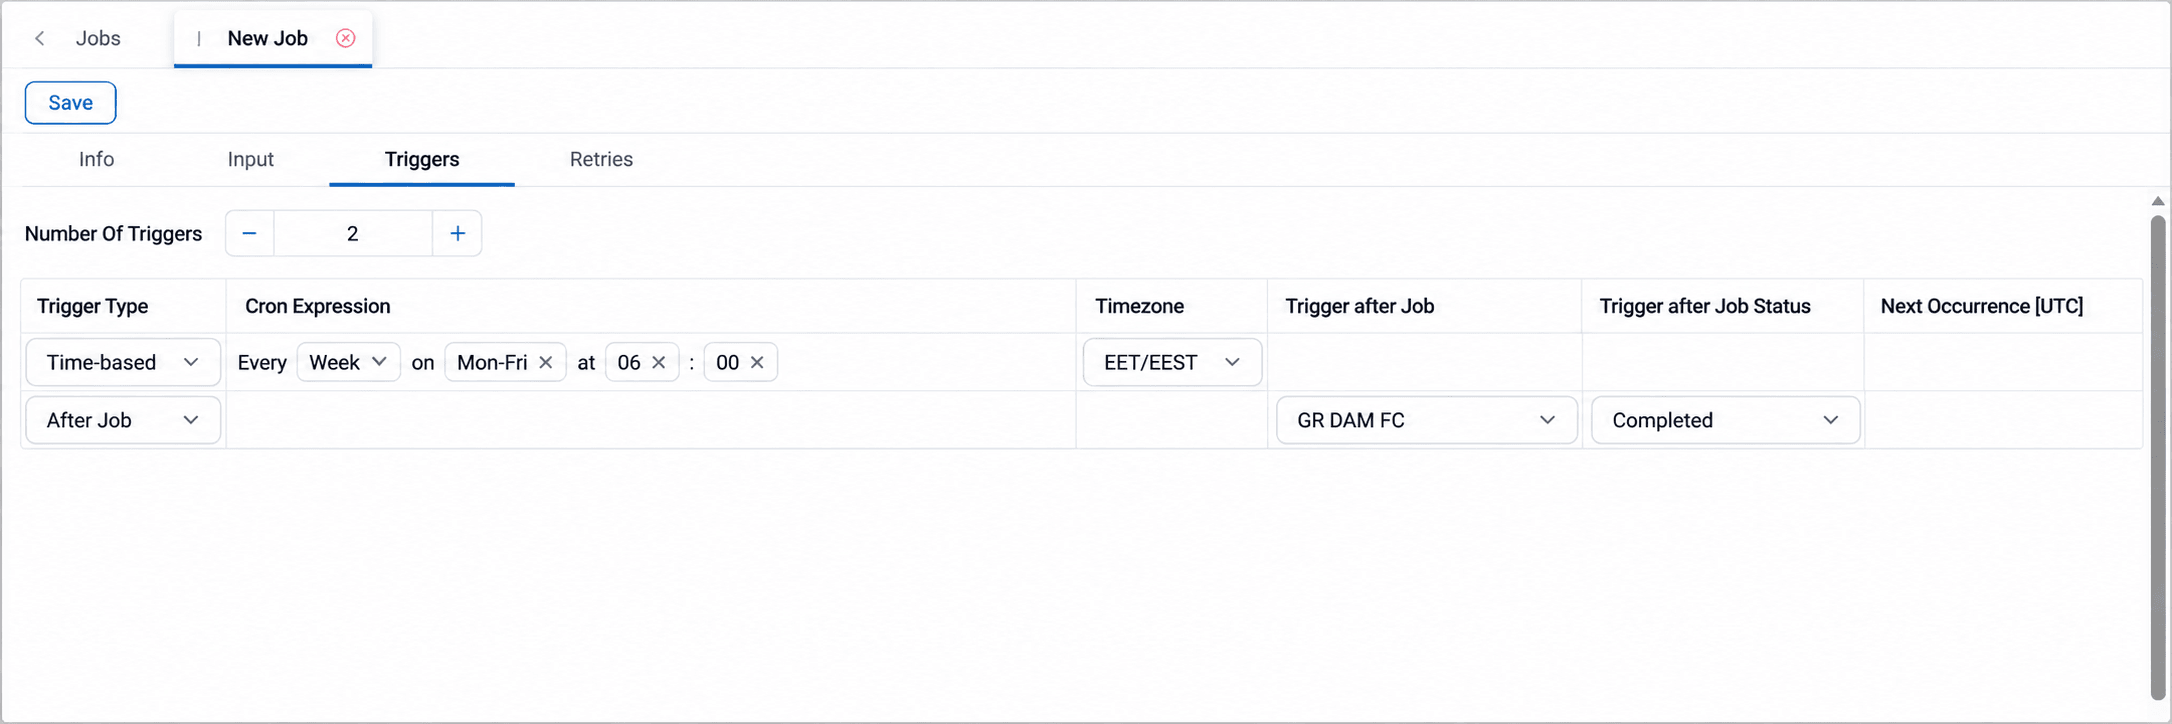
The Triggers tab defines when the job runs. A job can have one or more triggers, and it runs whenever any of them fires. Each trigger is a row in the triggers table, and rows are added or removed with Number Of Triggers.
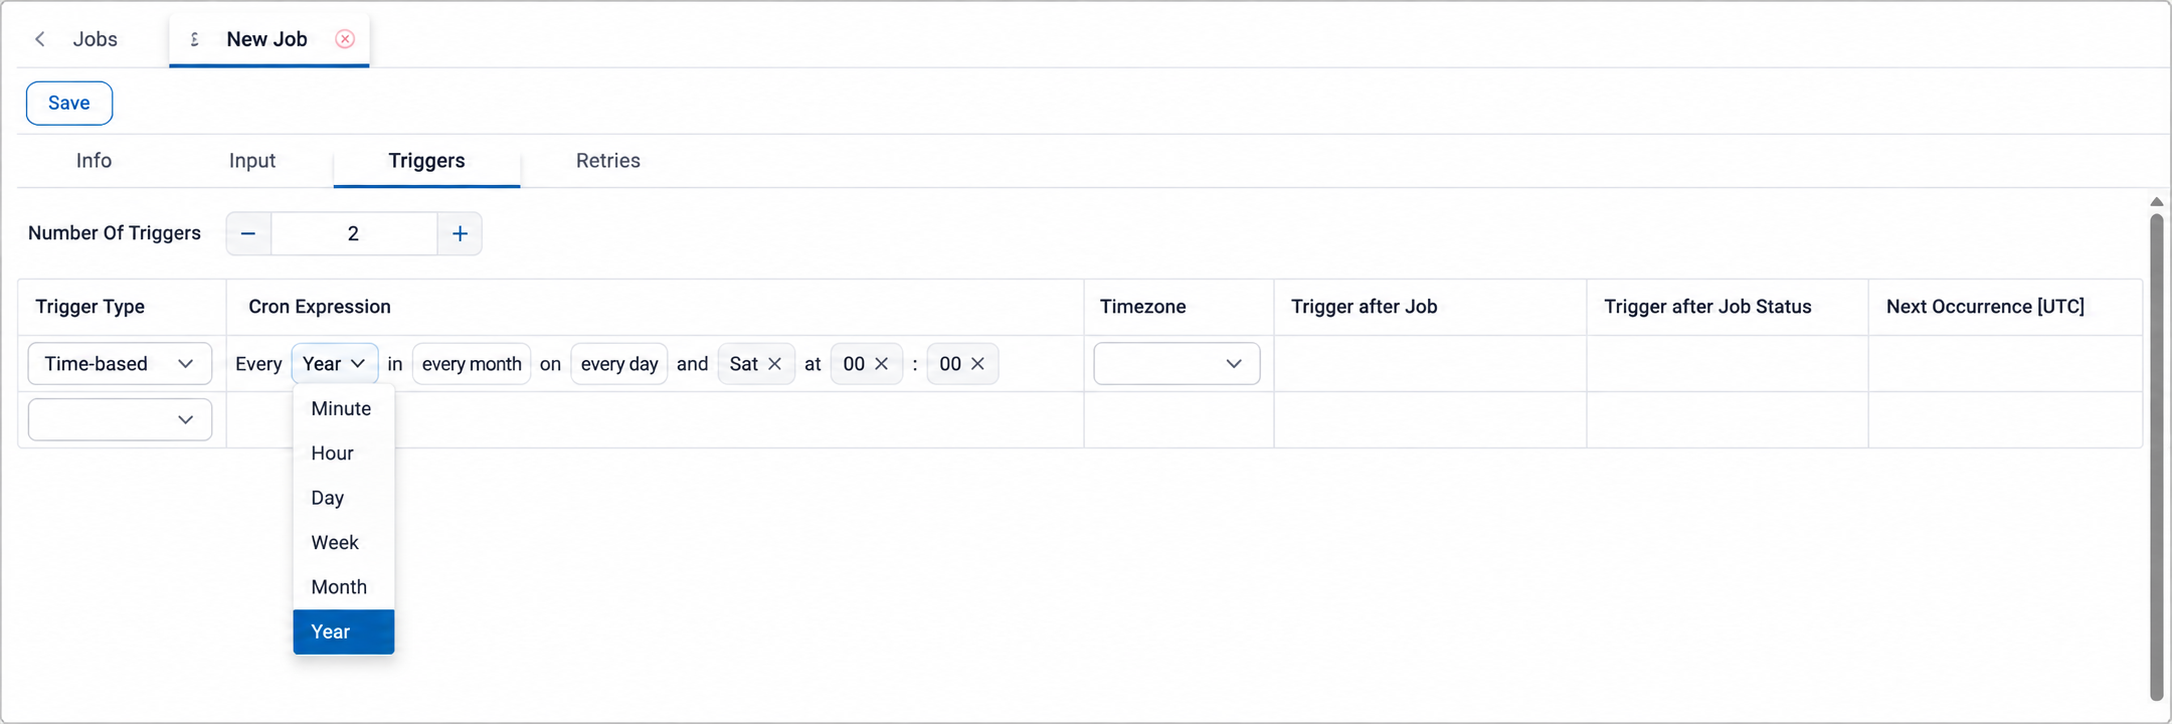
A Time-based trigger runs the job on a recurring schedule, for example every day at a given time or on specific days of the week, in the selected timezone. The schedule is built by choosing a frequency, from every minute to every year, and then the values that apply to it, such as the days of the week, hour and minute. Several values can be selected in each field, so one trigger can cover, for example, every weekday at 06:00. The timezone determines how the times are read: a schedule in EET/EEST follows Greek local time throughout the year, including across daylight saving changes, while a UTC schedule stays fixed in UTC.
An After Job trigger runs the job when another job finishes, either only after a successful run, only after a failed run, or always. The preceding job is selected from the list of existing jobs, which can be searched by name. Completed is used to chain dependent processes, so that a calculation starts as soon as the data it depends on has been loaded. Failed is useful for follow-up or alerting jobs, and Always runs the job after every run regardless of its outcome.
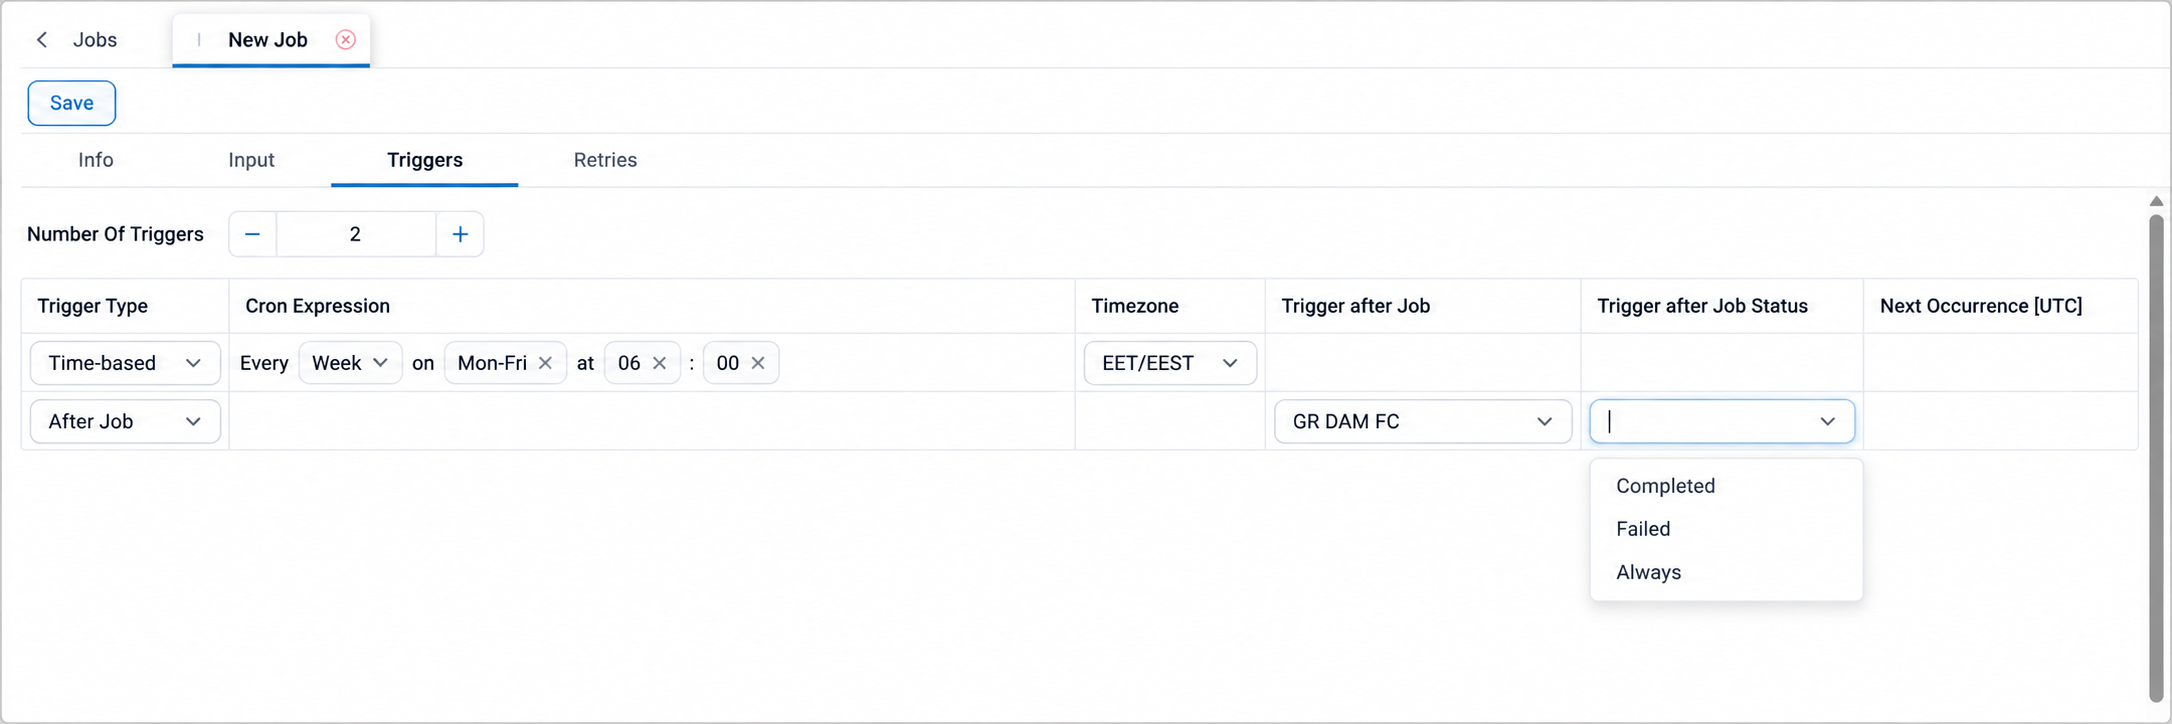
Both trigger types can be combined in the same job.
A common pattern is an After Job trigger as the main start and a time-based trigger as a fallback before a deadline, so that the process still runs if the preceding job is delayed.
Once the job is saved, the Next Occurrence column shows when each time-based trigger will fire next, so users can confirm the schedule.
Retries
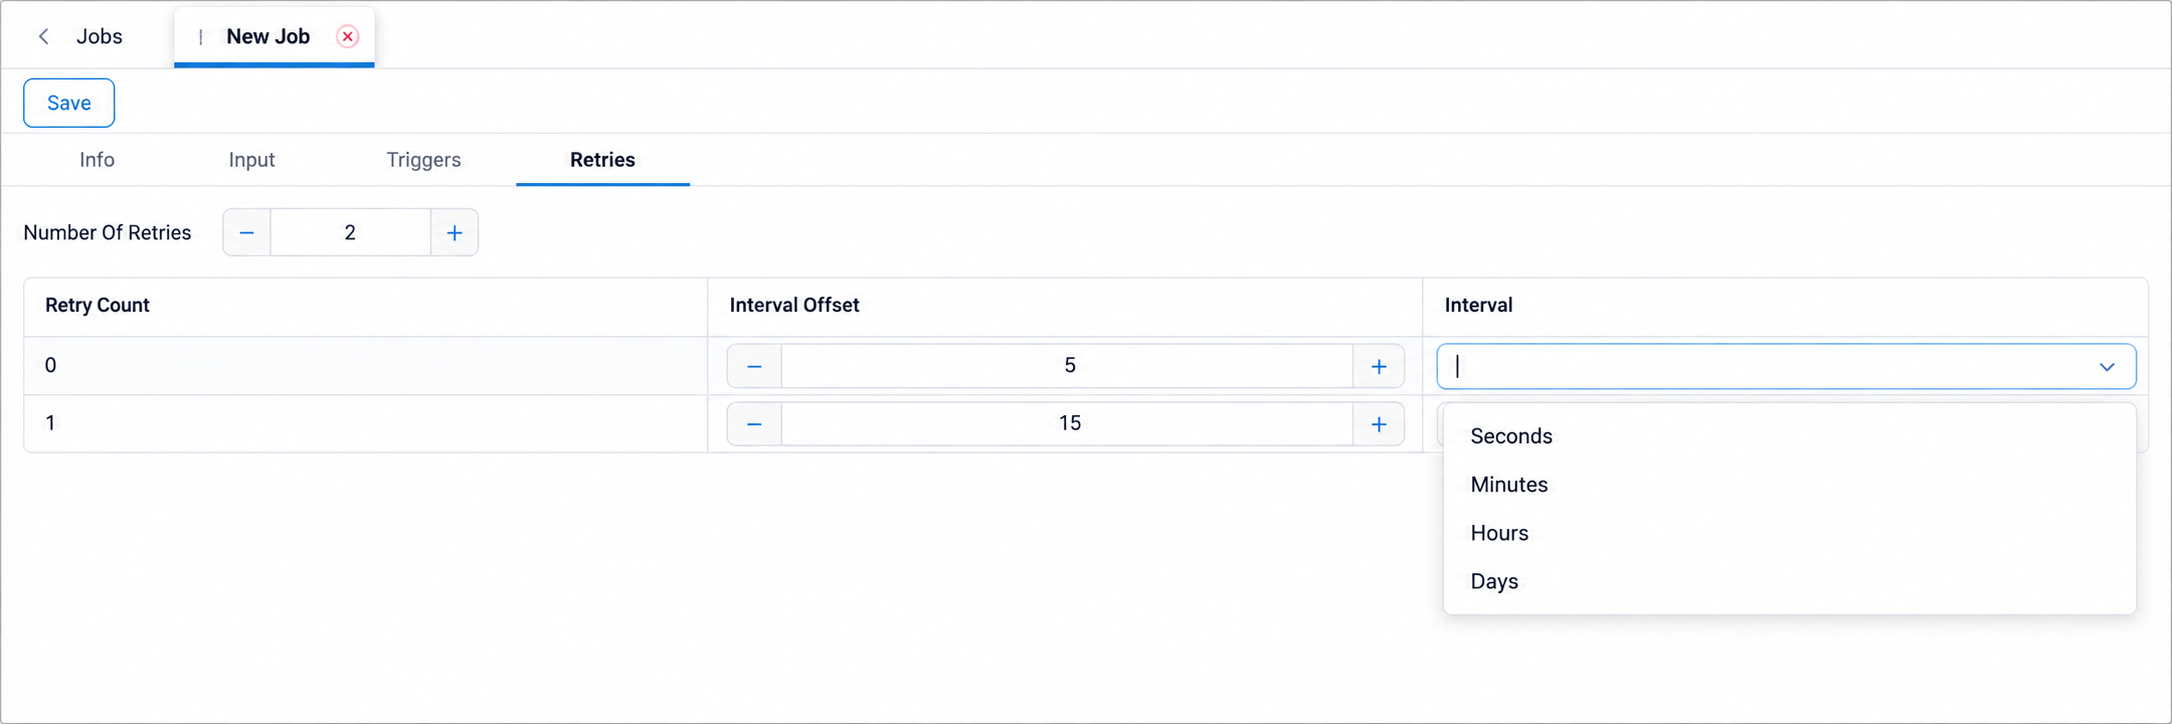
The Retries tab defines how the job reacts to a failed execution. Users set how many times ATLAS should retry the job and how long it should wait before each attempt. This allows temporary issues, such as delayed market data or a brief connection problem, to be resolved without manual intervention.
Each retry is a row with its own waiting time, so the intervals can grow between attempts, for example 5 minutes before the first retry and 15 minutes before the second. If all retries fail, the execution remains Failed and can be investigated in Job Executions.
For processes with a deadline, such as market submissions, the retries should be spaced so that enough time is left for manual action before gate closure.
Editing and Deleting a Job
An existing job is opened with the edit action in the grid and appears in its own tab, named after the job, with Save, Delete and Execute Job at the top. Users can change its name, description, validity period, input parameters, triggers and retries, and save the changes with Save. Saved changes apply from the next execution, while past executions keep the configuration they used, which remains visible in Job Executions. Closing the tab without saving discards the changes.
The Execute Job button runs the job immediately with its current configuration. This is useful for testing a new configuration or repeating a process after its inputs have been corrected. The run appears in Job Executions like any scheduled execution.
The job type cannot be changed once a job has been saved, and the Job Type field is shown as read-only. To use a different type, a new job must be created.
A job can be saved without completing its Input tab. This allows users to update only the triggers or retries of a job without reviewing all of its parameters.
A job is removed with Delete, and several jobs can be removed together with Delete Jobs from the right-click menu of the Jobs grid. If the job is used as an After Job trigger by another job, ATLAS displays a warning before deletion, as the dependent job will no longer be triggered. To stop a job temporarily without deleting it, set its Valid To date instead.
Appendix – Field Details
Jobs Grid
Field / Element | Description |
Actions | Edit opens the job for review and changes. Run Job executes the job immediately. |
ID | Unique identifier of the job. |
Name | Name of the job. |
Valid From | Date from which the job can be executed. |
Valid To | Date after which the job is no longer executed. Empty when the job has no end date. |
Job Type | Type of process the job performs. See [Job Types]. |
Description | Free-text description of the job. |
Next Execution | Date and time of the next scheduled execution. |
Created By | User who created the job. |
Created At | Date and time the job was created. |
Modified At | Date and time of the last change to the job. |
Info
Field / Element | Required | Description |
Name | Yes | Name of the job. |
Job Type | Yes | Type of process the job performs. Cannot be changed after the job is saved. |
Valid From | Yes | Start of the job's validity period. |
Valid To | No | End of the job's validity period. |
Description | No | Free-text description of the job. |
Triggers
Field / Element | Description |
Number Of Triggers | Number of triggers configured for the job. Each increase adds a row to the table. |
Trigger Type | Time-based or After Job. |
Cron Expression | Schedule of a time-based trigger. Built by selecting the frequency (Minute, Hour, Day, Week, Month or Year) and, depending on the frequency, the month, day of the month, day of the week, hour and minute. |
Timezone | Timezone in which a time-based schedule is interpreted. For available options see Data Options. |
Trigger after Job | Job whose completion triggers this job. Used by After Job triggers. |
Trigger after Job Status | Outcome of the preceding job that triggers this job: Completed, Failed or Always. |
Next Occurrence [UTC] | Next date and time at which the trigger will fire, in UTC. |
Retries
Field / Element | Description |
Number Of Retries | Number of retry attempts after a failed execution. Each increase adds a row to the table. |
Retry Count | Sequence number of the retry attempt. |
Interval Offset | Waiting time before the retry attempt, expressed in the selected interval. |
Interval | Unit of the waiting time: Seconds, Minutes, Hours or Days. |