Users
All registered users are available in the main grid, together with their user type, contact details, assigned roles and service account status. From this grid, IT Admins can create new users, open existing accounts for editing or delete accounts that are no longer required.
Select the Add (+) icon to create a user, or the edit (pencil) icon on an existing row to open the corresponding account. The delete (bin) icon removes the user. Row checkboxes allow records to be selected, with a selection checkbox also available in the grid header.
The grid provides column filters to locate the required records, Clear Filters to remove active filters and Refresh to reload the data. Column menus and the Columns panel provide access to the grid configuration. The displayed columns and their arrangement can be customised and saved, then recalled through Select Grid View.
Records can be exported through Data Export in Excel, Excel Filtered, CSV or CSV Filtered format. The filtered options export the results matching the applied filters.
Info
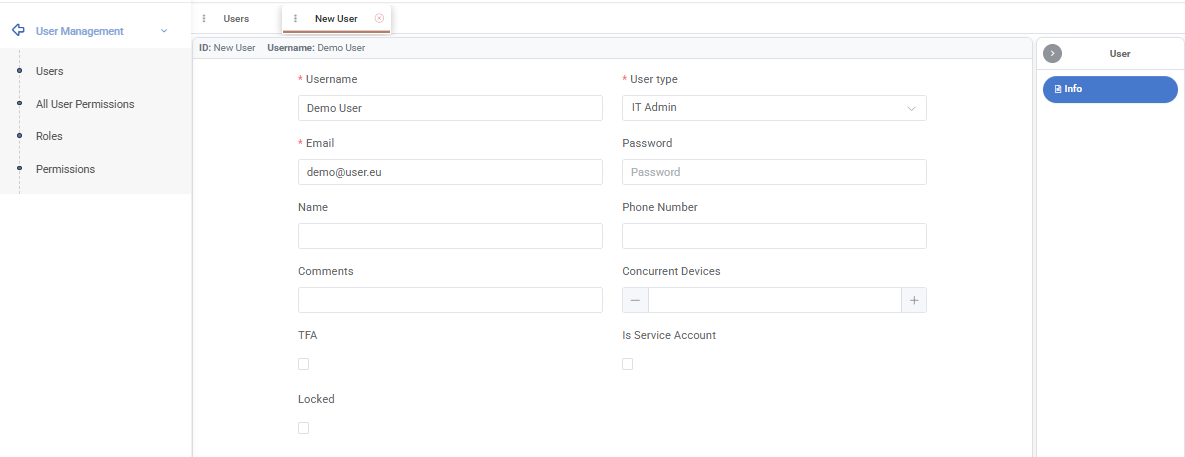
The Info subtab contains the details used to identify the user and configure the account. To create a user, enter the Username and Email, select the User type and complete the remaining account details as required. Name, Phone Number and Comments provide additional information about the user. The Password field is available during account creation.
The selected User type determines the user’s initial access. Admin users have access to all areas except User Management, while IT Admin users have access to all areas, including User Management. Member users have no access by default; an IT Admin must assign the required roles or individual permissions.
For accounts used exclusively through the API, enable Is Service Account. These accounts cannot sign in to the ETRM interface. Enable Locked to lock an account and prevent the user from signing in.
Select Save at the bottom right to save the account. Existing user records provide the Info, Roles and Permissions subtabs through the right-hand panel. Reload refreshes the opened record, while the panel arrow collapses or expands the subtab navigation. The close icon on the workspace tab closes the opened user tab.
Changing a Password
When a user is locked out, an IT Admin can assign a new password through Change Password. Enter the replacement password in New Password and select Update.
Roles
The Roles subtab displays the roles assigned to the selected user. Each role provides a set of permissions, allowing access associated with a particular responsibility to be assigned together.
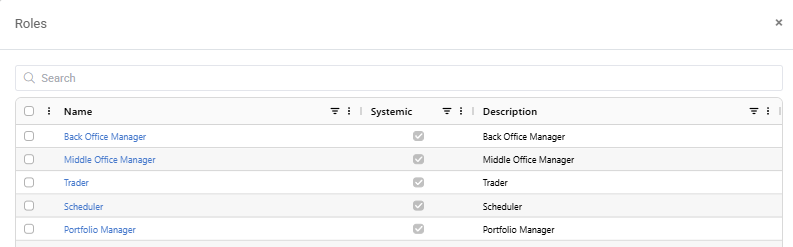
Select Add (+) to open the role selection window. Use Search or the column filters to locate the required roles, select them using the row checkboxes and select Submit. A header checkbox is available for selecting multiple rows, and the row count is displayed at the bottom of the list. By clicking on the role name the Role Info page opens in a separate tab to allow full inspection of the role and its permissions. Close or the × icon closes the selection window.
Assigned roles appear in the user’s role grid, together with their Entra Id where available. The delete (bin) icon removes the selected role assignment from the user. The grid also provides Refresh, Clear Filters, column options, Data Export and Select Grid View. Select Save after making the required changes.
Permissions
The Permissions subtab displays the permissions available to the selected user, including those inherited from assigned roles. Inherited permissions are shown in grey and cannot be changed directly in this subtab. The remaining permissions can be selected individually to provide additional access.
In Tree view, permissions are organized by module, page, access level and individual permission. Expand a branch using the arrow next to its name to review the permissions beneath it, or use the expand icon above the tree to expand the hierarchy. The same branch arrow collapses the corresponding section. The counters beside each group show the number of granted permissions relative to the total available in that group.
Checkboxes indicate the selection within the hierarchy. A checked box indicates that all permissions in the group are selected, an empty box indicates that none are selected, and a dash indicates a partial selection. Select the required editable permissions, or use the Select All checkbox above the tree to select the full editable permission set.
Use Search to locate a permission and the All, Granted and Pending options to display all permissions, granted permissions or permissions changed during the current editing session.
The Tree / Grid switch changes the presentation between a hierarchy and a tabular view.
Select Save to apply the changes. Reset restores the previous state by discarding unsaved permission changes.
Appendix - Field Details
User’s Info
Field / Element | Description |
Username | Username identifying the account. Required. |
User type | Admin, IT Admin or Member; determines the user’s initial access. Required. |
Email address associated with the account. Required. | |
Password | Password field available when creating an account. |
Name | Name of the user. |
Phone Number | Contact phone number. |
Comments | Additional information about the account. |
Is Service Account | Identifies an API-only account that cannot sign in to the ETRM interface. |
Locked | Locks the account and prevents sign-in. |
Was this helpful?